Recolor – Part 3
Over the last two weeks I’ve shown you how to recolor a variety of elements using the Color Blend Mode method. In last week’s “Recolor – Part 2” post I showed you how to recolor multi-layered and multi-colored objects.
Up until now, you’ve seen what kind of limitations this method presents. Using this method has required that the object to be recolored has a similar tint or shade as the desired new color.
Today that’s about to change as I finally talk about how to increase the range of colors to which something can be recolored. I’ll still be using the Color Blend Mode just with some enhancement.
Increase Color Range
I mentioned that I’ll be using an enhanced version of the Color Blend Mode method. This time I’ll be incorporating a Levels Adjustment Layer to give you more color options. And it’s going to almost seem like magic when you see how spectacularly it works.
Just a quick reminder; I use Photoshop Elements (PSE) 2024. If you use a different version, some of my screen shots may look different from what you see on your screen.
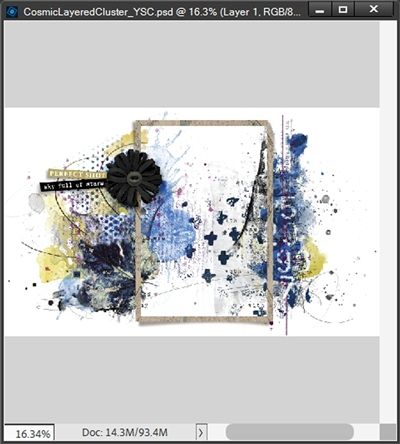
I have a cluster I’ve been working on and I thought I had the perfect flower. Well, the flower is technically perfect. It’s the color that isn’t sitting well with me. So, you get to watch me fix that…
Picking Colors
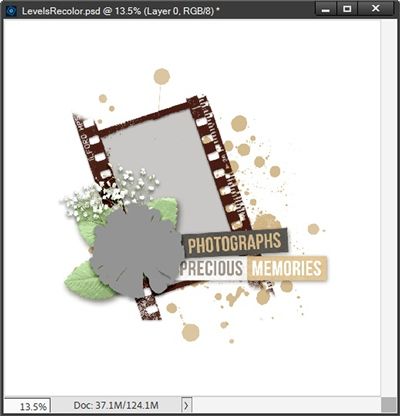
I’m going to start with a 12×12 file and a white background for now. I’ll pull in the unfinished cluster:
Note: If you’d like to follow along exactly, you can click here and this layered cluster will be automatically downloaded for you.
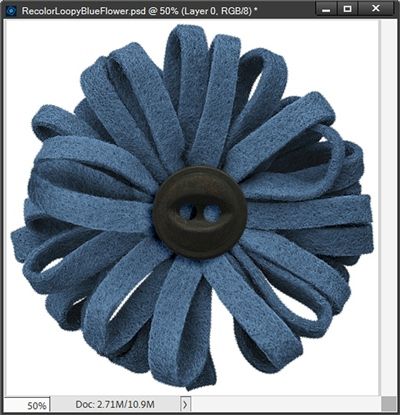
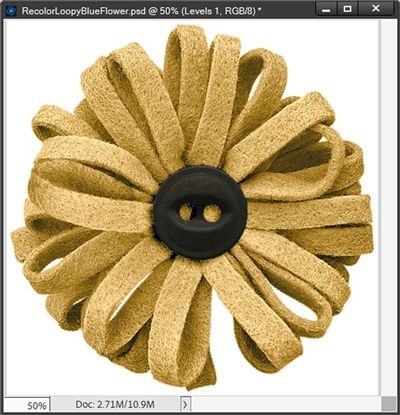
You should be able to see the placeholder for the flower. And here’s the flower I want to recolor:
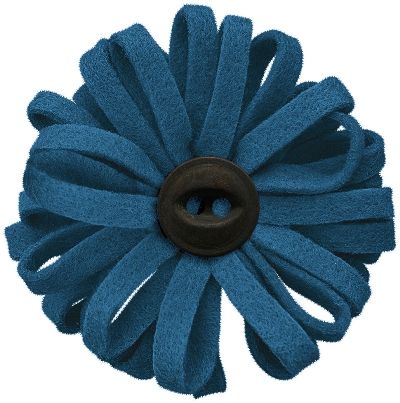
That shade of blue just isn’t working for me. I’d much prefer it was more in line with the earthtones in the cluster.
Note: If you’d like to follow along exactly, you can click here and that blue flower will be automatically downloaded for you.
You are also welcome to use any flower that you like. But try to pick one that is close to the color of mine so you will more likely be able to use the levels settings I’ll define.
If I use the color picker to sample a section of the paint behind the cluster, I get an earthy brown tone (#917349). If I sample the color of the word “Photographs” I get a light thistle color (#d5b383), while the word “Precious” ends up being a dusty taupe color (#a4988c). The part of the word strip under the word “Moments” resulted in a light sand color (#e3c191). And the film strip is a dark red-brown (#522318) but I don’t think that’s what I’m looking for…too dark. I also tried a mint green color (#b9d9be) that would coordinate with the leaves. Not sure about that one either.
And here’s how all those colors turned out when blended over that blue flower:
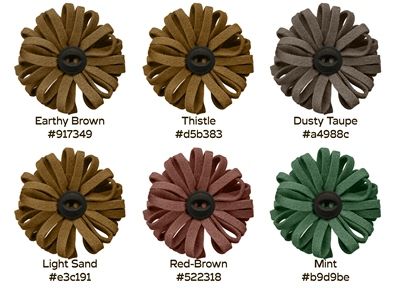
As varied as the lighter brown shades were, they actually all looked very similar. This just reinforces the limitations we encountered over the last two weeks. Colors in shades of the same hue will frequently look similar when blended.
The limitation now is that there’s really only one flower I might consider using without any adjustment; the Dusty Taupe one. Unfortunately, that one and the Red-Brown are my least favorites. The other four are all too dark. But that’s kind of the point of this exercise.
Recolor Flower
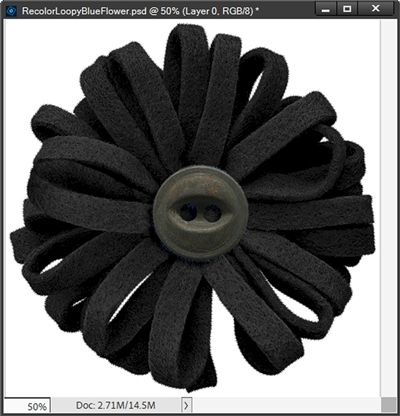
I’m going to open my blue flower in PSE and put a white background behind it. I then save this file as a PSD with a descriptive name (RecolorLoopyBlueFlower). I do this so I don’t accidentally overwrite the original flower:
The first thing I have to do is isolate that black button and put it on its own layer. If you read my “Recolor Anything” post two weeks ago you should already know how to do that. But I’ll give you a quick refresher.
The best option for isolating that button is to use the Elliptical Marquee tool. I click on the New selection icon, set the Feather to zero px, the Aspect to Normal and check Anti-aliasing. Then being careful to select only the button and not it’s shadow, I drag a selection around the button:

You should be able to see that the selection is around only the button…no shadow. This is very important because if I include the shadow in the selection, the shadow will still have a blue cast to it and I definitely don’t want that.
I then simply press Ctrl+J to copy this selection to a new layer, rename the new layer Button Center and make the flower layer active.
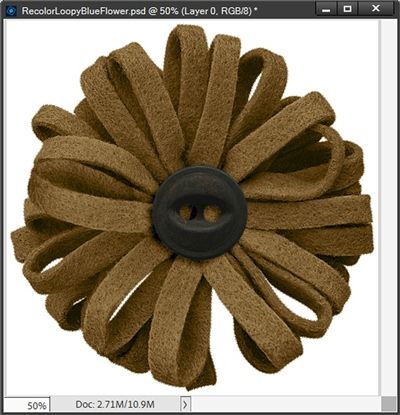
I decided to try using the light sand color (#e3c191) and hopefully make it lighter. So, I create a solid fill layer with that color, clipping it to the flower and change the Blend Mode to Color just as I’ve been doing for weeks:
This is where the Levels Adjustment Layer comes in…
Understanding Levels
Before I start making any adjustments, I want you to understand a few things. The settings I’ll use in the Levels Adjustment dialog box are going to depend on two things. First, the original blue color of the flower. And second, the new color I’m trying to achieve.
There is no set formula for the Levels sliders settings. So, each time I use this method I very likely will NOT be able to use the same settings, even when using the same starting flower, I used previously. Nearly every time I use this Levels mode, I need to adjust the sliders until the desired new color is achieved.
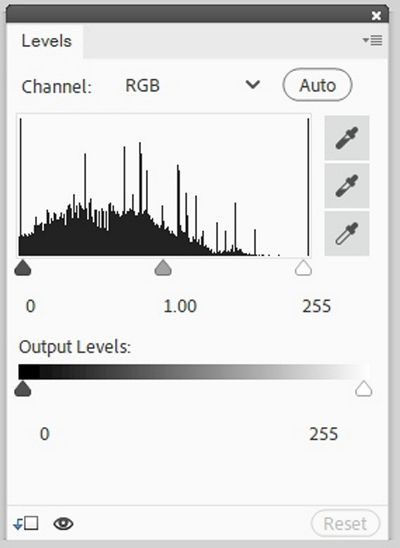
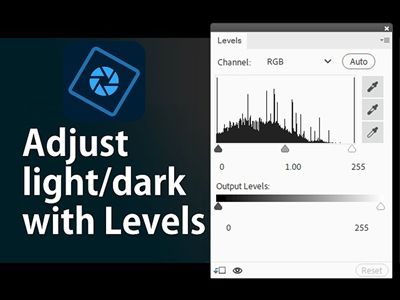
It is also important to understand the different parts of the Levels box. If you look at the image directly above, you’ll see that there are actually three parts or sections in the Levels box.
The first is Channels. This section defaults to RGB (all color channels). RGB works for brightness (or darkness), which is what I’m doing today. There is also an “Auto” button that will automatically adjust the levels for contrast. My recommendation is typically to stick with the RGB channel.
And I can honestly say I almost never use the Auto feature. But you are welcome to give it a try and see what happens. It’s easy enough to reset things if you’re not happy with the results.
The next section in the Levels box is the Histogram. This histogram is a graphical representation showing the distribution of brightness levels in an image. There are three sliders here: Black Point: Drag right to increase shadows/contrast. White Point: Drag left to increase highlights/brightness. Grey Point: Drag left to brighten, right to darken.
The third section in the Levels box is for Output Levels which controls the absolute range of brightness. There are two sliders here: Moving the white slider to the left darkens highlights, while moving the black slider to the right lightens shadows.
There is one last thing I need to point out…the eyedroppers to the right of the Histogram. I highly recommend against using these. Unless you are a professional that has an expert grasp of color balance, these eyedroppers will only lead at a minimum, to confusion or worse, disastrous results.
Using Levels
Using the Levels Sliders gives me the power to take this flower from a medium, sandy brown, to a light sandy brown. So how about we start playing around to see what happens.
In my opinion, it is best to always clip a Levels Adjustment Layer to either the object being recolored or to the Solid Fill layer used for coloring, either will work.
It is possible to adjust levels on an existing object to just lighten/darken it without also recoloring. In that case just clip the Levels layer directly to the object.
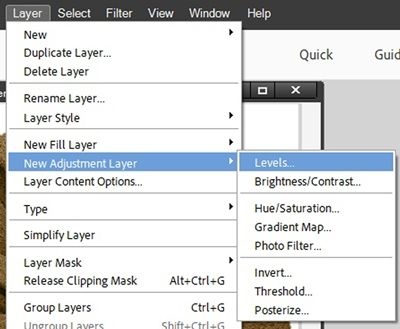
So, with the Solid Fill layer active, I go to the top tool bar and select Layer->New Adjustment Layer->Levels:
When PSE opens the New Layer dialog box, I check the Use Previous Layer to Create Clipping Mask box and the Levels layer is created (Levels 1 for me) and clipped simultaneously to the active layer. The Levels box is now visible:
I immediately rename the Levels 1 layer to Lightening Levels.
Now it’s time to lighten that flower…
Lightening Levels
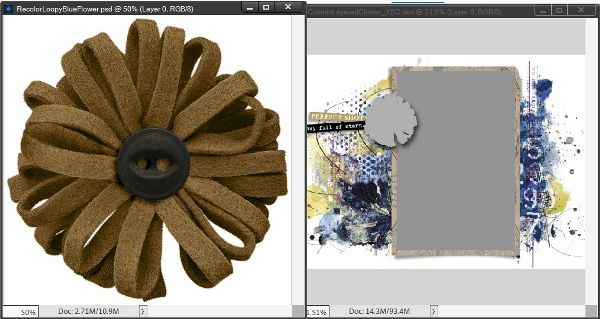
I want to be able to see both my cluster and my flower at the same time so I have both files open in my workspace:
This will allow me to see all of the “target” lighter colors that I’ll try on this flower. I can then just position my Levels box over the Layers Panel and it won’t obscure the visibility of the cluster.
Let’s start adjusting…
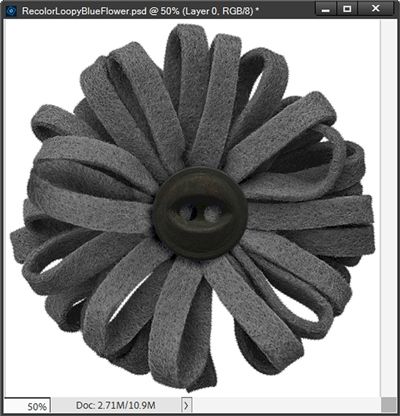
If I move the top black slider to the right, this flower will start to get darker. That’s the opposite of what I want here so I’m not going to do that. If I move the top white slider to the left, this flower starts to lighten up. I moved it over until I hit around 150 for now:
It’s much lighter, but not quite there yet. If I move that white slider too much more to the left, I may start to lose some of the felt detail. So, this time I’ll move the grey mid-point slider. If I move it to the right, the flower darkens again. So, I move it to the left until I got to about 1.45 (the middle number):
Getting closer!
Note: If you take any of the sliders too far, you could start to lose detail. Try to never move a slider so far that the details of the object begin to disappear. When that happens, go back and move one slider at a time (in the opposite direction) until the detail returns. You may then need to adjust other sliders as well.
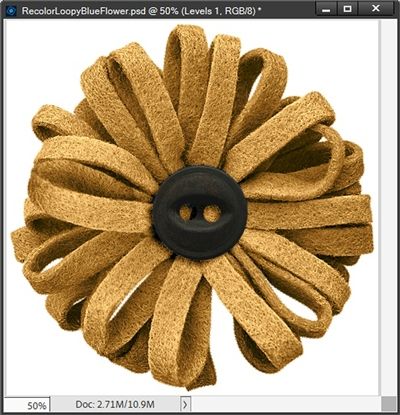
Now I’m going to concentrate on the Output Levels for a minute. If you remember, these control the absolute range of brightness. I’m going to move the lower black slider to the right until I hit about 35. I think that did it:

I think this might actually be the perfect flower. I’m going to hide the white background and save this as a PNG file with a unique name (LoopyLightSandFlower).
Let’s see how it looks on the cluster…
I already have my cluster file open in my workspace. Now all I have to do is open that new light sand flower. I can then just pull it into the cluster, position it over the flower placeholder, re-size it to fit, hide the placeholder and copy the layer style from the placeholder to the flower layer:

I’m pretty happy with how this turned out. I can now save the cluster PSD file and go back to my flower file.
I’m also going to save the flower file as a PSD with a unique name, something like “FlowerLighteningLevels”. I will then have a levels lightening template to use as a starting point for other elements.
Darkening Levels
Now I’m going to go back to that light sand colored flower from above and hide the Lightening Levels layer. So, my flower is now back to the medium brown flower:
I have another cluster I’ve been working on using this same flower shape. And this “sand” color isn’t going to work well on that cluster either. My goal is to get this flower as close to black as possible. And you know I can’t do that with just a solid fill layer 😉
So, I’m going to open that unfinished cluster. And just as I did with the prior cluster, I want to be able to see both my cluster and my flower at the same time so I have both files visible in my workspace:
Again, this allows me to see all of the “target” darker colors from which I could choose.
Note: If you’d like to follow along exactly, you can click here and this second layered cluster will be automatically downloaded for you.
I want the cluster file to be completely visible so I just click somewhere within the file. I then click on the Foreground color chip to open the color picker. I can now sample any one of the really dark areas (preferably close to black).
For now, I’m going to hone in on the one smaller “black” dot near the lower left portion of the cluster. That resulted in a very dark (nearly black) red color #262626.
Then I go back to my other file. With the Flower layer active, I create a solid fill layer with that “black” color, clipping it to my flower and change the Blend Mode to Color:
At this point, the flower is more grey than black so I need to darken it. And just as with the sand flower, I create a new Levels Adjustment Layer (Levels 1 for me) clipping it to the solid fill layer.
In the Levels box, I drag the upper black slider to the right until it’s at about 32. I then drag the upper gray slider to the right until it’s at about 0.77. Next, I drag the lower white slider to the left until it’s at 165:
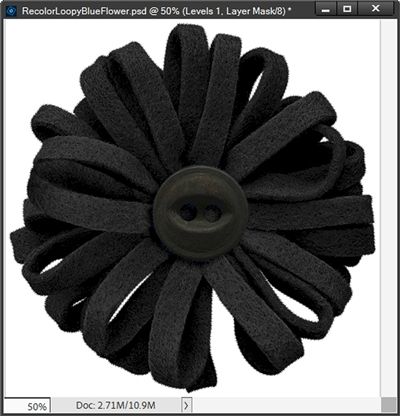
The reason I used these numbers is because if I went any higher or lower, I would start to lose the felt detail in the flower and I don’t want that.
I can now close the Levels dialog box and rename the Levels 1 layer to Darkening Levels.
I have one last fix to make. That button in the center of my flower is now way too dark. You might be thinking this is going to be tough to fix. But I have a plan!
Do you remember that way back in the very beginning with the blue flower I isolated that button and put it on its own layer (Button Center)? That’s going to make it super easy to fix the color. All I have to do is duplicate the Button Center layer and change the blend mode of the duplicate button to Screen:
The button is still kind of black but not so dark that it doesn’t show up nicely. Now let’s see how this looks on my cluster:
I’m definitely happy with how this turned out. I can now save the cluster PSD file and go back to my flower file.
After creating the lightened flower earlier, I saved the flower file as a PSD with the unique name, FlowerLighteningLevels. I now have both lighten and darken levels in this “template” file. Rather than creating a separate file for the darkening, I’m just going to save the current file under its existing name. After closing the file, I can rename it to FlowerLighten&DarkenLevels. This way I have both levels in one template!
When I open this template in the future to recolor for a different project, I can either hide both of the levels layers when I need a medium color, unhide the lighten level layer, or unhide the darken layer depending on the new color I need.
If any levels adjustments are required, all I have to do is double click on the thumbnail of the levels adjustment layer I want to change and PSE will open that Levels box.
The last thing left is to give you some tips on recoloring objects to white. I had really hoped to do that today. But this got a bit long after all the explanations about working with levels. So, as much as I don’t want to put this off to next week, I think it’s better for you if I stop here today!
Top Tips

Incorporating a Levels Adjustment layer into the Color Blend Mode method allows you to increase the range of colors that can be used to recolor something.
Just remember that using the Levels sliders will almost always be different for every recoloring scenario. So, each time you recolor something new, you’ll likely need to move the sliders depending on the desired result.
When using levels to lighten or darken an object always be careful that you don’t move the sliders so much that details become lost.
Creative quote for this week: The world is full of beautiful colors; don’t let your mind live in black and white.
Thanks for reading this week’s Tuesday Tip. Remember, if you have any suggestions or questions please don’t hesitate to “Message Me“. Check back next week for more recoloring tips. Click “Follow Me” to stay in touch. I hope you have a wonderful week!