So Many Colors
Oh my gosh…it’s already the first week in October. Here in the United States, Fall is in full swing and the spirit of Halloween is in the air! Fall is my favorite season and I have to admit, Halloween is my favorite “holiday”.
I absolutely love Fall! There are so many good smells: pumpkin spice, apple cider, toasted marshmallows, the scent coming off a pile of raked leaves, the mere crispness in the air…I could go on!
But it’s not just the smells. It’s also about all the colors! And all those smells I mentioned often translate to yummy colors! And if you’ve never been to Vermont during peak leaf peeping time, you have no idea of the gorgeous reds that can seemingly only be seen in Vermont maple trees!

Speaking of colors…picking a color within a Photoshop Elements (PSE) file is pretty straight forward. It’s as simple as selecting the Eyedropper tool and then clicking on a new color within an image open in PSE.
Seems silly that I even said that, right?!? We all know how to do this.
But what about times when you see a beautiful image on the Internet. It could be a photo, a digital scrapbook page, or just about anything. You fall in love with one or more colors in the image but can’t quite manually, exactly replicate the color(s) using the PSE Color Picker:
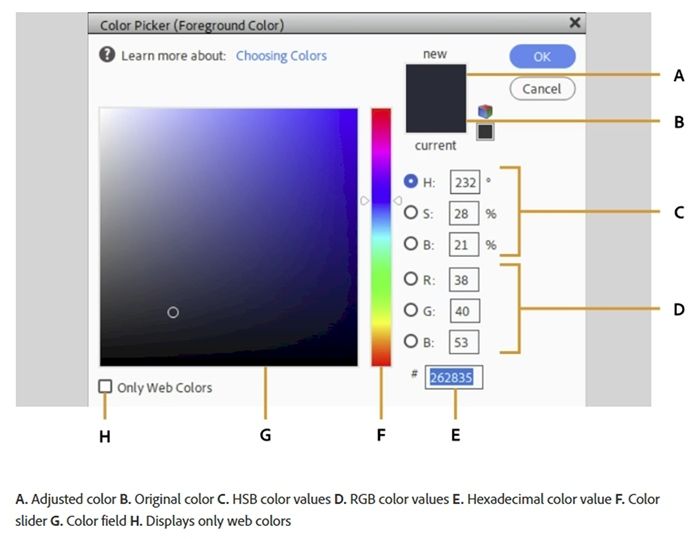
This typically involves dragging the white triangles along the color slider (F in the image above) to move to another color group. Then dragging the circular marker within the color field (G in the image above) until you see the color desired.
Yeah, that’s never as easy as we think it’s going to be ☹
Well, today I have an amazing quick tip that you may not know about. I actually feel bad that I haven’t thought to bring this up sooner. Using today’s tip, you’ll be able to capture the Hex value of any lovely colors you find that aren’t within a PSE file in mere seconds.
Eye Dropper Trick

Before I get started here’s a quick reminder, I use PSE 2024. If you use a different version, some of my screen shots may not look the same as what you see on your screen.
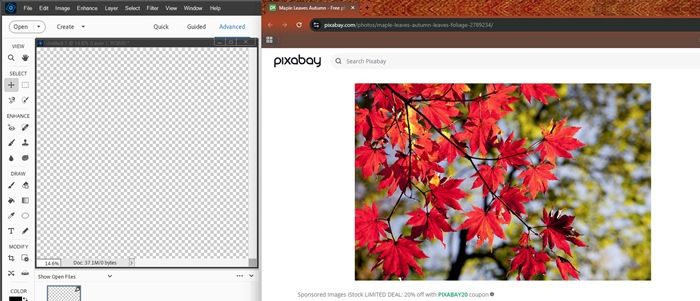
I start by opening a blank 12×12 file in PSE. Though I actually could have any existing file open.
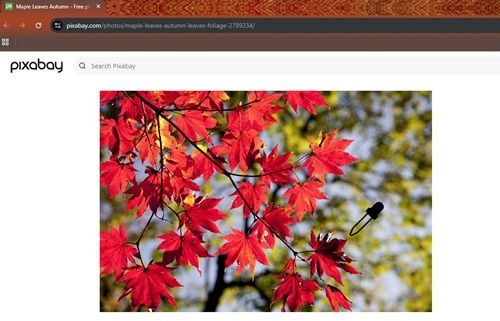
I’m going to go to the Pixabay website with the fall photo of those maple leaves you see in the featured image at the top of this post. I have PSE open and have moved my browser window so it is adjacent to my PSE work area:
Note: If you’re following along, you can use any website image that you like.
With the Eyedropper Tool selected I move my cursor onto the blank file:
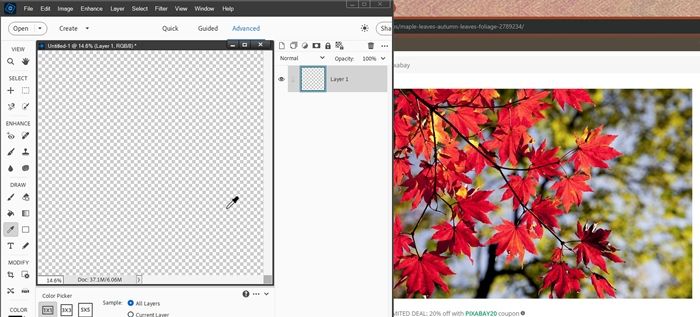
At this point I can see the Eyedropper icon over my file. Now, I can simply click and hold as I drag my cursor onto the fall leaves until the Eyedropper is over the color I want to copy:
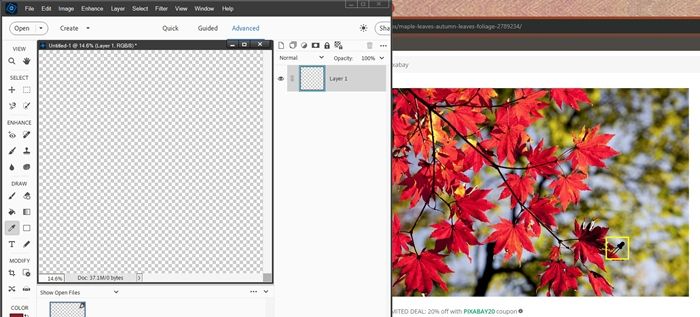
Hopefully you can see the Eyedropper (highlighted in a yellow frame) over a dark maroon section of a leaf. At this point I can simply release the mouse button and PSE sets my Foreground color chip to that color.
Note: The ability to click and drag the Eyedropper tool outside of the workspace was included in Photoshop Elements 6, released in September 2007. If you’re using a version of PSE older than PSE 6, you will need to resort to workarounds, such as taking a screenshot of the desired color, saving it as a JPG and opening the JPG in PSE to sample it.
With the sampled color now set as the new Foreground color, I can easily identify the Hex value by clicking on the Foreground color chip to open the Color Picker. the Hex Code (for me #7a041d) appears at the bottom of the Color Picker dialog box.
That’s how easy it is. I hope you find this tip as useful as I do!
If I want to sample more than one color from a given photo at the same time, I can simply make note of the Hex value for each color.
Better yet, I can store the colors for future use in a custom Color Swatch. If you’d like pointers on how to create a custom Color Swatch, refer to my “Save That Color” post from March 2024.
Now go enjoy picking/saving lots of fabulous colors!
Extra Tips

When using the Eyedropper Tool to try and pick a color outside your PSE file, you do not have to use only a blank file as a starting point. You can simply click, hold and drag the cursor from an PSE file and onto an image outside the file.
When using the Eyedropper Tool, in the Color Picker options at the bottom of the screen, you can see three different Sample Size options: Point Sample (1×1) – Samples the exact color of a single pixel; Average (3×3) – Samples the average color of a 3px square area under the Eyedropper; and Average (5×5) – Samples the average color value of a 5px square area of pixels, which can be useful for selecting a more representative color.
The color you sample will immediately become the new Foreground color. If you want the sampled color to become the Background color, hold down the Alt key when clicking on the color you want to sample.
If there is a color you’d like to use often, you can save the color as a swatch in the Color Swatches panel. Just click in the “blank” area beyond the last color in the open swatch group (generally Default). PSE will then open a dialog box allowing you to name the new color.
Photoshop Elements displays a small cube icon in the Color Picker to indicate a non-web-safe color. If you see this on a sampled color, it means the color you have selected is part of the full RGB color spectrum but is not in the older, more limited 216-color “web-safe” palette. For modern web usage, this warning is largely obsolete and can generally be ignored.
Caution: If you click on the small cube icon that appears next to your color selection in the Color Picker. PSE will automatically change your color to the nearest web-safe alternative. That sort of defeats the purpose of having sampled that web-based color!
Adding too many individual colors to PSE Color Swatches panels can slow down Photoshop Elements. If you want to save a lot of new colors it is best to set up your own custom color swatch library. You can then reload or manage these libraries for use in other images. But be mindful of how many swatches you’re storing in a given library. Try to organize colors by specific projects/themes to keep the library smaller.
And lastly…Color! What a deep and mysterious language, the language of dreams. – Paul Gauguin
Thanks for reading this week’s Tuesday Tip. Remember, if you have any suggestions or questions please don’t hesitate to “Message Me“. Check back next week for a tip about shadowing glass. Click “Follow Me” to stay in touch. I hope you have a wonderful week!
