
Curvy Words
Typing text on straight lines or straight edged shapes generally isn’t an issue. Normally, all I have to do is use the Horizontal or Vertical Type tool. Typing on irregular shapes can be a bit more challenging.
I’ve written multiple posts about typing on selections or paths starting all the way back in March of 2024 with my post about “Text On Shapes”.
I don’t know about you but I tend to struggle with the Text on Custom Path Tool. I mentioned this in my “Type A Stitch” post back in July of 2024. I’ve always had a horrible time digitally drawing any non-straight line that didn’t end up looking more jagged than smooth.
And if you read my “Stitches Cont’d” post you likely already know that the actual Text on Shape Tool really only works if using one of the hundreds of “standard” shapes within Photoshop Elements (PSE). In that post I also showed you how to create your own custom shape to work around that. But sometimes that’s not always the right solution.
In all of those other posts I’ve not covered how to deal with shapes that come in a kit or template. Those certainly aren’t PSE shapes, nor are they custom shapes made “on the fly”. They are however, still shapes around which we can make a selection. So, you’d think they would work seamlessly with the Text on Selection Tool…right?!?
Today I want to share with you some amazing shortcuts that will give you a whole new way to do just that.
Typing On Selections
I know we have the Text on Selection Tool that is typically a good workaround when drawing a custom path is difficult. But that may not work for all situations. As you are likely already aware, when typing text on a selection, PSE places the text along (outside) the selection outline.
What happens when I want to type inside of a selection outline? Sometimes it’s easy to work around just by nudging the text below the selection outline once it has been typed. But that can also depend on how the selection is oriented on the page. That doesn’t mean it always leads to the “last resort” option…the Text on Custom Path Tool ☹
Typing inside a selection can sometimes be tricky. Today I’ll show you how to do it using the Text on Selection Tool and a couple simple shortcuts.
Before I move forward, just a quick reminder that I use PSE 2024. If you use a different version, some of my screen shots may not look the same as what you see on your screen.
Inside Selections

You may be wondering why typing inside of a selection sounds hard. Or perhaps you’ve already figured out a way around using a custom path. Either way, you may want to keep reading just in case 😉
I’m going to show you what I mean by “inside” a selection. First, I’m going to walk you through the easy steps to get your text inside the top of a shape selection.
One thing to note here is about font selection. On occasion I might be typing inside a selection that is part of a “stack” of layers that looks something like this:
In those cases, it is often best to use a Serif or Sans Serif font that isn’t too fancy and type the text in all caps. This way I can ensure there won’t be any “tails” dangling over other layers.
I have this fun template from, “Art Of Color Templates” by Scrapping With Liz at Hey Scrapper:

For this first example even though I want my journaling inside that top, hot pink rainbow band I’m going to start with it above the band.
First, I select the Text On Selection Tool. PSE opens the tool options which look a bit different than a normal text option:

I ensure that the Add to selection icon is selected. I then select Summer Crab Regular (from 1001 Fonts) as my font (already installed). I set the size to 18px, the color to a dark blue violet (#1b1464) and the Offset to minus 8. The Offset is supposed to adjust the size of the selection. Using a negative setting should make it smaller.
Earlier I said that when typing inside a selection it is best to use all caps for your text. We need to be careful about font “tails” like the ones below:

While the font I selected for this example (not the one directly above) will show both upper and lowercase letters…none of the tails fall much below any other letters. Combine that with the fact that I didn’t need to worry about any tails touching an adjacent layer, it really wasn’t a big issue. Just be careful when you select fonts for your project.
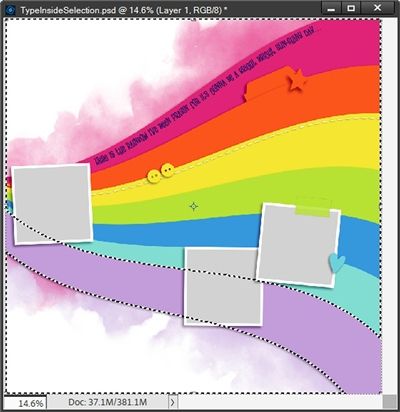
With the top, hot pink rainbow band’s layer active I now go to the Layers Panel and Ctrl+Click on the thumbnail for the pink band. Then I just click somewhere inside the selection. PSE displays a “confirmation” box like this:
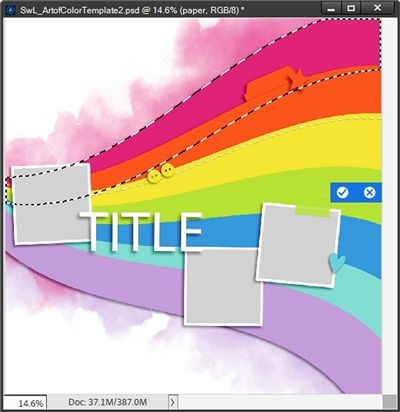
You should be able to see the marching ants around the selection.
At this point the only thing I’m confused about is why setting the Offset to minus 8 when I first selected the Text On Selection tool resulted in no change in the size of the selection. So, moving forward I’d say it’s not necessary to change it if it shows up as zero.
Clearly you can also see that the pink band extends beneath the orange band directly below. That’s not going to be an issue at this point. So, I just click the check mark to confirm and I get this:
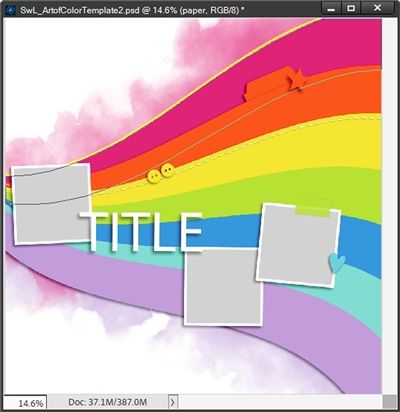
Now it may not be readily visible to you but PSE has changed that selection into a text path (a very thin black line). I tried to highlight (in yellow) the top part of that pink band so you could hopefully see where the path is at this point.
Now all I have to do is hover my cursor over the path until I see the Type on Path icon (an I-beam with a curved line through it). Then I click once on the path where I would like my journaling to start. I don’t want any of my text to end up behind that photo spot so I click just to the right of it!
I now see the Horizontal Type Tool options vs. the Text On Selection options. This gives me the opportunity to make any other changes before I start typing:

I can now adjust the font settings. For whatever reason PSE shows the Leading at 18.07px (at least for me). I don’t see a need to change this but I could set it to Auto since I’ll only have one line of text. The font name, size and color are still what I set above.
I do need to double check the text alignment. Since I’m working on a shape that is basically oriented horizontally and I’m going to start typing near the left edge of the shape, I’m going to ensure that the alignment is set to Left align text.
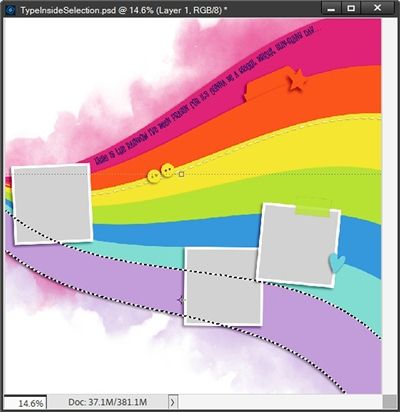
Now I can add my “lyrical” journaling!

I’m using part of the lyrics from “I Can See Clearly Now” by Johnny Nash as my journaling and I just type the words as follows,” Here is the rainbow I’ve been prayin’ for. It’s gonna be a bright, bright, Sun-shiny day…”
If I see that there’s any issue with sizing or spacing, I can make adjustments as long as I still have all of the text highlighted like this:

I can either use the size “slider” or enter a new value. If I’m not happy with how the words are positioned, I can hold down the CTRL key then position my cursor over the words and just nudge them either to the right or left.
I’m okay with how things look so I click the check mark to confirm. And here’s my text on that selection/path:

Clearly you can see that this text is not inside that pink band. But I knew this is exactly what would happen. You should also be able to see the bounding box around that text. That means I can treat this the same way I would any other “image”. I can move it or resize it however I may need/want.
Since I want that text inside that pink band all I have to do is move it to the desired spot:

Easy, peasy…my text is now inside that pink band.
And because this is still a text layer I could go in and change the font itself and its color if desired. If you should decide to do that don’t be shocked when you see the original path still show up! That just means that whatever changes are made it will still follow the line of the path.
So that wasn’t so tricky really, was it? But the next example will be a bit different.
Let’s say I want to incorporate a different set of lyrics on the bottom purple band. For this band I’m using part of the lyrics from “Here Comes The Sun” by the Beatles: “Here comes the sun, doo, dun, doo, doo. Here comes the sun, and I say it’s all right.”
And this time I still want the text to be on the inside of the band but along the bottom vs. the top. This is where it gets a bit challenging.
If I do things the same way I did on the pink band and position my cursor and start typing, this happens:

Not only is the text on the outside of the band (not unexpected) it’s also upside down and backwards! This clearly isn’t going to work.
Now it’s time for those clever shortcuts I promised…
Amazing Shortcuts
After deleting that failed attempt to type on the bottom of that purple band, I go to the Layers Panel, hold down the Ctrl key and click on the thumbnail of the purple band once more:
Then just as above I select the Text on Selection tool and use the same settings for font and color. This time I’ll leave the Offset at zero.
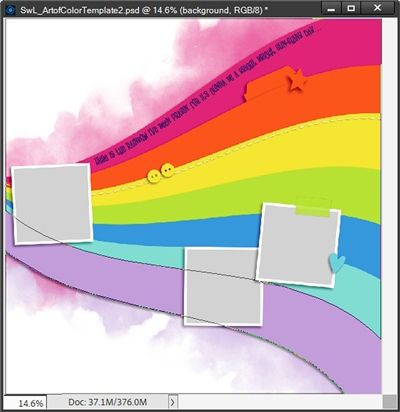
Now for shortcut (trick) number 1…I go to the top tool bar and click Select->Inverse:
You should be able to see that the marching ants are no longer around only the purple band. PSE now has inverted the selection so that it is actually around the background and excluding the purple band.
Note: If you’re following along and your selection still is around only the purple band, please try to re-do the Inverse step again. If it still isn’t working just cancel the selection completely and repeat the last few steps again.

Now, in the Layers Panel I click on the layer for the white background to make it the active layer. Please be aware, it is a requirement to click on a background layer that is not blank. PSE can only complete a selection when there is pixel data within the selection. This is why I activated my white background layer.
Then, back on the document I click once somewhere inside the active selection (preferably on the white background). Remember, the purple band is not part of the selection, you must click somewhere inside the remaining selection.
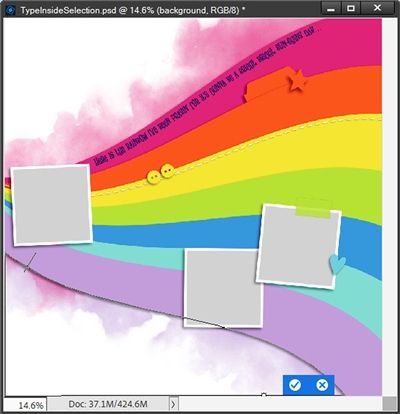
PSE brings up that “confirmation” box again. I click the check mark to confirm. And now I have a text path:
Then I hover my cursor over the path until I see the Type on Path icon again. I click once on the path wherever I want my words to start…but wait! I DO NOT start typing yet.
I simply click the check mark to commit. PSE creates a text layer above the white background layer in the Layers Panel.
Now for shortcut (trick) number 2…
In the Layers Panel, I click and drag the text layer directly above the purple band’s layer. Then I double-click on the thumbnail of the text layer. PSE opens the Horizontal Type tool and reactivates the cursor. Now I can type my lyrics and click the check mark to commit:

You can see I added some extra spaces to bypass the bottom of that photo spot. Now just as before I can nudge this text up away from the bottom of the purple band:

This technique can also work on a shape that is vertically oriented using the exact same steps as above. Though, I would recommend that you have your text “read” from bottom to top.
And here are some good fonts if you’re looking for ones that look nice if everything is all uppercase. Just click on the font name and you can see if you’re interested. They are all free:
And here’s a layout I made using this “inside a selection” technique:

If you’d like to see the details about this layout you can find it in my 2025 Gallery.
Additional Tips

Remember that this technique may require the use of all caps for the text. It will strictly depend on how much space you have within the shape. Typically, you won’t want your letters to “hang over” the edge of the shape 😉
This technique is best suited to journaling that fits on one line. If you want to include more than one line of text within a given shape, create one path (line) of text first. Then just duplicate that line, change the text and reposition it within the shape.
Always create a selection of your shape (Ctrl+Click on the shape layer’s thumbnail) then select the Text on Selection Tool before you invert the selection.

Remember, when “confirming” the inverted selection, a layer must be active in the Layers Panel (preferably the background layer). Do not select a blank layer. PSE must be able to recognize pixels within the selection.
Experiment with different font sizes and tracking settings to fit your text within the shape.
And don’t forget that you can “move” your text (right, left, up or down) while typing simply by holding down the Ctrl key and dragging it in one direction or another!
Thanks for reading this week’s Tuesday Tip. Remember, if you have any suggestions or questions please don’t hesitate to “Message Me“. Check back next week for a tip about neutralizing colors using a filter. Click “Follow Me” to stay in touch. I hope you have a wonderful week!
