Creating Artistic Images
Have you ever played around with the Filters option at the bottom of the Layers Panel in Photoshop Elements (PSE)? If not, today’s your day to give it a try. I don’t use filters terribly often but I do use them. And I’m always amazed at what all I can do with them. There are so many wonderful options that will let you alter a photo or even an element. This can give you so much versatility in showcasing a photo and in using your supplies.
Note: I use PSE 2022. I know the Filters Panel was added to PSE in version 15. If you are using an even older version of PSE, you should still have access to the Filter Tool in the top menu bar in Expert Mode. However, you may or may not be able to perform all of the steps I will show below. And it certainly may look different if you can get to the filters I am about to discuss.
Using Filters
Photoshop filters are a great way to try on new looks and show off your creativity by fine-tuning the details of photos & elements. Some filters let you modify the intensity of the applied filter by simply adjusting a slider. Using a combination of filters and effects, you can spruce up your photographs or other images before using them in a layout.
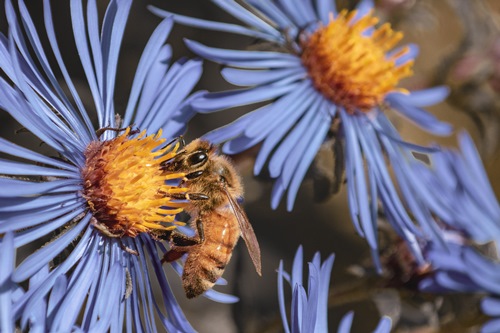
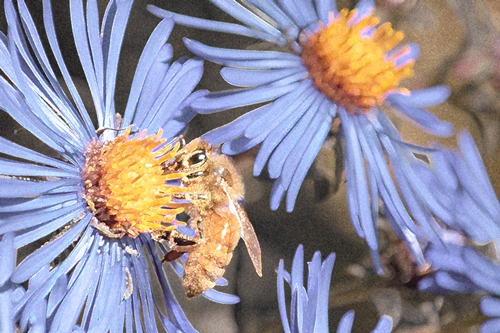
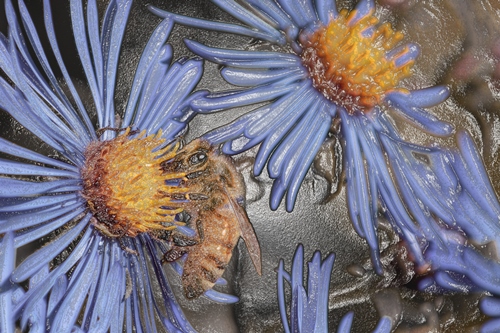
Using the lovely daisy photo above I’m going to show you what a few of the filter options will do to create a more artistic version of this photo.
Colored Pencil
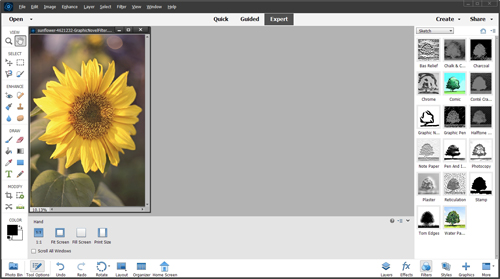
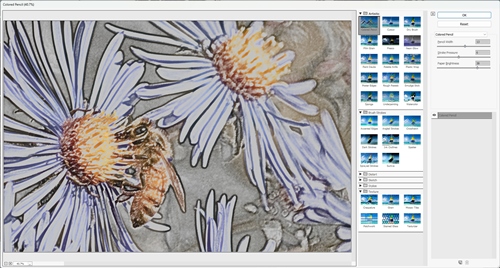
So, with my daisy photo open in PSE, the first thing I do is create a duplicate copy of the photo. This is always a good idea (even with the undo option available) so you don’t inadvertently “wreck” the original. I then select the Filters option at the bottom of the layers panel:
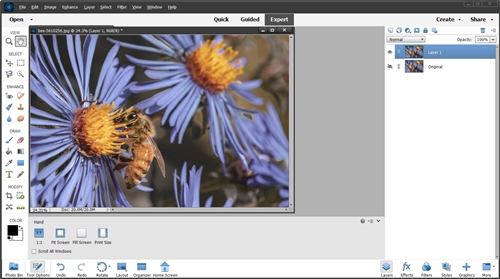
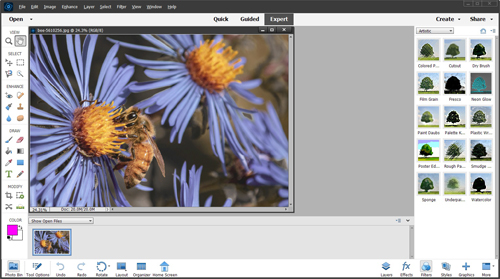
When PSE opens the Filters Panel, Artistic is the default and I’m going to stick with that for now. There are 15 different artistic filter options available (with thumbnail examples which helps).
I’m going to select Colored Pencil. PSE then “expands” the Colored Pencil option showing three sliders that will let you manipulate Pencil Width, Stroke Pressure & Paper Brightness. Each of these are set to PSE defaults and the photo has already been modified based on those.
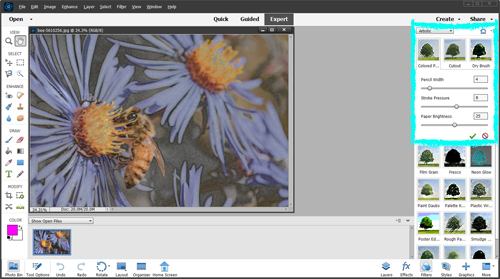
I played around with these sliders until I was happy with the result. I ended up using the following settings: Pencil Width=13, Stroke Pressure=5 & Paper Brightness=39. I click the green arrow to commit the changes & here’s what that looks like:
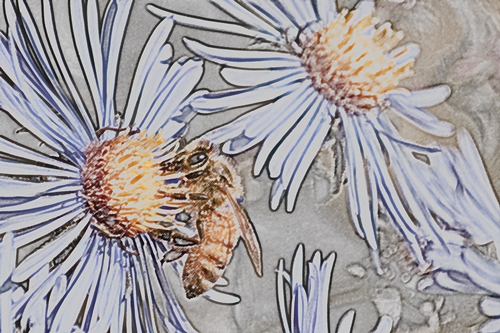
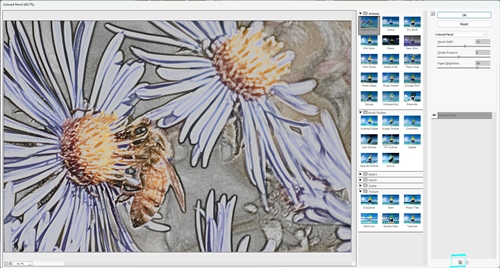
How pretty would this be either as a page background on its own or even blended into another paper? But I’m not done. Let’s take a look at another option using this same photo.
Paint Daubs
Using the same original photo, I select Paint Daubs. PSE again “expands” the Paint Daubs option.
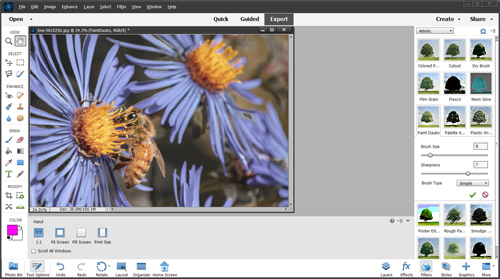
This time there are only two sliders. These will let you manipulate Brush Size, & Sharpness. But there’s also a Brush Type dropdown from which you can select one of six different types: Simple, Light Rough, Dark Rough, Wide Sharp, Wide Blurry & Sparkle.
I played around with these options until I was happy with the result. I ended up using the following settings: Brush Size=35, Sharpness=10 (which is the max) & Brush Type=Light Rough. I click the green arrow to commit the changes & here’s the result:
Let’s try another effect…
Plastic Wrap
Going back to the original photo, I select Plastic Wrap. PSE will “expand” the Plastic Wrap option.
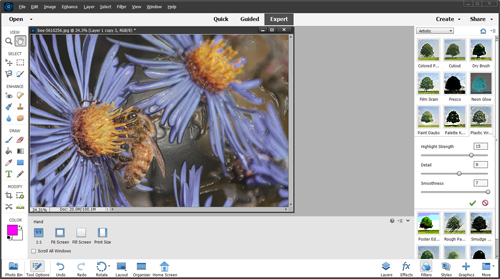
This time there are once again three sliders: Highlight Strength, Detail, & Smoothness. I played around with these options until I was happy with the result.
I ended up using the following settings: Highlight Strength=19, Detail=13 & Smoothness=5. I click the green arrow to commit the changes & here’s the result:
So, this one looks kind of fun. I’m going to show you another option…
Neon Glow
I will tell you this, the Neon Glow option is the “trickiest” one (in my opinion) with which to work. The Neon Glow filter uses the foreground color chip, background color chip, and glow color (you set this in the filter options) to colorize an image while softening its look.
You can set the glow size, glow brightness, and glow color to whatever you like. Lower glow size values restrict the glow color to the shadow areas, and higher values move the glow color to the mid-tones and highlight areas of a layer. To select a glow color, click the Glow Color box, and select a color in the Color Picker.
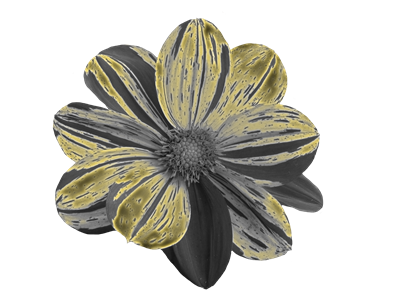
This time I’m going to use a flower element rather than a photo:

Knowing the colors of this element, I need to ensure that my foreground & background color chips are set to some contrasting colors before going forward. I think I’m going to leave them at the default black & white. I select Neon Glow and PSE again will “expand” the Neon Glow option.

Wow…that preview based on the color chips is not what I expected. But don’t panic, changes to the settings will make a huge difference.
This time there are once again only two sliders: Glow Size, & Glow Brightness. But there is also a Glow “color chip” that you can change (the default color is blue – at least on my version). I played around with these options until I was happy with the result.
I ended up using the following settings: Glow Size=19, Glow Brightness=21 & I set the Glow Color Chip to a nice yellow (#f7d63c). I click the green arrow to commit the changes & here’s the result:
Obviously, playing around with lots of different color combinations will give you lots of varying results. Try to experiment with this one. It’s tricky at first but once you get the hang of it, you can have a lot of fun.
I’m not going to go through the rest of the artistic options. I’d encourage you to try all of them to see for yourself what else you can do.
There are so many other Filter options. It would be a lot to go through in this one post. But there is one other Filter that I’d like to show you today…
Sketch
Just as with the Artistic Filters, Sketch Filters have a lot of options. The one I tend to use the most is Graphic Novel.
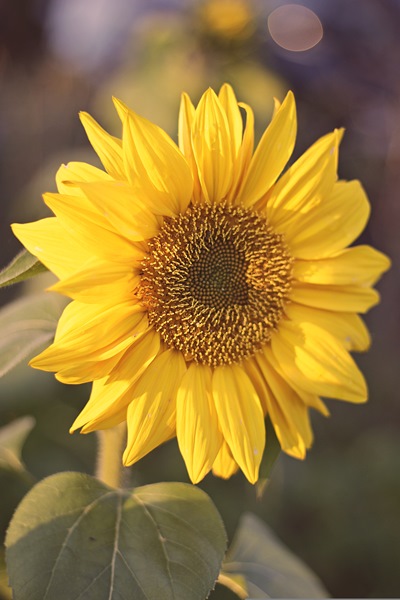
I’m going to use a different photo this time:
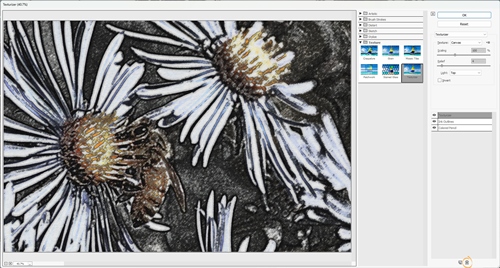
In the Layers Panel I once again select Filters (at the bottom). When PSE opens the Filters Panel Artistic is the default so I’m going to select Sketch from that top dropdown.
I then Select Graphic Novel. This time PSE will open a new window with the preset options:

This time there’s more to it than just sliders. There are four different types of graphic novel options: Painted Gray, Fine Detail, Hard Edges & Twisted Plot. Each of these can provide a completely different look even with all of the other settings being the same. The one I tend to use most often is Hard Edges so I’ll go with that.
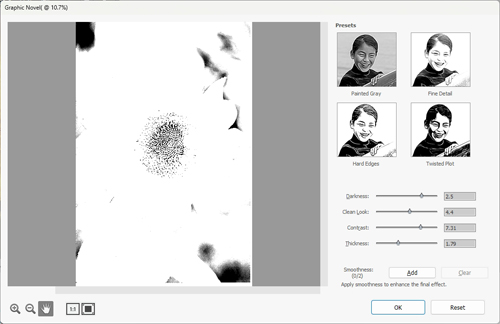
All of the Graphic Novel options have four sliders: Darkness, Clean Look, Contrast & Thickness. Each of these are set to PSE defaults and the photo has again been modified based on those.
Once you get the settings that you like you can than opt to apply a smoothness to enhance the final effect by clicking the “Add” button. This is totally optional.
I’m used the following settings: Darkness=3.5, Clean Look=1, Contrast=7.5 & Thickness=4. And I added the smoothness. Here is the result:
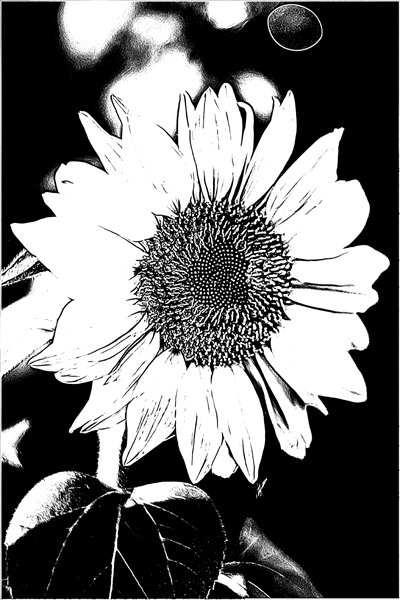
Now not only do I have a black & white version of the photo, it looks like a sketch! Try this with some photos of people to really get a good idea of how this filter can give you some great photo alternatives.
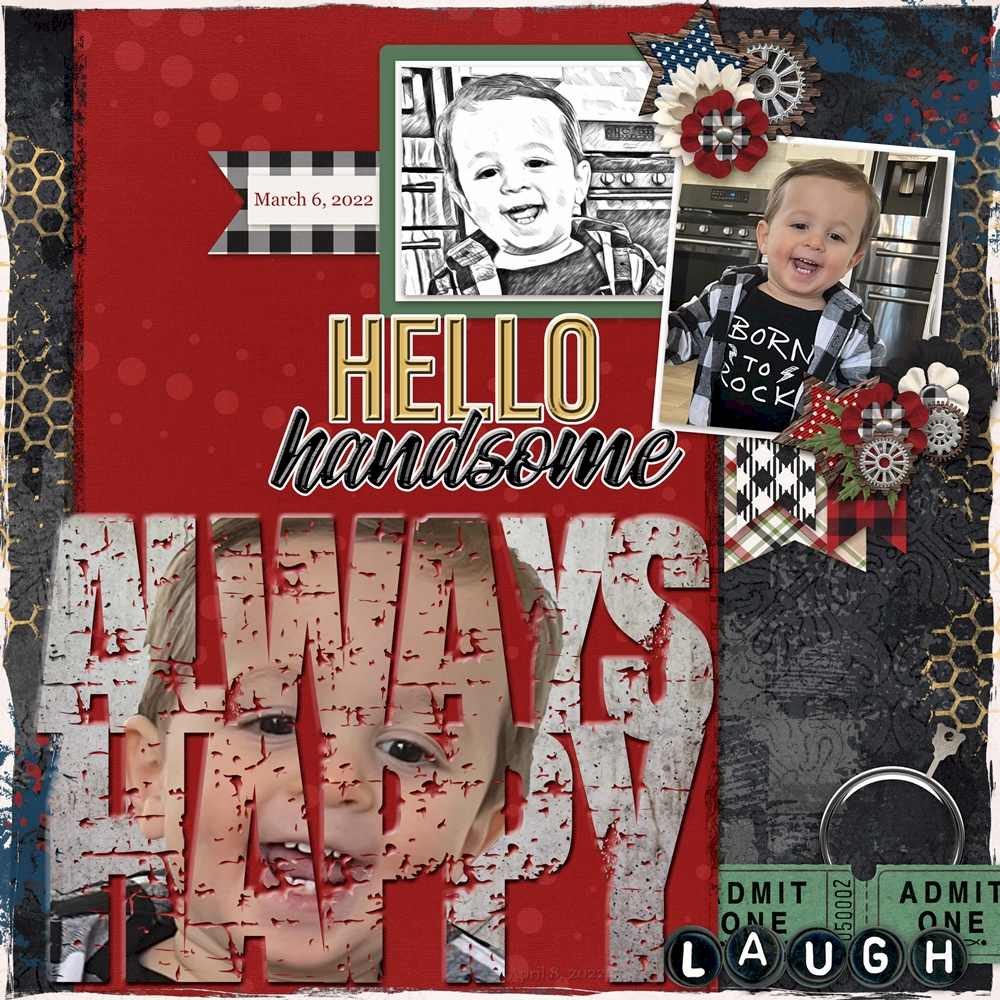
There is a layout in my 2022 Personal Gallery that will give you an idea of one photo on which I used a sketch filter. Look for the layout captioned “Always Happy”. It’s about 13 rows down! And if you don’t want to scroll through the gallery…here’s a direct link to the image in my media library.
Now one last option before I let you go for the day…
Stacking Filters
You can layer more than one filter over a given photo/image simply by finishing one filter then selecting a new one. No “stacking” or blending of multiple photos is required. But this is not something you can do using the Filters from the Layers Panel. You will need to access the Filter Gallery via the Filter tool in the top menu bar.
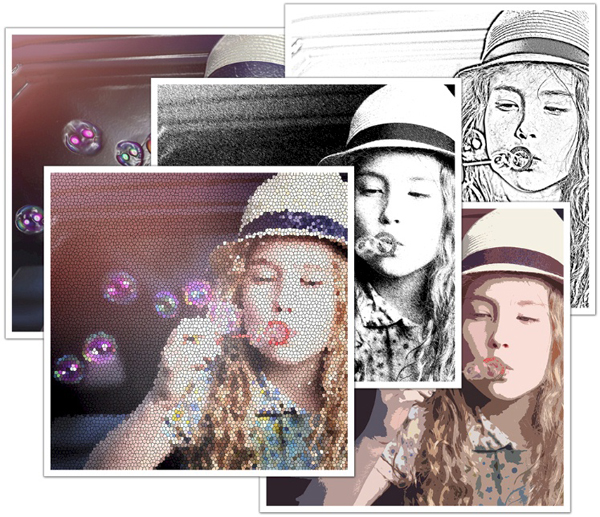
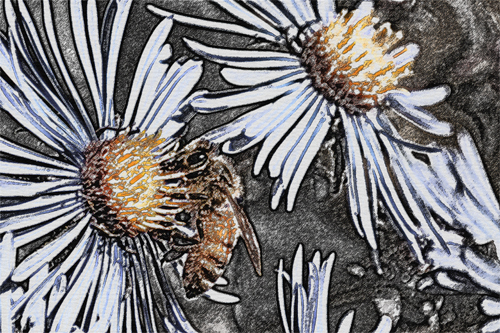
I’m not going to spend a lot of time on this but I did want to give a quick overview. The above image is that original daisy photo over which I “stacked” 3 different filters. Here’s how…
With the daisy photo open in PSE, I select Filter->Filter Gallery from the top menu bar. PSE will then open the gallery with a default selection of the Artistic – Colored Pencil (at least that’s what it is in my version):
Below, you can see the first applied filter in the box just under the filter settings box. Notice the “eye” icon (circled in red) on the filter thumbnail…this will allow you to turn the filter off for now if you choose to do so.

To keep this quick, I’m going to use the default filter/options (colored pencil) as the first filter “layer”.
Below you will notice a “new layer” icon (in the aqua box) at the very bottom of that filter pane. I click that and PSE will again open a default 2nd filter – Brush Strokes – Ink Outlines (again that’s per my version). I’m just going to go with that and the default settings for simplicity’s sake.
Let’s add one more filter. I click that “new layer” icon once more and PSE now opens Texture – Texturizers. Again, I’m just going to go with the defaults for now.
And that’s how I got the image shown at the top of this topic. You certainly don’t ever have to use the defaults. Select whichever filter type/option you choose. And you can re-order the filter layers to see what kind of difference that would make.
Once you have more than one filter “layer” you also can completely remove other layers if they aren’t working for you. Below notice there’s a little “trash can” icon (circled in gold) at the very bottom of that filter pane. Just select the undesired filter layer and click that little trash can.
I know I ran through a lot of this pretty quickly. I just didn’t want to make this too long or overwhelm you.
If you want/need more detailed guidance, there are a lot of tutorials on the internet about using filters in PSE. There is one YouTube tutorial that I would highly recommend. It is by TeachUComp, Inc. and goes into using filters in PSE 2022. Click here to view that. You might find a bit more detail in there than what I’ve given here today.
If you don’t use PSE 2022, I believe they have tutorials using other versions. Try doing a search for “teachucomp video using pse filters”. Hopefully that will help you find a video for your version of PSE.
Some Important Tips For Using Filters

First & foremost…always work on a duplicate version of your photo or image!
Don’t forget…you can add more than one filter to a given photo/image. No “stacking” or blending of multiple photos is required. Just use the Filter Gallery
Experiment with different filters on both photos and element images. It’s so much fun watching how the various options/settings can change the image. I know I can spend days playing with filters once I get started 😊
Remember, the more you practice with filters, the better you’ll get at using them!
As usual, if you have any questions or need a bit of help, please don’t hesitate to “Message Me” for some assistance.
Thanks for reading this week’s Tuesday Tip. If you want to stay informed about next week’s post, just click “Follow Me” to get an update. I hope you have a wonderful week!