
Tricky Shadows
Over the past two years in countless posts, I’ve talked about the importance of proper shadows. This goes all the way back to one of my first real technique driven posts, “Don’t Let Your Pages Look Flat” from April of 2023.
Between April of 2023 and a recent post about creating folds in July of this year, I’ve talked about shadowing countless types of elements from buttons and bows to complex things like hot air balloons.
Oddly enough, I’ve never specifically talked about how to properly (and easily) add a shadow to transparent elements. I have no idea why I’ve never talked about this before. But I’m going to take care of that today.
It’s high time I share my technique for shadowing glass or other translucent images. It doesn’t involve any special filters and can be accomplished in just a few steps. And I’m not kidding…I promise!
Shadowing Glass
Before I get started here’s a quick reminder, I use Photoshop Elements (PSE) 2024. If you use a different version, some of my screen shots may not look the same as what you see on your screen.
Last August in my “Stitching Realism” post I showed you how to create a shadow on its own layer. Knowing how to do that is one of the keys to successfully shadowing transparent objects. But today I’m going to show you a quicker and easier way to put a shadow on its own layer.

I know, you’re wondering why I didn’t do that last year. You’re not alone, I’m wondering the same thing right about now
There is one thing about shadowing glass that I won’t get into today…creating a cast shadow!
Glass can cast a shadow. If you read my “Shadows Flying High” post you already know about Cast Shadows! But I’m guessing you didn’t think an empty glass would cast a shadow.
Well, it can and here’s why. No material is 100% transparent; glass interacts with light through reflection and refraction, which are processes that deflect light rays. The edges of the glass or any curved surfaces, like lenses, can bend light and create darker areas (shadows) where light is blocked, and brighter areas where light is focused.
This bending of light rays can redirect some of the light away from the area directly behind the glass. The areas where light is deflected or blocked by the glass become darker, creating a shadow.
I’m going to keep our shadows simple today. Mostly because I’m going to be working with relatively flat elements and I’ve already covered creating Cast shadows. Just keep that concept in mind if you’re going to be trying to create a shadow for an element that is tall, like a bottle or vase.
Okay…that’s enough science for today. Let’s create a reasonably proper shadow for most “flat” glass…
Create Glass Shadow
I’m just going to open a blank 12×12 file in PSE and pull in a nice background from “Over The Moon” by Art Addicts Designs:

Note: If you’re following along, you can use any paper that you like.
Now I’m going to pull in a cute fish bowl element from that same kit:
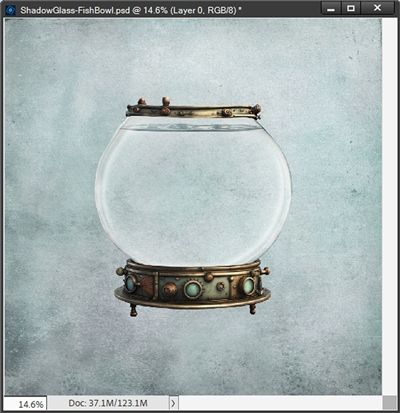
Note: If you’re following along, you can use any glass element that you like.
Now, just for fun I’m going to add a fish (again from the same kit) and layer it beneath the fish bowl in the Layers Panel. Then I add a drop shadow:
Note: If you’re following along using the fish bowl, you can skip adding the fish if you only want to work on the fish bowl.
Because this fish is inside a round fish bowl that would, in reality, be lifted fairly high off the paper, I created the shadow for the fish so it too would appear to be floating off the paper.
The settings I used for that shadow are: Lighting Angle=120 degrees, Color=medium-dark grey (#696258), Size=50, Distance=40px and Opacity=85%. You can use whatever settings fit the element you’re using.
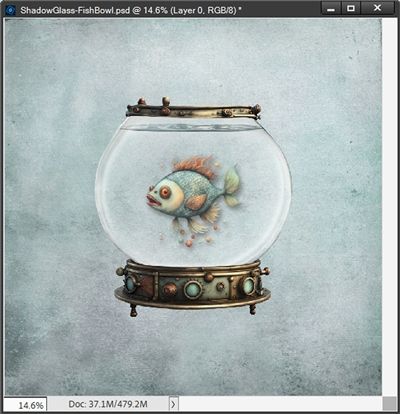
Next, I duplicate the fish bowl and add a drop shadow to the original fish bowl:
Again, this is a round fish bowl that would, in reality, be lifted fairly high off the paper. So, I created the shadow with these settings: Lighting Angle=120 degrees, Color=medium-dark grey (#696258), Size=50, Distance=40px and Opacity=85%.
Note: If you’re using a flat element, you’ll want to use whatever settings fit the dimension of the element you’re using. For example, if you’re using a flat glass button your settings should be something like this: Lighting Angle=120 degrees (or whatever is appropriate for your project), Color=medium-dark grey (#696258), Size=18, Distance=10px and Opacity=60%.
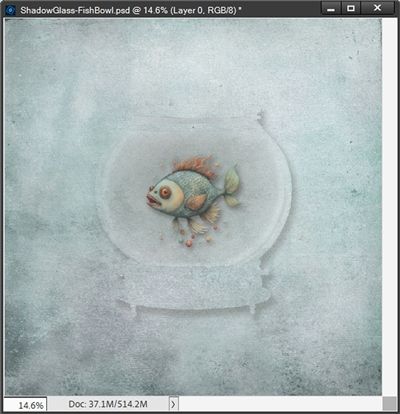
Clearly (well maybe not so clear 😉), the shadow has darkened the “water” in the fish bowl! I certainly don’t want a shadow filling the space that should be clear. This is where putting the shadow on its own layer is important.
And here’s the easy way to get that shadow on its own layer…
Separate The Shadow
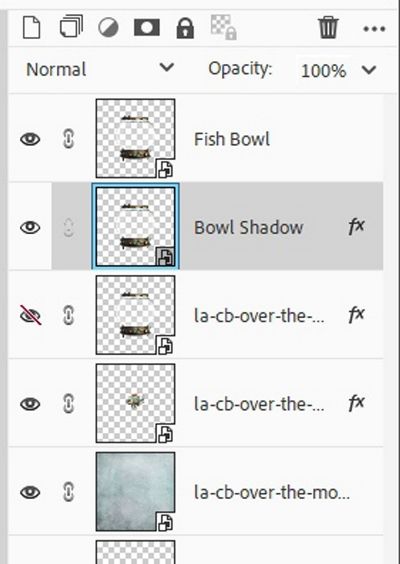
I’m actually going to duplicate the original fish bowl layer that now has the shadow. I’m doing this so I can preserve the shadow settings in the event I need to make changes to the shadow later.
I hide the “original” shadowed layer and rename the duplicate layer to Bowl Shadow. Then I also rename the first duplicate fish bowl layer (should be the top layer in the Layers Panel) to Fish Bowl. I know this might be getting confusing so here is what my Layers Panel looks like right now:
Next, I simplify the Bowl Shadow layer. Sometimes PSE isn’t always cooperative when simplifying a layer that has a style applied.
If your layer still shows the fx (style) icon on the far right in the Layers Panel after having simplified the layer, just simplify the layer a second time!
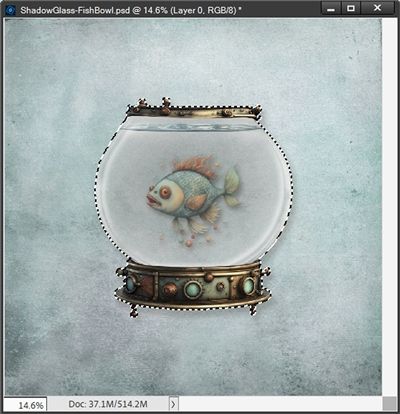
I want to delete everything except the shadow on the Bowl Shadow layer. So with the Bowl Shadow layer active, I Ctrl-Click on the thumbnail of the Fish Bowl layer:
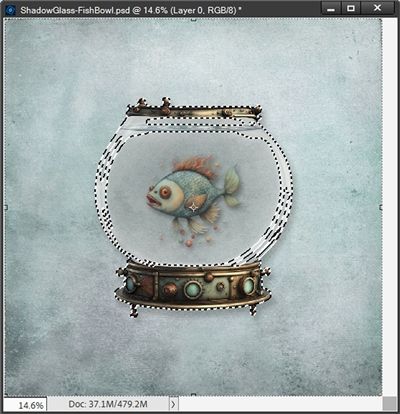
At first glance, it looks like the marching ants are around everything except the shadow around the bowl. Which, on the surface, looks to be true. But in actuality…the shadow within the bowl is not part of the selection.
For just a moment I’m going to hide the Fish Bowl layer so I can better illustrate what is happening. At this point if I were to press the Delete key, PSE would in fact delete the actual element leaving only the shadow:
But having the shadow inside the bowl is still problematic. So, I’m going to undo this (Ctrl-Z) and get back to the original selection that you saw above with the Fish Bowl layer unhidden.
With the Bowl Shadow layer still active and the selection still around the element, all I have to do is grab the Magic Wand tool and click the Add to selection icon, set the Tolerance to 32px and check Contiguous. Now I can simply select the remaining portions of the shadow inside the fish bowl:
Note: Depending on the element you’re using, sometimes the Magic Wand tool isn’t the best option when trying to add to the selection. If you’re having trouble with that try using the Selection Brush tool instead.
At this point when I press the Delete key, hide the Fish Bowl layer again and cancel the selection (Ctrl-D or Esc) I see this:
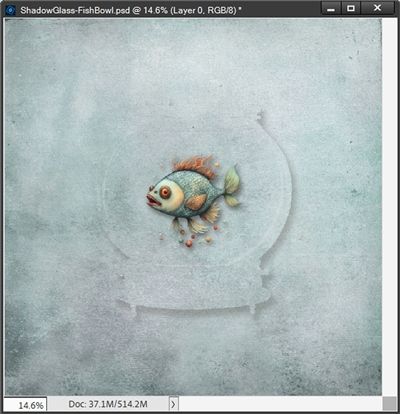
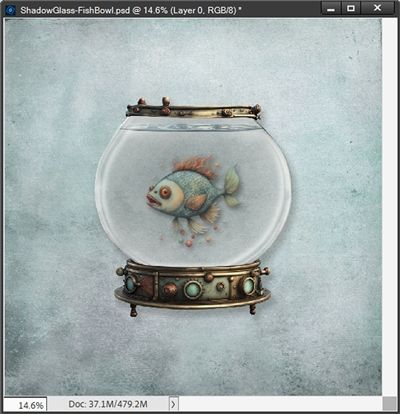
This created a shadow on its own layer without any part of the fish bowl remaining and no “inside” shadows.
Now I can unhide the Fish Bowl layer which contains the original fish bowl (no shadow):
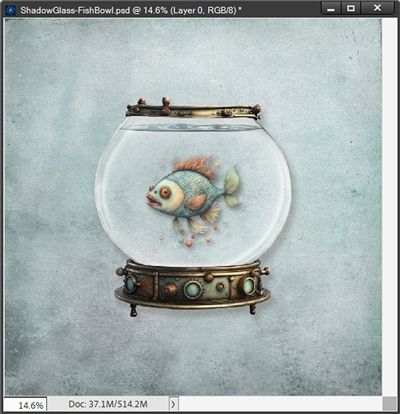
I now have a shadow around my fish bowl, but not behind/inside it. I can also clearly see my cute fish inside the transparent glass.
That really was pretty easy, right?!? And it works on just about any element when you want the shadow to be on a separate layer. But it is particularly effective when dealing with transparent/translucent images.
And here’s a layout where I used that finished fish bowl:
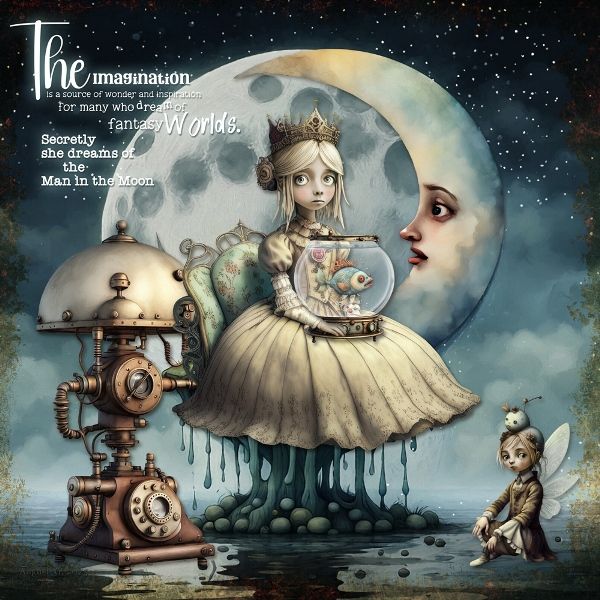
If you’d like to see more details about this layout you can find it in my 2025 Gallery. The title of the layout is “Man In The Moon”.
Before I let you go, here’s an example of some translucent water splashes: one with a “regular” shadow and one with a shadow on its own layer:
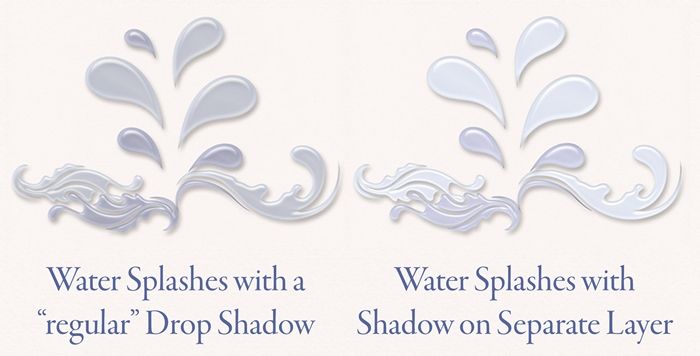
Note: Those water splashes were provided to participants in a challenge back several years ago. Consequently, I cannot give you a link for these.
I hope you enjoyed learning a quick way to shadow a transparent image! And if you feel really brave maybe you can try to create a Cast shadow on a tall glass of water. Please give it a try and let me know how it goes.
A Few Tips

When simplifying a layer always ensure that it is truly simplified. Just double-check to see if the fx icon is still showing. If so, just simplify the layer again.
Experiment with changing the shadow layer’s blending mode to Multiply. This makes the shadow blend more realistically with the color(s) beneath it.
Try adjusting the shadow layer’s overall opacity to control its intensity.
Don’t forget, this “easy” way to get a shadow on its own layer will work with most any elements, transparent or not!
Remember…Inspiration exists but it has to find you working. – Pablo Picasso
Thanks for reading this week’s Tuesday Tip. Remember, if you have any suggestions or questions please don’t hesitate to “Message Me“. Check back next week for yet another tip about grunge. Click “Follow Me” to stay in touch. I hope you have a wonderful week!
