Shadows Flying High
When I started working on this post and came up with the title, I couldn’t help but think of a song I hadn’t listened to for quite some time; Lost Boy/Neverland by Ruth B. Here are the first lines of the song…
“There was a time when I was alone. Nowhere to go and no place to call home. My only friend was the man in the moon. And even sometimes he would go away, too. Then one night, as I closed my eyes, I saw a shadow flying high.”
Mount Rainier is an iconic landmark in the northwest region of the United States…and it can cast the most amazing shadows. The photo featured at the top of this post was taken by Chuck Graham one morning in June 2013. With a relatively uniform cloud deck that topped out around 6500 ft, the mountain’s shadow was quite evident upon the clouds.
Complex Shadows
Our world is made up of light and shadow. So, all artists need to understand how to create realistic shadows.
Without correct shadow and light relationships, a layout will fall flat. Shadows explain form, depth, and much more. I’m fairly certain that most people with any experience in digital scrapbooking are already familiar with how to create drop shadows. If you need a refresher, check out my “Don’t Let Your Pages Look Flat” post from April 2023.
Today I’m going to address some other shadows that can be a bit more complex than a simple drop shadow. I’m hoping to simplify these shadows by breaking them down into the two categories of Cast and Form.
So, let’s take a look at a bit of the science (I can almost see you cringing 😉) behind these two main types of complex shadows, learn what causes them, how to use them, and make them believable in our artwork. After the science lesson, I’ll walk you through creating a realistic cast shadow.
Cast Shadows
A quick reminder before I begin…I use the current version of Photoshop Elements (PSE – 2024). Some of my screen shots may look different than what you see on your screen depending on the version you are using.
Cast and form shadows require different techniques. In general, most cast shadows have sharp edges (but that isn’t always the case) and explain that a light is being blocked to create a shadow. The shape of the object is projected in shadow form across surfaces opposite the source of the light. Some cast shadows will have a softer edge when further away from the object.
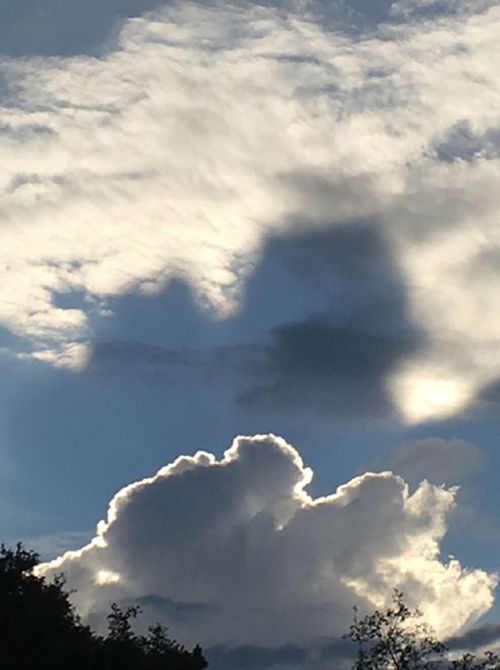
The photo above shows a cumulus cloud (at the bottom) and its projection on a cloud bank in the background. It was captured above Tampa, Florida, not long before sunset. Projected shadows such as this one result when the cloud shadow is cast upon a thin layer of haze (dust or aerosols).
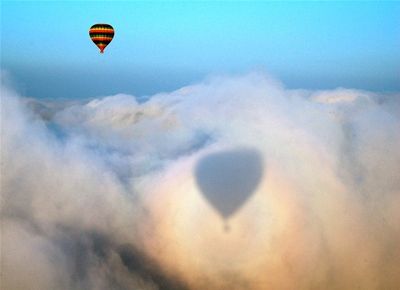
Note: It is highly unusual to see objects cast a shadow in the sky. Other than clouds and sun rays we almost never see an object casting a shadow in the sky. The image featured at the top of this post is a rare exception. The image below shows not only an object casting a shadow in the sky but a great example of softer edges.
Even though nature is stingy with shadows in the sky, that doesn’t mean we can’t make objects on our layouts appear to be flying high. Afterall the hot air balloon above certainly casts a shadow across the clouds! We can do this by using cast Shadows.
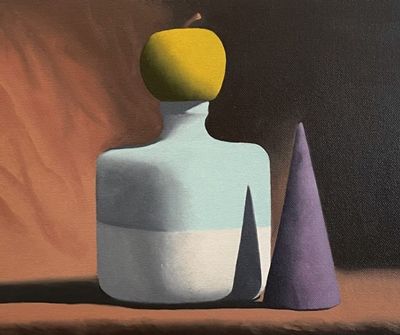
Another example of a cast shadow is in the image directly above. The purple cone blocks the light completely from hitting the vase in a certain area. This shadow has sharp edges all around. Completely blocked by the cone, the blue & white pot isn’t being hit by the light in that one area. But the blue & white pot is also casting a shadow of its own upon the floor.
Often, cast shadows have darker values than form shadows, depending on the object they are cast on. Because the light source becomes completely blocked, there is usually less or darker reflected light in a cast shadow.
Creating shadows requires thought about the light source, and cast shadows are no exception. The further a cast shadow falls from the object creating it, the lighter the shadow gets and the softer the edge often becomes. Knowing this will help you as you seek to make realistic images.
Note: I realize that what I just said about shadows being lighter/softer the further away the object is seems to contradict the hot air balloon image above. Not all shadows get smaller the further away they are. A shadow can appear larger than the object that casts it if the light source is close to the shadow or if the object is large. Larger objects block more light, resulting in larger (often darker) shadows.
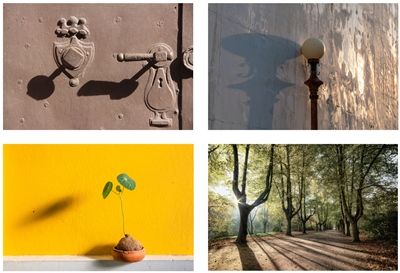
Here are some other examples of “natural” cast shadows:
As you may be able to guess, the first step in creating a realistic cast shadow is to identify an imaginary light source. I’ll talk more about that in just a bit.
Form Shadows
Form shadows happen when part of an object lies on the opposite side or away from the light source, and therefore does not sit directly in the light. It still is affected by the light indirectly, and has color and dimension, but does not sit in the direct path of the light source.
I know the image above is a duplicate but it is an important repeat! I’ve already pointed out the cast shadows in the section above. But can you also find the Form shadow in that same image? If you can’t then carefully re-read the paragraph directly above.
Do you see the shadow of the blue & white pot and the apple against the wall?
Form shadows receive this name because they define the form and shape of an object. As the light hits a certain object like a sphere, it dissipates around the sphere, unable to reach certain parts of the object due to its rounded shape. As what happened with that blue & white pot.
Because of this gradual fade into shadow, a form shadow has a softer, graded edge when compared to a cast shadow.
These shadows appear very soft and gradual and help to explain the third dimension to any piece of artwork. When creating shadows like this, artists often use a gradient technique to get a soft fade from light into shadow.
When done correctly, the viewer cannot point out where exactly the light changes into shadow but can see a distinct difference between the two.
Understanding how form shadows are created is an important concept. But for most scrapbookers, there aren’t going to be too many times when a form shadow will “occur” on a layout. Consequently, I’m not going to go into the specifics of creating form shadows.
Identify Light Source
While generally more complex to create than drop shadows, cast shadows are still a relatively simple way to enhance text and graphics in page layouts and give a three-dimensional appearance to a flat piece of paper.
Unless you are intentionally creating a fantasy world that breaks the rules of light and shadow, cast your shadows using a reasonably placed imaginary light source based on reality or a light source already identifiable in your layout.
Let’s take a look at these examples again. Three of the four photos have a light source coming from the right but not all at the same angle. With the fourth photo (trees) the light source is directly behind the trees. But all of those shadows require more work to replicate than just setting the PSE Lighting Angle. I’ll discuss that shortly.
Cast your shadow opposite the light source. Light sources that shine down almost from directly above tend to create shorter shadows (again perhaps a bit contrary to that hot air balloon photo above). Light more to the side of an object make longer shadows. A bright beam creates a more pronounced shadow while low light or diffused lighting results in softer shadows.
Shadow Color & Value
Many people (not just beginners) will color all of their shadows pure black (now I’m cringing 😉). As I mentioned in last week’s post about “Stitching Realism”, shadows are not completely black. In “real life” they also aren’t one flat color! Instead, they have light and dark values, and color within the shadow.
I’m about to tell you something that may fly in the face of all that seems “normal” to most of us. In nature, shadows are inherently blue in hue. Most of us tend to think of shadows as being black or varying shades thereof. However black is a neutral color. The hue of a shadow is not neutral. Therefore, when we create a shadow, theoretically it should have blue in it. Or should it?
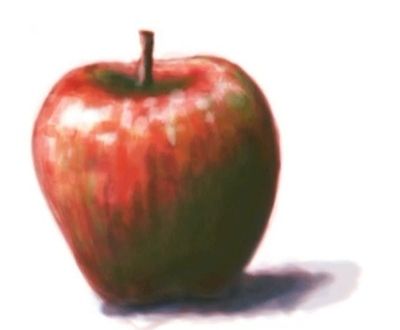
We don’t see blue shadows everywhere around us. Instead, we see what’s called “local color”. Local color refers to the actual color of the object. A red apple’s local color is red. There may be some other colors on the apple like yellow, white, or green. Local color includes those colors as well. “Proper” shadows should typically be created by including shades of the local color.
Shadows are also affected by the object they cast onto or the environment around them. In order to create realistic shadows, we should also take into account the colors beneath or around the object. To achieve the utmost in realism, we must keep this in mind and color shadows with the shades we can see in and around them.
And if you read last week’s Stitching Realism post, you may remember that I very briefly touched on the concept of shadows having different colors based on the paper/element beneath the object being shadowed. One of the easiest ways for us to have our shadows include local colors is by using Blend Modes.
All of that said, you don’t have to go crazy making shadows in colors like what you see under the apple above but it is fun to play with this concept.
Creating Cast Shadows
After reading all the “science” (yawn), you may be able to tell that the image above contains both cast & form shadows. Don’t panic. I’m not going to walk you through all the steps to create similar shadowing effects. I’m only going to cover what is required to produce a realistic cast shadow (like the one on the wall).
Creating cast shadows requires that the shadow is on its own layer. Again, if you read last week’s post you should now know how to put your shadow on its own layer. If not, please refer back to that post for tips on doing that.
Today I am going to do something a bit different when I create my shadow on its own layer. But the basic principle is still the same as what I showed you last week. It’s just tweaked a bit to show you a touch more realism. Keep that earlier discussion about “local color” in the back of your mind as we work on creating that shadow layer.
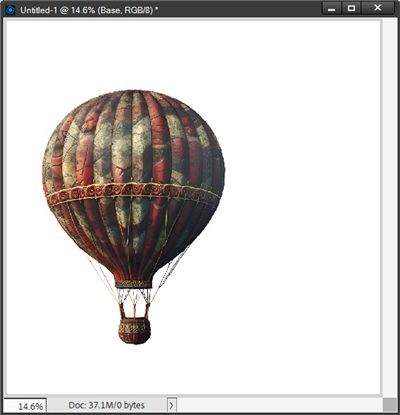
I’m going to be working with the hot air balloon I extracted from this Pixabay image:
Note: If you need tips on how to extract an element from an image like the one above, please refer back to my post about “Making The Right Selection“.
As usual, I’m going to start with a blank 12×12 file. I will fill the initial layer (Layer 1) with white. This will make it super easy to see my shadow as I create the proper size, color, edge softness (blur) and position. I then bring in the balloon:
Next, I duplicate the balloon layer and name the new layer Shadow. This duplicate balloon will be the basis of my shadow. And this Shadow layer is currently above the original balloon layer.
Clearly, I don’t want that balloon Shadow layer to be in full color. At this particular point, I can do one of a few things. Most people would just fill the balloon image with black (not ideal but workable) or clip a black paper to the image. But based on all the science above, I’m going to try a third option and have a bit of fun creating this shadow layer.
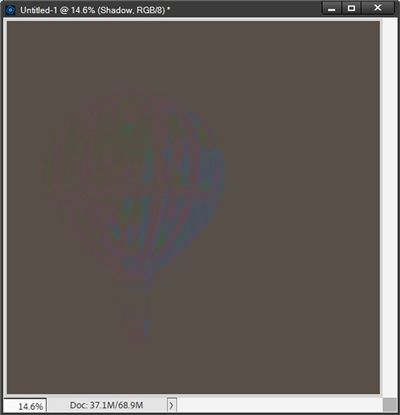
I’m going to start by hiding my original balloon layer just so things don’t get too confusing. Then, with the Shadow layer active, I’m going to select one of the darker shades of brown near the bottom portion of the balloon itself (not the basket) . The color I grabbed ended up being the shade of brown with a hex value of #594e46.
Then I create a new blank layer, name the new layer Brown Base and move that layer below the Shadow (duplicate balloon) layer. I then fill it with the brown color I selected above (#594e46):
With the Shadow (duplicate balloon) layer active I set the Blend Mode to Hue:
You might not be able to see all the touches of blue green and maroon. These would be the “local colors” I talked about earlier. I know, right now this doesn’t look so great, right? Bear with me.
Next, I activate that Brown Base layer and press Ctrl+Click on the Shadow layer to select the shape of the balloon (marching ants):
Then, I do the following:
- Go to the top tool bar and Select Layer->New->Layer Via Copy (or Ctrl+J) to create a new “brown” layer (Layer 2) using the balloon shape that I selected.
- I then hide the original Brown Base layer.
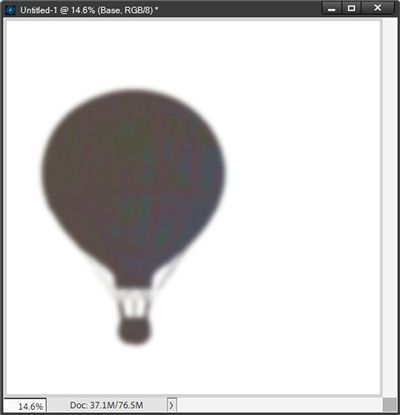
- Then I select both the Shadow layer and the new brown layer (Layer 2) and merge those two layers together. Because the Shadow layer had been on top, PSE keeps that name for the merged layer.
And here’s what my “new” Shadow looks like now:
Can you see how that shadow color is no longer one single flat color? This is what I talked about in the section above about shadow colors & values.
I can now delete the original brown layer. Before I move my Shadow layer below the original balloon layer I’m going to blur the edges. Remember a cast shadow generally has softer edges which will become even softer the further the shadow is from the image.
I’m going to use a Gaussian Blur:
As a starting point I’m going to use a Radius of 25 Pixels (you can blur as much, or as little, as you like):
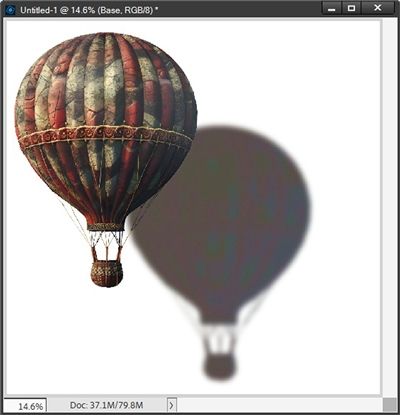
I can now unhide the balloon layer and move the Shadow layer beneath it:
Even though the Shadow layer was originally created at the exact same size as the balloon layer, because of the blur, I can already see the shadow peeking out around the edges of the balloon.
The next step is to move that shadow as far away from the balloon as I want. The goal here is to make it look as though the balloon is flying high above the paper:
Note: I did move the balloon to a different location close to the top of the page. This allowed for more distance between it and the shadow.
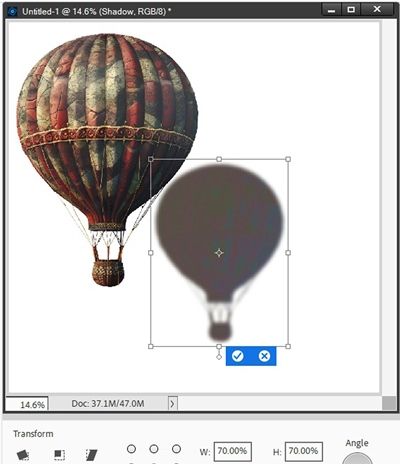
To make it seem as if the balloon is flying even higher, I can re-size the shadow to 70% (you can make yours as small as you like). To do this I select the Shadow layer and ensure the Move tool is active. Then I carefully grab one of the corner “handles” but try not to move it. This will cause PSE to open the Transform tool options:
Next, I ensure the Constrain Proportions box is checked. Then I set the W(idth) to 70%:
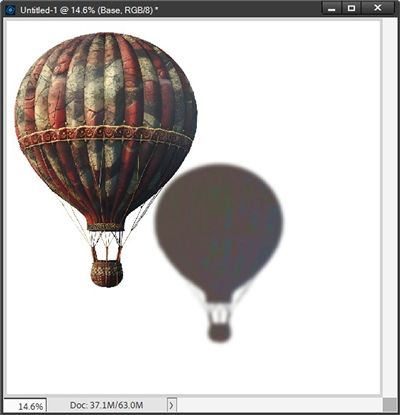
I click the check mark to confirm and now my balloon looks even “higher”:
Do you remember that typically the further a cast shadow falls from the object creating it, the lighter the shadow gets and the softer the edge often becomes? Clearly some adjustments need to be made to that shadow.
But before I start making any more changes, I’m going to pull in a nice landscape photo from Pixabay so I can make this all look more real:
With that landscape placed below the balloon & Shadow layers, I re-size and reposition my balloon & shadow to more appropriately fit within the landscape:
Before I change the hue (opacity) of the shadow I want to soften the edges more. I‘m going to use the Gaussian Blur again.
When PSE opens that dialog box, the Radius will be set to the same value as the last time it was used (for me a Radius of 25 Pixels). And PSE will automatically apply that blur to the Shadow layer.
I don’t think that’s quite enough so I’m going to gradually bump that up until I feel like the edges are softened appropriately…I’ll call it a WAG. If you aren’t sure what that means…check it out on the internet 😉 There’s really no specific guidance I can give you for picking the blur amount…mostly because it will vary for each instance so just go with what looks good to you.
I ended up setting the Radius to 40 pixels (you can increase the blur as little or as much as you like):
Clearly the shadow is still too dark. Now, I could just reduce the opacity. But after all that “science talk” about local colors, the best option is to once again change the Blend Mode for the Shadow layer. This time I used a Blend Mode of Difference:
I don’t know about you but, that shadow looks a whole lot more realistic to me than a plain old solid color shadow.
Today I tried to give you a good foundation for creating simple cast shadow. If you combine that with previous tips I’ve shared about “warping” shadows, you’re well on your way to creating a complex cast shadow like you saw in the photo of that woman at the top of this section.
I hope you give this technique a try the next time you want something to fly high off your page!
Additional Shadow Thoughts
Our world is made up of light and shadow. Shadows help to define the shape and form of objects all around us, and they provide perspective and grounding. We really should try to always create as realistic a shadow as we can.
Creating shadows requires thought about the light source. Don’t put too much pressure on yourself. This doesn’t have to be a complicated thing. Just rely on what you already know about Lighting Angles in PSE.
Also, don’t feel like you have to worry about “local colors” for shadows. If you’re happy working with a single “solid” color, then do that. But I would encourage you to at least give it a try.
I would also urge you to think outside the box and not always use the same color shadow for everything. And PLEASE, try never to use black! Don’t get me wrong. Black can have its place…just not very often.
Some of the most important things when creating shadows (not just these “complex” ones) are the hue, opacity and the crispness or blur of the edges. Remember this…most often the further away an object is from what is beneath it, the lighter and “softer” the shadow needs to be.
Realistic cast and form shadows require stronger concentration than many people realize. However, if you start slowly and follow the concepts I’ve mentioned, you will be off to a strong start in creating accurate shadows.
You can practice today by identifying cast and form shadows in the objects around you and looking closely to see the true value or color of each one. I think you’ll find it a good way to practice and perhaps you will begin to see shadows in a new way.
As always, if you have any questions or want to make a suggestion about a topic you’d like me to cover, please don’t ever hesitate to “Message Me”.
Thanks for reading this week’s Tuesday Tip. If you want to stay informed about new posts, just click “Follow Me” to stay in touch. I hope you have a wonderful week!
