The Right Selection
Making a clean selection easily in most graphics editing packages can be tricky. There are so many selection tools available and it’s hard to know which one is best suited for your desired result.
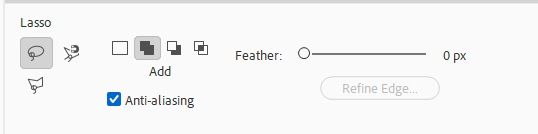
Photoshop Elements (PSE) provides selection tools for different kinds of selections. For example, the Elliptical Marquee tool selects circular and elliptical areas, and the Magic Wand tool can select an area of similar colors with one click. More complex selections can be made with one of the Lasso tools. You can even smooth the edges of a selection with feathering and anti-aliasing.
I’ve already written several posts that have shown you how to use some of the selection tools available in PSE. Most recently in my “Out Of Bounds Frame Or Spill Frame” post a few weeks ago when I talked about using the Quick Selection tool.
Today I thought it might be nice if I took some time to give you a handy primer on selection tool basics & provide you with some tips regarding some of the most used selection tools. One tip will be about a selection tool option that will make certain selections so much faster. Specifically, when we’re trying to select a single color that has minute, subtle varying shades within an element (such as a flower).
Selection Tools
Selections allow you to modify one area in an image without affecting the rest. Selections can be made with either a selection tool or a selection command (keyboard shortcut). Picking the right selection tool is key to being able to make a clean selection.
Selections define the editable pixels in a photograph or other image. They allow you, for example, to darken or re-color one area without affecting the rest. You can even paste something (from your clipboard) into the selection area! A selection outline surrounds the selection (marching ants), and can be hidden. You can edit the pixels inside a selection border, but you can’t access pixels outside the selection outline until you deselect the selection.
In the rare cases you might want to hide the selection outline, you can do this by going to the top tool bar and clicking View->Selection (Ctrl+H). Remember that the selection is still active, it’s just invisible. To bring it back simply press Ctrl+H again.
Before I go further, please remember that I use Windows and the current version of PSE (2024) so all of the steps that follow are accomplished using that software configuration. Since I do use Windows, only Windows shortcut keys will be shown. If you use a Mac, please refer back to my prior post about shortcut keys.
Some of my screen shots may look different than what you see on your screen depending on the version you are using. Regardless, the same methods should work in Photoshop or most other graphics editing software that features selection tools. If you find this not to be the case, please search the internet for tips/tutorials specific to the graphics editing software that you use.
Anti-Aliasing & Feathering Settings

Before I get into the specific tools, I want to talk just a bit about Anti-aliasing and Feathering. For the samples in the above image: 1 = no feathering or anti-aliasing, 2 = anti-alias only and 3 = with feathering. You can see how jagged the edges are in the first element. That’s what these tools are designed to “correct”.
These are terms that refer to smoothing the hard edges of a selection. Both anti-aliasing and feathering attempt to gently soften the edges of a selection as it appears on a background. There are no other settings when using anti-aliasing. It softens the edges the same amount on each selection. On the other hand, a value can be given to the feathering option. Feathering can be adjusted to merely gently soften the edges, or blur them to a great extent. A feathering value of “1” produces more of a blurred look than the anti-aliasing feature.
Anti-aliasing smooths the jagged edges of a selection by softening the transition between edges and background pixels. Because only the edge pixels change, no detail is lost. This option is available on more than just the selection tools. You’ll also find this option on the Eraser, Paint Bucket & Text Tools.
Feathering builds a transition between the selection and surrounding pixels. This blurring can create interesting effects but at times can cause some loss of detail at the edge of the selection. You can create a feathered selection with the Elliptical Marquee, Rectangular Marquee, Lasso, Polygonal Lasso, or Magnetic Lasso tool. You can also add feathering to an existing selection by going to the top tool bar and clicking Select->Feather (Alt+Ctrl+D).
I will admit, I can’t recall using either of these options very much when I’m making a selection. I do use anti-aliasing a lot when I use the Eraser tools. I have also used Feathering if I’m trying to create a vignette like this:
I’m not going to include any detailed references about how/when to use these options. If you’d like more information about them, I’d encourage you to search for other tutorials on the internet.
Layer Selection Tool
I’m going to start with a “tool” that a lot of people might not consider a true Selection tool. It’s something I’ve used for years and don’t know of any “menu” path that will achieve the same thing. I didn’t know what else to call this other than the Layer Selection Tool.
If I want to select an entire layer (excluding any transparent pixels), all I have to do is Ctrl+Click on the layer’s thumbnail. I then see the marching ants around the object.
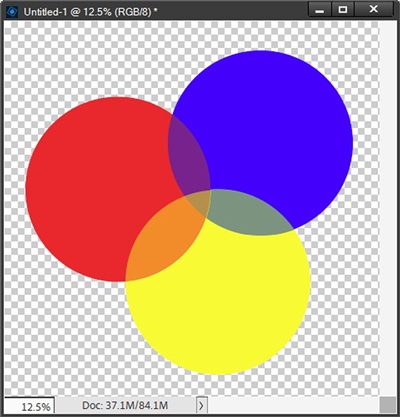
You might be asking why I’d want to do this. Well, there are lots of reasons. Here’s a fun example. Let’s say I have two circles of different colors that overlap one another like this:
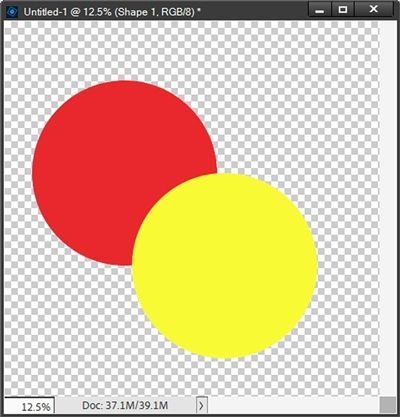
I want the part where they overlap (intersect) to show a blend of the two colors. And it’s is so simple to do this.
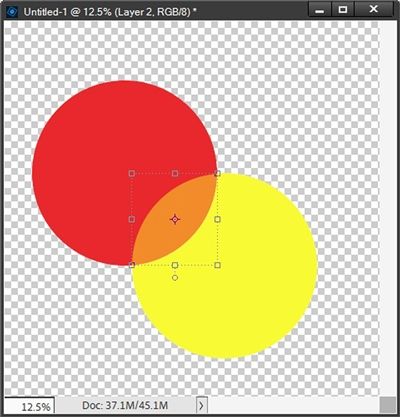
I Ctrl+Click on the red circle layer’s thumbnail and the marching ants outline that circle:

In order to select only the portion of the yellow circle that overlaps the red circle (current selection) I press Ctrl+Shift+Alt and click on the yellow circle layer’s thumbnail. Now the marching ants are only around where the yellow circle intersects with the current selection:

With the yellow circle layer active, I go to the top tool bar and select Layer->New->Layer Via Cut (Shift+Ctrl+J). PSE places this new “cut out” portion of the yellow circle on its own layer. All I have to do is change the opacity of this new layer to 50% and I get this:
I can add another circle and do the same intersection selections over the other two circles and end up with this:
Note: There is also a way to select intersecting sections within a given image using the Intersect with selection feature in the selection tool Options bar. I’m not going to go into that option today. If you want more information about intersecting selections, I’d encourage you to search for that on the internet.
There are many other times this layer selection “tool” can come in handy. Namely centering an element over another.
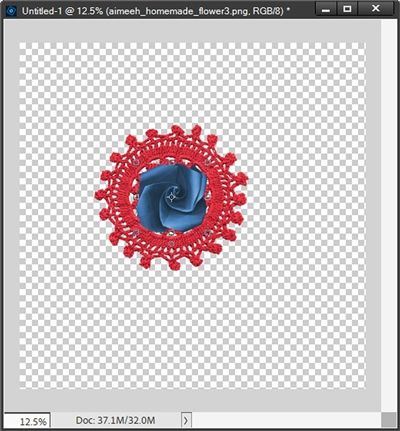
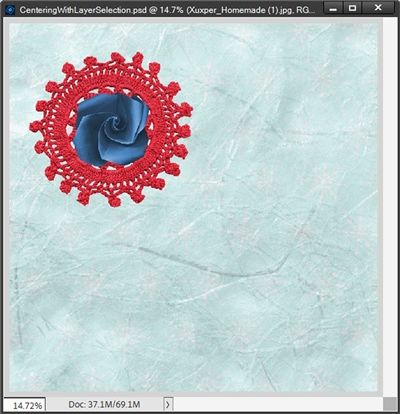
Here is a great example of how using the Layer selection “tool” is useful for centering. I have this doily and a rose in my file and I want to center the rose over the doily keeping the doily near the top left:

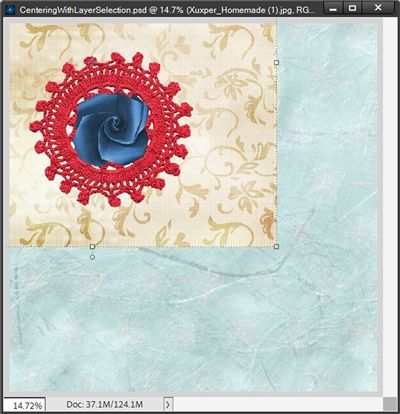
If I were to activate both layers in the Layers panel:
Then select the move tool and use the Align Center & Align Middle options:

I end up with this:
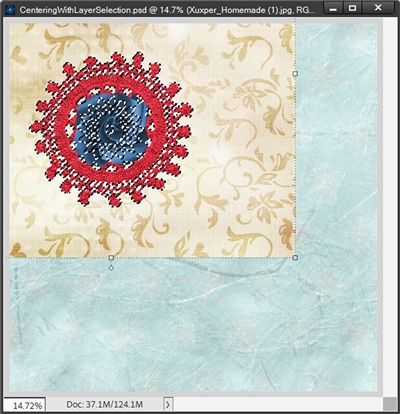
That’s not what I wanted…the doily moved. But if I move everything back to where it was and “select” the doily layer using Ctrl+Click I see this:

I now have marching ants around the doily. I then select the move tool (marching ants still there) and click on the rose layer (marching ants still around the doily). Now when I use the Align Center & Align Middle options, I end up with this:
The doily is exactly where I want it and the flower is perfectly centered over it.
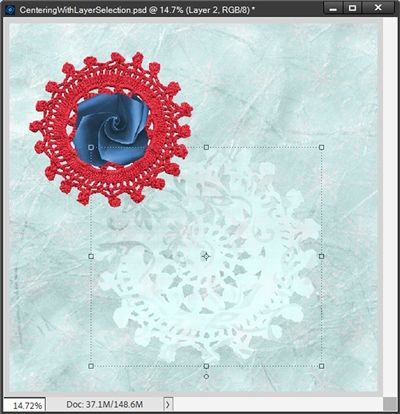
Another perhaps obvious option for using the Layer selection tool is to create a new layer from another…not a duplicate layer but a new (different) layer.
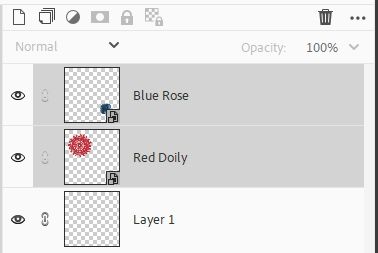
I’m going to use that same red doily & rose for this example. Now I’ve added a background layer:
I’d love to create an accent layer the same shape as the red doily. So, I’ve also brought in another paper for this accent and repositioned it so the portion I want to use as the accent is under the doily:
With the accent paper layer still active, I’ll “select” the doily layer (Ctrl+Click thumbnail) to get the marching ants:
I then go to the top tool bar and select Layer->New->Layer Via Copy (Ctrl+J) creating a brand-new layer from the accent paper using the selection I made of the doily. I then delete (or hide) the original accent paper layer. I can now manipulate that new paper accent any way I’d like (re-size, reposition, change blend modes, etc.). Here’s what I ended up with after some manipulation & blending:
Again, this Layer selection “tool” (Ctrl+Click thumbnail) can be used for a lot of things. I’m not going to go any further on this. I’m sure you can imagine other possible uses perhaps for creating a layer mask?!?
Rectangular & Elliptical Marquee Tools
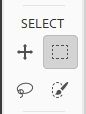
The image above shows the Rectangular Marquee tool icon. But you can get to the Elliptical Marquee tool by clicking that same icon.
The shape/function of these two tools should be fairly self-explanatory. The Rectangular Marquee tool selects square and rectangular areas whereas the Elliptical Marquee tool selects elliptical (oval) or circular areas. These tools are great for selecting large portions of an image that don’t need to be very intricate or detailed. For either tool you can use the Options bar to customize tool settings, like Add to Selection or Subtract from Selection, to get the exact selection that you want.
With both the elliptical and rectangular marquee tools, you can modify only the areas inside your selection with adjustment layers, or you can run a filter or action and it will only affect the area you selected. All you have to do is draw the selection area by dragging over the area you want to select.
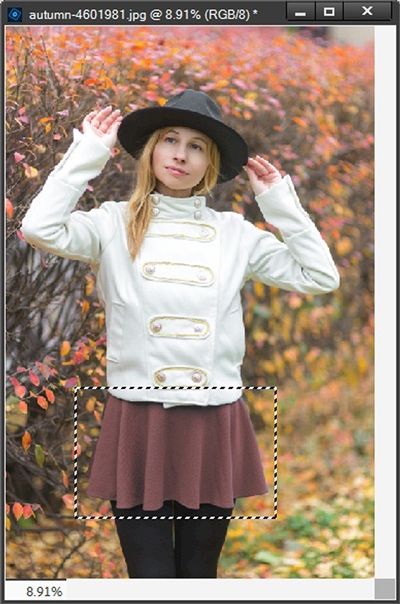
For example, let’s say you only want to change the color of a specific part of a photo. Using these selection tools is perfect for that. Take a look at this photos (from Pixabay):
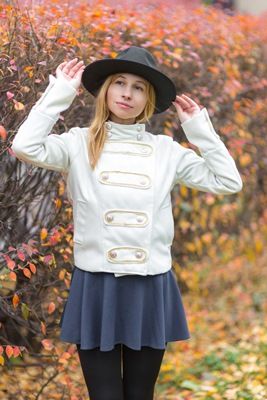
I want to change her grey skirt to a color that blends well with the fall foliage. All I have to do is draw a selection box around just her skirt like this:
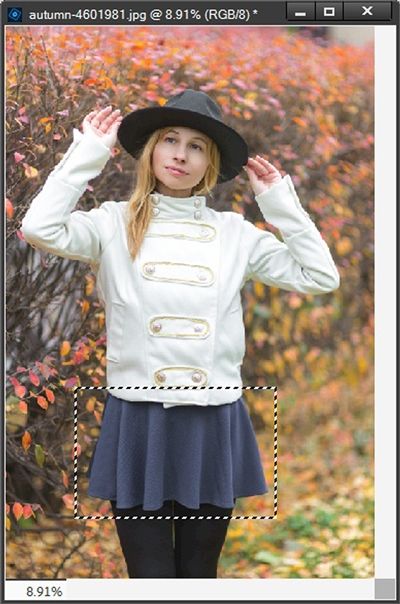
With that selection made I can now go in and change just her skirt. First, I set my foreground color chip to something that goes with the foliage. I ended up picking a rusty red color from the leaves (hex value #c24e51) and I copy that color value to my clipboard (Ctrl+C).
Then from the top tool bar I select Enhance->Adjust Color->Replace Color. This opens the Replace Color dialog box:
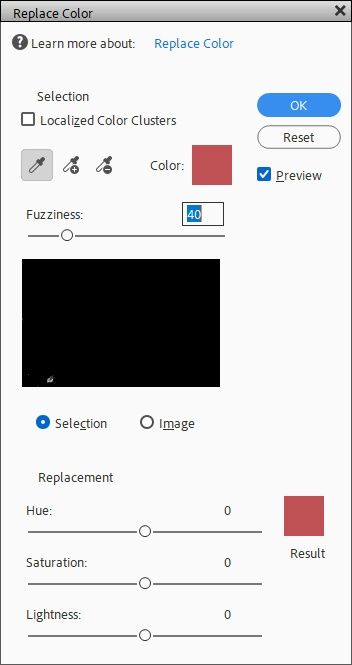
You can see that both the Selection & Replacement color chips in this dialog box are now already set to the rusty red color that I chose. So, next I need to select the color of the skirt that I want to change. As soon as I do that both color chips change to that color. That’s why I had to copy the “red” color value to the clipboard.
All I have to do is change the Replacement color to the hex value I copied to my clipboard. I can then select the Add to Sample option and click around the skirt until I have replaced all of the grey color in the skirt:
Here’s an example using the Elliptical Marquee tool. Take a look at another photo (from Pixabay):
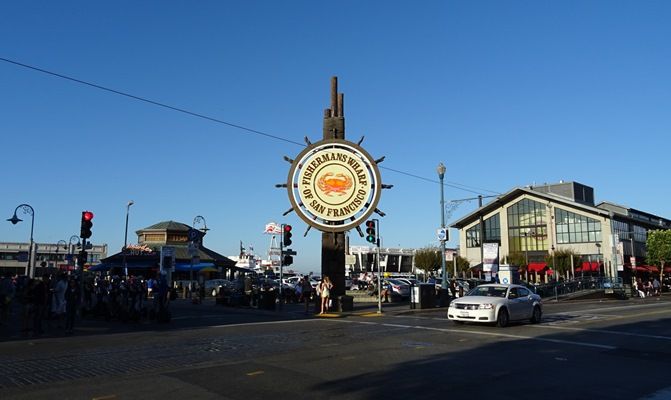
I want the center of the sign to show up a bit more vibrant than it currently does. So, using the Elliptical Marquee tool I’m going to draw a circle around the part I want to brighten:
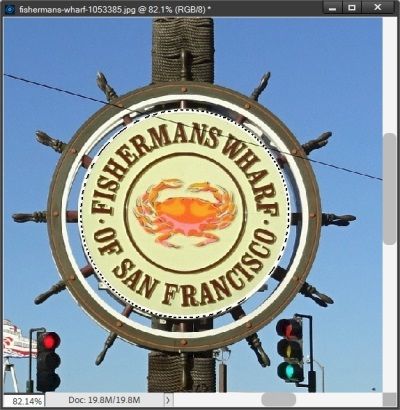
I zoomed in quite a bit so you could see this better. Now all I have to do is select Enhance->Adjust Color->Adjust Hue/Saturation (Ctrl+U) and change the Saturation to +84 & the Lightness to -18 to get this result:
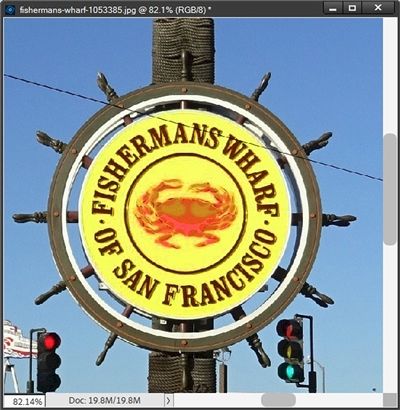
I like how the sign “pops” a little more now. And this time I did draw my circle from the center out.
Anytime you’re making a selection with the Rectangular or Elliptical Marquee tools & you want a perfect square or circle just hold down the Shift key and drag diagonally in any direction. If you want to draw from the center out, press the Alt key as you drag.
Note: If you’re trying to draw a perfect square or circle from the center out you need to press Shift+Alt as you drag your selection. If you’re having trouble drawing a perfect square/circle with or without the Alt key…you may need to ensure that you have selected the New Selection setting in the tool options.
While making your selection if you find that it’s not quite lining up exactly where you want it, you can move your selection by holding down the spacebar and dragging your cursor (the selection) to the desired spot. You can then release the spacebar and continue dragging it to size. But you have to do this BEFORE you stop dragging (releasing the left-click button).
If you’ve already released the left-click button…no worries. You can still change the placement of the selection by using the arrow keys to move it up/down or left/right. You just won’t be able to resize the selection at this point.
A great (and often overlooked) use of these “marquee” tools is centering something within a certain section of another image or a portion of your layout.
Take a look at this layout I’ve almost finished:
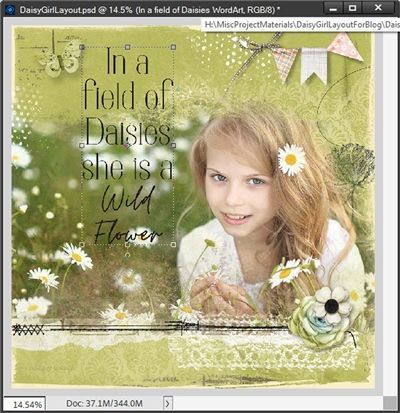
I have everything done except for proper placement of the word art. I want that word art centered horizontally between the girl’s right (our left) shoulder and one of the daisies on the left edge of the page. I also want it centered vertically between the stitching and the top of the “paint spots” also near the left edge of the page.
Now, I could just eyeball it. But there’s a very simple way to be sure I have it placed exactly centered within the area I just described.
All I have to do is draw a selection box using the Rectangular Marquee tool in the space I want to center the word art. Because I’m not looking to modify something in the selection area it doesn’t really matter which layer is active when I make this selection. I’m only defining an area. I hope this makes sense. The selection looks like this:
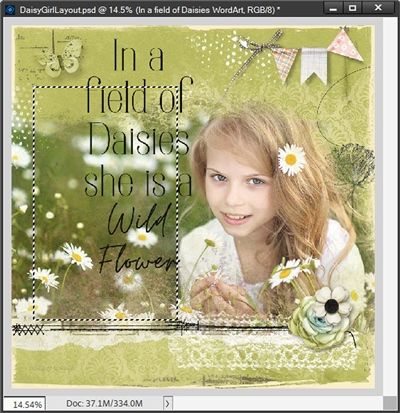
You should be able to see the marching ants around the selection area. Then I click on the word art layer to make it the active layer & select the Move tool in the leftmost tool area of the work space.
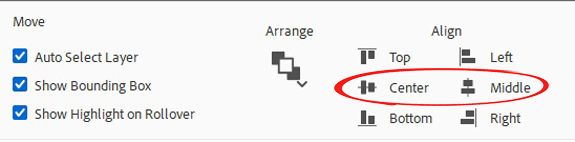
Then within the Move tool options I select the Align Center & Align Middle options:
As soon as I do that the word art is centered perfectly withing the area I defined:
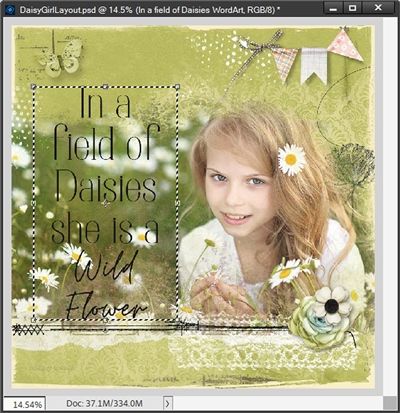
I can then just deselect the selection (Ctrl+D or Esc) and my layout is finished. If you’d like more details about this layout, you can see it in my 2024 Gallery.
Now on to some of the other selection tools…
Main Selection “Types”
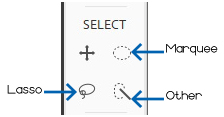
Looking at the image above you can see the three main types of selection tools available in PSE: Marquee, Lasso & what I have called “Other”.
As I’ve already discussed, the Marquee tool group includes Rectangular & Elliptical. The Lasso tool group includes Lasso, Magnetic Lasso & Polygonal Lasso. The “Other” tool group includes Quick Selection, Selection Brush, Magic Wand, Refine Selection Brush & Auto Selection Brush.
I’m not going to go into detail on all of these but I’ll give at least a brief description for each of the remaining tools. I’m going to start with the most commonly used tools (at least for me) providing a bit more detail on those. I’ll finish up with brief discussions on the rest.
Magic Wand
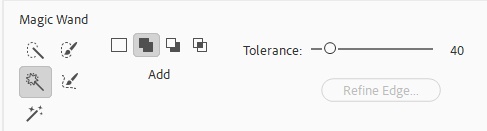
The Magic Wand tool selects pixels based on their color. It is incredibly accurate and fast, but it is not discerning. Specifically, there are times when not all shades of a given color will be detected as desired. It will select pixels based upon color, not whether they are part of the object you are trying to select.
For example, if you are trying to select a blue plane from a blue sky, this may not be the tool for you. However, if you are trying to select a red plane from the same blue sky, this tool just might do it quickly and easily.
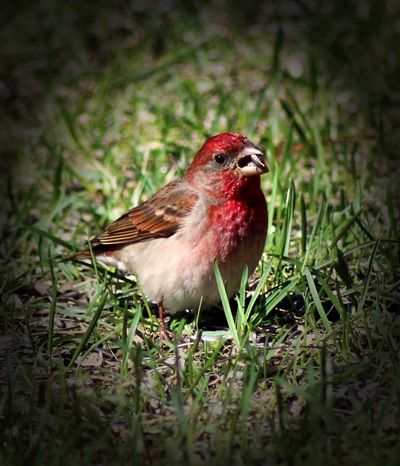
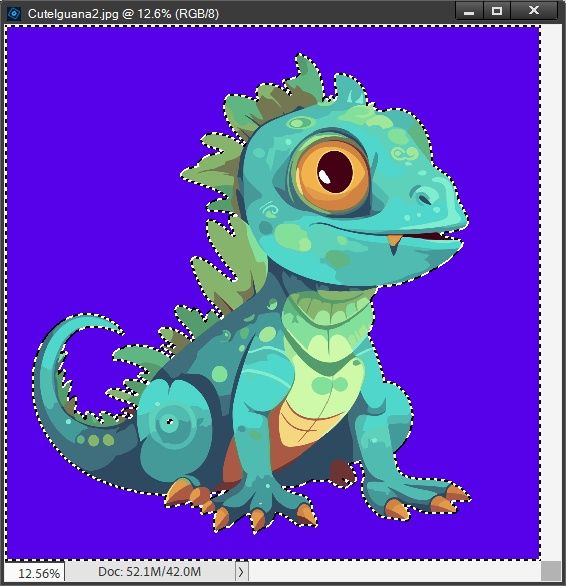
A lot of tips/tutorials that are out on the internet will tell you to use the Magic Wand tool to quickly select an object you want to isolate. This works great if the object is a solid color as with the background behind this cute little iguana:

I want to change that blue background. So, I use the Magic Wand tool and click on the background and my selection looks like this:
You should be able to see the marching ants around the entire area that is blue. I can then either delete the background or change it to a completely different color like this:
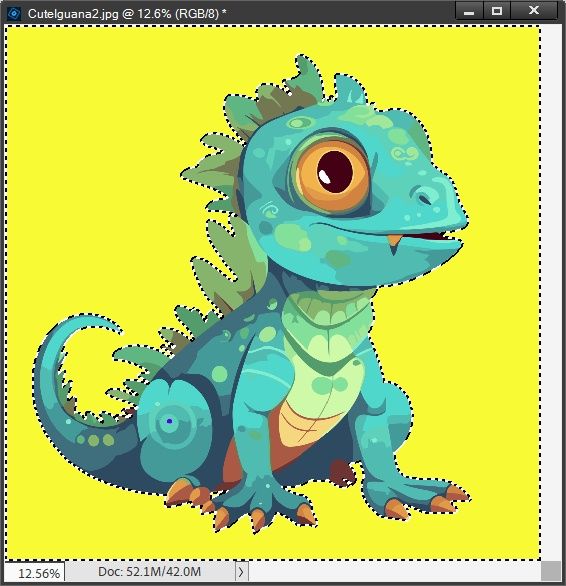
Easy peasy…that blue background has been changed to yellow in just a few clicks.
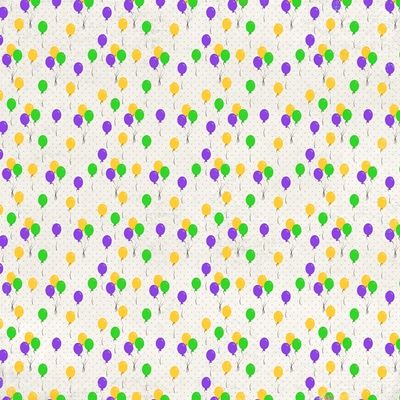
I can do the same thing with a piece of paper having well defined crisp colors such as this one:
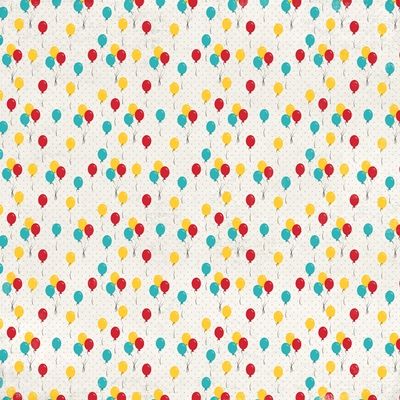
I was easily able to first select the red balloons and change them to green. After closing that selection (Ctrl+D or ESC), I then selected the aqua balloons and changed them to purple. Again, with just a few clicks I have this the new paper:
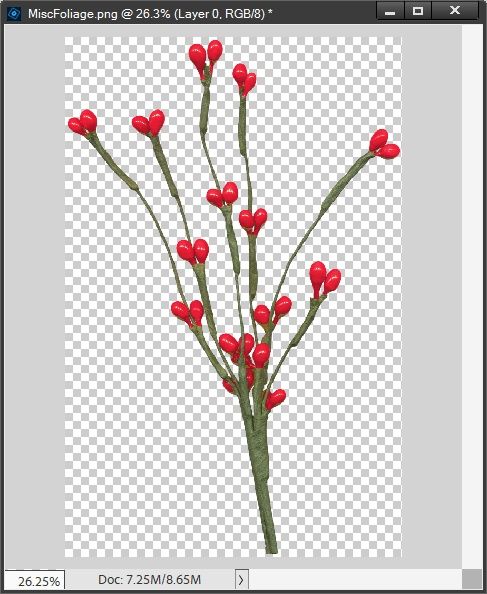
But let’s take a look at an element that isn’t going to be so easy. I’m using a simple foliage element from my stash:
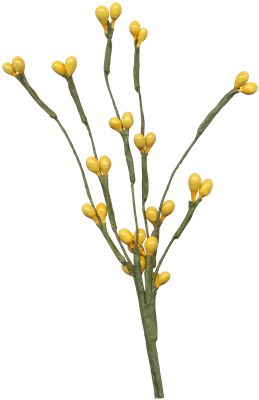
I want to change those yellow “berries” to red. Let’s see what happens when I select the yellow using the Magic Wand tool:
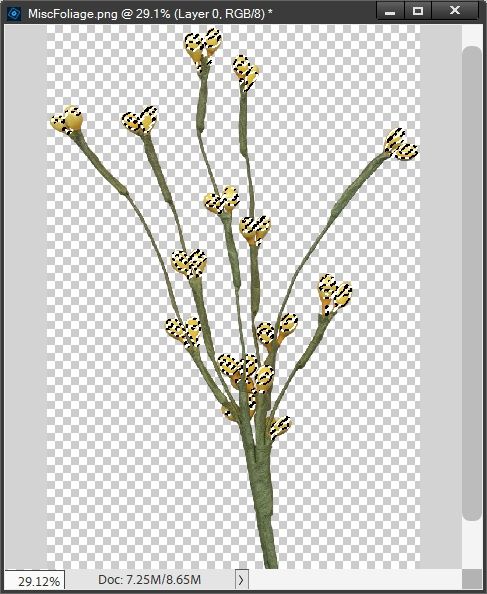
It may be hard to see but not all of the yellow was selected. That’s because there are varying shades of yellow on those berries. Now clearly, I could go in and just adjust the selection with the “Add” option in the Magic Wand tool area. But that’s going to be time consuming and may still pick up something other than the yellow, depending on where I click.
There’s a much quicker method that a lot of people don’t know about…
Quick Selection
Now with that same foliage element, rather than the Magic wand, I’m going to use the Quick Selection tool.
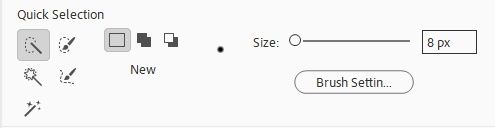
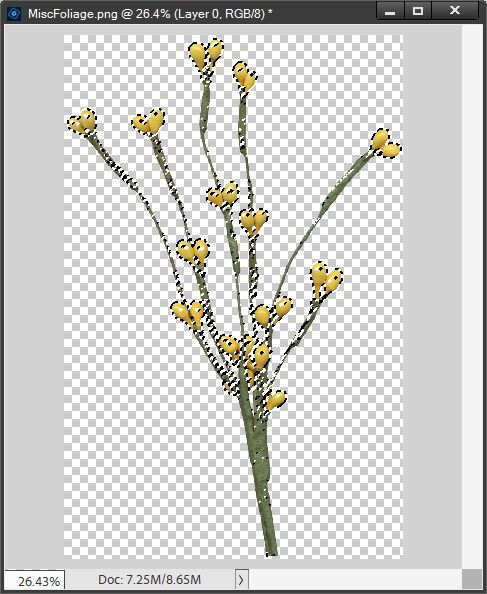
Because those berries are pretty small, I set the selection “brush” size to 8 pixels. I then clicked a medium shade of yellow on one berry:
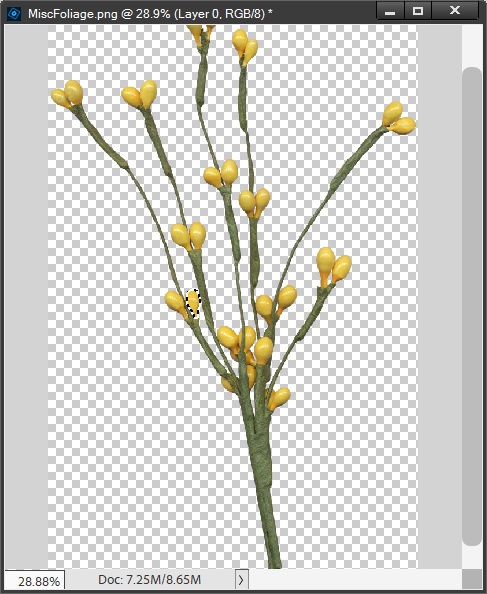
You might be able to see that there is currently only one berry selected. Yes, I could just use the “Add” option in the Quick Selection tool area. But again, that’s going to be time consuming. So how am I going to make it quicker? Keep reading…
Select Similar
That’s right. There’s this often-overlooked selection option that makes color selection so much easier; Select->Similar:
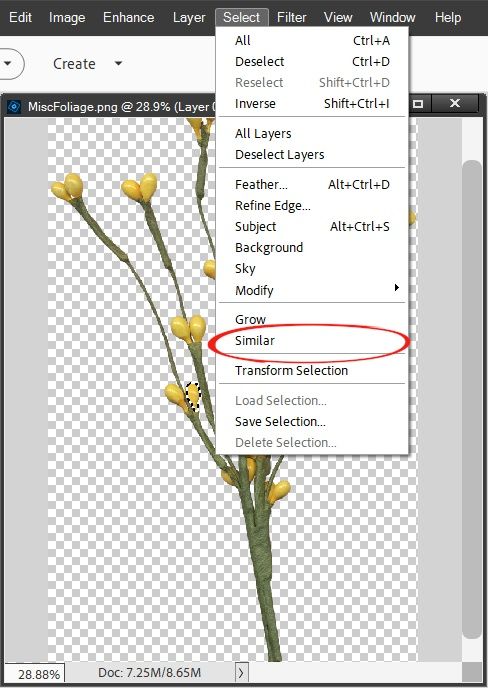
By using Select->Similar (after the initial Quick Selection), in just one click I have all the yellow berries isolated:
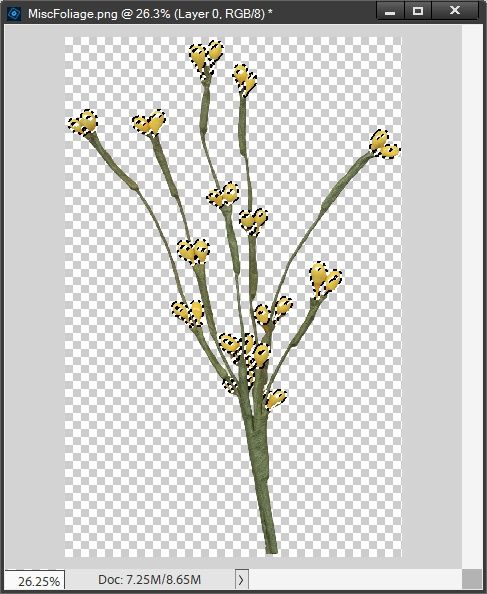
Is it a perfect selection? Perhaps not but I’m going to change the yellow to red (without making any selection adjustments) by using the Hue/Saturation tool (Ctrl+U) and checking the Colorize box. Let’s see just how close the selection was:
Yes, there are some areas that didn’t get changed to red but they’re very hard to detect unless you zoom in pretty close. Chances are, they wouldn’t show up when using these berries in a layout.
But you probably know that I would take the time to make those adjustments all due to that Type-A personality of mine 😊. Was it really worth the time? You tell me:
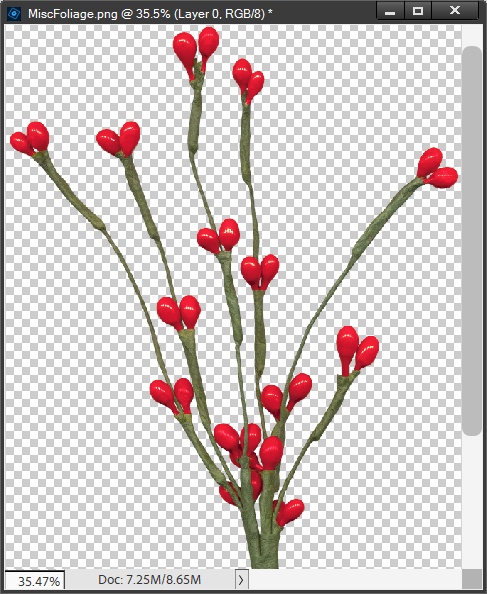
Personally, I don’t see enough difference to warrant having spent the extra time it took to make the adjustments. And that’s a shocking statement from me 😉
Now I’m sure you’re wondering if Select->Similar will work with the Magic Wand. The short answer is “Not really!” You can try it for yourself but for me it didn’t seem to change anything the first time I did click Select->Similar. So, I tried doing that two more times and this is what I ended up with:
Clearly you can see that some of the green ended up in the selection. Definitely not what I wanted. But I’d encourage you to experiment to see if it works for you under different circumstances.
Lasso Selection Tools
Lasso tools allow you to make free-hand selections by simply drawing a selection around a specific portion of an image in free-flow with no set shapes.
The “primary” Lasso tool draws freehand selections. This is considered to be the easiest of all the selection tools in the PSE arsenal and here’s why: select the Lasso tool, choose your starting point and just move your cursor in the shape you want to select, clicking whenever the angle/direction changes. Repeat until you’ve completely outlined the entire shape.
The Polygonal Lasso tool draws multiple straight-edged segments of a selection. It provides a “map” of sorts for your selection. As you move the cursor around the parts of an image you wish to select, PSE creates markers (or pointers) each time you click along the way until you get back to the starting point.
The Magnetic Lasso tool is great for beginners. As you draw your selection PSE automatically snaps to contrast edges as you drag over the image/photo. While using this tool, it attaches small anchor-like points to the selection, making it easier to modify later. I’ve touched on this tool in a prior post about the Color Pop technique.
Selection Brush Tool

The Selection Brush tool makes selections two ways: you can paint over the area you want to select in Selection mode, or you can paint over areas you don’t want to select using a semi opaque overlay in Mask mode.
You can first make a rough selection with a marquee tool, Quick Selection tool, or other selection tool, and then fine-tune your selection with the Selection Brush tool. You can add to the selection using the Selection Brush tool in Selection mode, or subtract from it in Mask mode.
Refine Selection Brush Tool
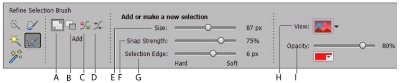
Refine Selection Brush tool options: A. Add to selection B. Subtract from selection C. Push Selection D. Smooth Selection E. Size F. Snap Strength G. Selection Edge H. View I. Opacity.
As I’ve already said, making selections is a crucial part of editing images. PSE has the Refine Selection Brush tool to assist you in creating the most precise selections possible. This tool helps you add or remove areas to and from an existing selection by automatically detecting the edges.
The cursor for the tool is a set of two concentric circles. While the inner circle is the size of the brush, the outer circle indicates the area within which to look for an edge.
Note: In my opinion, this is one of the more robust & complicated selection tools to use. While it allows you to create extremely detailed & precise selections on an object that has fuzzy or wispy edges (such as hair or animal fur), it requires a great deal of patience and practice to master this tool.
Auto Selection Tool
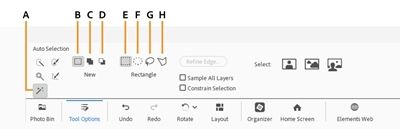
Auto Selection tool options: A. Auto Selection Tool B. New Selection C. Add to selection D. Subtract from selection E. Rectangle F. Ellipse G. Lasso H. Polygon Lasso
The Auto Selection tool was first introduced in PSE 2018. If you have an older version of PSE, you can skip the remainder of this section.
With the Auto Selection tool PSE attempts to automatically select an image or object within by having you draw a selection shape around it. This tool may not always perfectly select the entire object at first. However, it makes a terrific starting point from which you can then refine the selection it makes. It is fairly easy to use.
The shape you draw doesn’t have to be precise; it just needs to outline the object you want to select. Just draw around the object you want to select in the image. The selection border appears. For better results, select one object (or major part of one) at a time. After you select one object (or piece), you can use the Add to selection option to add another portion to your selection.
Some Extra Tips On Selections

Using a combination of selection tools you can make precision edits, composite (or “photoshop”) photos together, change out backgrounds and a whole lot more!
As far as I’m aware, Select->Similar only works with the Quick Selection tool. There really aren’t any good tutorials out there that deal specifically with “Selecting Similar”. I learned this tip ages ago in a class I took about using the Adjustment Layer (Hue/Saturation) from the Layers Panel. This class was offered for members of the PhotoEditing & Digi-Scrap Academy.
Using Select->Similar is a great option when trying to isolate pieces of word art that you want to re-color.
When using the Quick Selection tool Enable Auto-Enhance to reduce rough edges of the selection in transitional areas.
Use Select->Deselect (Ctrl+D or ESC) at any time to deselect. If you accidentally deselect your selection, use Select->Reselect (Shift+Ctrl+D) to restore the selection.
If you’d like a bit more control over your selection, try masking by following these steps:
- Before you make your selection duplicate the original.
- If necessary, simplify the duplicate layer.
- Make your selection on the duplicate layer.
- Click the Add layer mask icon in the layers panel. This will create a mask from your selection.
- Double-click on the layer thumbnail & re-color or otherwise manipulate your selection.
- You’ll easily be able to see what areas may need to be removed or added to the selection. You can then do this by hiding areas (black) or adding areas (white) on the layer mask.
Oftentimes this masking technique is easier than using the Add/Subtract options on the selection tool area. Not always any less time consuming but you will have more precise control.
Remember…the more you work with these selection tools the better results you’ll get over time.
And, if you have any questions, need a bit of help, or want to make a suggestion about future topics you’d like me to cover please don’t hesitate to “Message Me”.
Thanks for reading this week’s Tuesday Tip. If you want to stay informed about new posts, just click “Follow Me” to stay in touch. I hope you have a wonderful week!
