It’s Overflowing!
Many people aren’t sure what the difference is between an Out of Bounds effect and a Spill Frame. First and foremost, there is a technical difference. I believe the difference is based mostly on the precision. A Photo Spill Frame is out of bounds but an Out of Bounds effect is not necessarily a Photo Spill Frame! Confused?
Typically, the Out of Bounds effect results in only a very finite portion of the photo extending beyond the edge of a frame. This can happen in multiple locations around the frame but not often. You will almost never see the entirety (or additional portions) of the original photo showing up outside the frame. That doesn’t mean it can’t happen…it’s just not the norm. Here’s an example of an Out of Bounds effect with an entire photo still showing that makes some sense:

See how the “lifted” frame accentuates the primary focal point of the picture yet you can still see the overall image? To get this look there’s still a fair amount of precision required. Unlike what you might be able to accomplish with a Spill Frame.
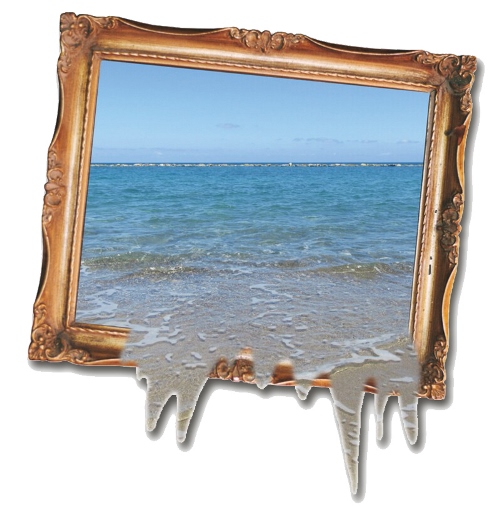
A Photo Spill Frame effect has something spilling out over the frame. While it’s still technically an out of bounds effect it’s not anywhere near as precise as an Out of Bounds effect. Water and waves are perfect subjects for this effect but not the only possibilities. Consider anything that can, well, spill or overflow such as this:

The technique used in each case is also different. Today I’ll try to explain the difference. I’m going to start with the Out of Bounds effect as it is more complex.
Out Of Bounds Frame
Out of Bounds (OOB) is an interesting photo effect where the object or scene in the image seems to jump right out of the photo or its borders/frame. Done correctly, it adds the illusion of 3-dimensionality to a flat photo. Getting an interesting OOB effect depends largely on the photo angle and the overall execution of the concept.

It is lots of fun to create an OOB effect. You can use just about any photo editing software. With some imagination, creativity and basic photo editing knowledge you can create an amazing OOB image that captivates the viewer’s attention.
The “bounds” generally refers to the photo’s frame or edge. When I think of the Out of Bounds effect I think about arms, hands, heads, leaves, or something similar extending beyond the frame’s border(s).
Note: Please remember that I am using the current version of Photoshop Elements (PSE 2024). Some of my screen shots may look different than what you see on your screen. All of the steps that follow will be done using that software. I’m fairly certain you can accomplish all of this in most any graphics editing software. Just look for tutorials specific to your chosen software.
Creating The OOB Effect
There is an Out of Bounds (OOB) feature in PSE that will guide you through the process. The image above was created using this feature. You can find this OOB feature using the Guided option at the top of the main work area in PSE. Depending on what version of PSE you have, how you ultimately get to the OOB feature will vary. There are some great tutorials about this feature and you can search for those on the internet.

Today I want to help you work with OOB independently. It’s pretty difficult to find a layered PSD file for a precise OOB. Obviously, it would be next to impossible for a designer to create something that would fit your particular photo. But there are some Photoshop Actions out there that will help you if you don’t want to use the Guided Edit feature. One of my favorites is “Out Of Bounds” by PanosFX and it’s free!
Some photos lend themselves better than others to a precise OOB effect. Action photos tend to work the best with this effect. But other photos will work depending on how you apply the effect. Let’s take a look at a few examples:

Of the ones pictured above, I’m sure the most obvious choices might be the kayak, flying swan & flapping goose. These are what you’d typically consider action shots. The other three…not so much. But every one of the photos above could be used with the OOB effect.
Now, I have to say it’s really not all that hard to do this on your own. It does take some practice and will require a certain amount of skill & patience using the PSE Selection tools. But it can be done. And I’m going to show you how to create several different effects. A couple that might just surprise you.
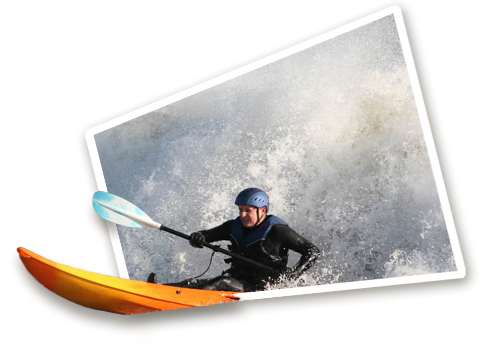
Basic “Action” OOB
I’m going to use the photo above that shows a man in a kayak. This is a classic action shot that lends itself perfectly to the OOB effect.
Note: Before I begin, I want to remind you that I have a Windows operating system. So, all of my keyboard shortcut commands will be Windows based. If you are a Mac user, I’m going to presume that you already know the corresponding keys. Therefore, I will not include those in each step. But you can also refer back to my prior post about shortcut commands.
Moving on…with the photo open in PSE, the very first thing I do is duplicate (and hide) the original photo layer (Layer 0). I rename the new layer Original Image. I do this to preserve the “background” photo. All other actions I take in the following steps will be based around this new Original Image layer. And this is what my Layers panel looks like:

Next, I use the rounded rectangle tool to draw a white frame layer over the portion of the photo I want to remain “inside” the frame. I name this layer Frame. Then I rotate it a bit to create a more interesting angle.

And this is what my Layers panel looks like:

Then using Shift+Ctrl+Alt, I skew the frame for an even more dramatic effect.

Once I’m happy with the frame shape I hold down the Ctrl key and double-click the Frame layer “thumbnail” in the Layers panel.

I now have the “marching ants” around the frame.

Now, I select the Original Image layer (I still see the marching ants around the frame) and create a new layer via copy. I name this new layer Inside Photo, move the layer on top of the Frame layer and resize the Inside Photo to fit nicely in the frame.

And this is what my Layers panel looks like at this point:

Now, here comes the trickier part…
For now, I’m going to hide both the Frame & Inside Photo Image layers. All I see is the Original Image layer and I ensure that it is selected. Using the Quick Selection tool I draw around the area of the photo that I want to be outside of the frame.

Again, I see marching ants (more detailed image below). My selection isn’t 100% perfect and I could tweak it a bit using the Add/Subtract options in the selection area. But I’m trying to make this easier/quicker for you. I’ll try to explain a different selection option a little further down.

With the selection made I once again create a new layer via copy. I name this new layer Outside Photo and move the layer on top of the Inside Photo layer. Then I hide the Original Image layer & unhide both the Frame & Inside Photo layers.

This is what my Layers panel looks like at this point:

With the Outside Photo Layer selected, I add a layer mask and just brush away the parts I don’t want to show outside the frame.

Once I’ve gotten rid of everything that I don’t want outside the frame the Layers panel looks like this:

And this is how my photo ended up.

Looks pretty good right? I could just save the image “as is” as a PNG file. Then add a shadow to the new image and call it a day.

Ignore the grey background. I added that so you could better see the shadow. But now I’m going to take this shadowing one step farther…I’ll explain why in a minute.
I now want to brush away anything (on the Outside Photo) that might be showing up “inside” the frame. I switch to a square brush sized at about 10 pixels (px) to start masking away along the frame’s edge. Note: I zoom in pretty tight during this process so I can get right into the “corners”.
I then click as close to the point where the top of the oar first touches the inside edge of the frame. Then while holding down the Shift key, I click a second time as close to the point where the top of the kayak first touches the inside edge of the frame.
I do this so I can ensure I know exactly where the “inner” frame edge begins in relation to the “inside photo.
I now hide the Inside Photo layer before I go on to brush way any remaining parts of the Outside Photo that might still be “inside” the frame. You can see below how easy it is to see what else needs to be “erased”.

Now the Layers panel looks a bit different because you can see more masking on the Layer Mask:

So, why do I go this extra step? I intend to put a shadow on the part of the oar that extends beyond the frame. If I don’t erase all of the extraneous portions of that Outside Photo, I’ll end up with shadows in places I don’t want to see shadows. Like this:

See how there are shadows along the left edge of the photo, across the top of the kayak where it crosses the frame, around the oar and above where the cord is that runs from the oar to the kayak? Those definitely don’t belong.
Now some people might want to leave the shadow around the oar and where the kayak crosses the frame. They think this will add a more 3D effect. Truth be told, if you’ve read my post about shadows & lighting angles, you know shadows in those locations would seem unnatural. But you could leave them if you really want to be dramatic. Clearly, the edge of the photo and the cord should not have shadows. So, one way or the other cleaning up that “outside” photo is necessary.
Once I have the Outside Photo layer all cleaned up it’s time to put the final shadows on. I’m going to start with the Outside Photo layer first because it’s a bit trickier.
Before moving on, I simplify that Outside Photo layer. Now I can add the shadow but I’ll need to put this shadow on its own layer. Remember, I use PSE so this isn’t as easy as it may be in full Photoshop (or other graphics editing software).
If you don’t already know how to do this, I highly recommend that you check out this video tutorial from Fiddle-Dee-Dee Designs. I could go into all the steps here but this post has already gotten really long.
With the shadow layer created, I move it to below the Outside Photo layer. Here’s how the Layers panel looks now:

I still have one problem, there’s some shadow where it doesn’t belong…

If the shadow wasn’t on its own layer, I wouldn’t be able to fix this. But now it’s a simple matter of going in and erasing the shadow where it doesn’t belong. And once again, I use a layer mask to do this as it’s the non-destructive method and will be easier to fix if I make a mistake.
Then I add the shadow to the Frame layer and it’s all finished…
As I said above, I could have just saved the OOB Kayak Photo as a PNG file and added a shadow to the whole thing but there would be one thing missing. Take a look again at the one with a “simple” shadow around the “final” image from above:
You see how there’s no shadow under the oar where it crosses over the frame? I know for some that may not be a big deal or even noticeable. But if you’ve been following me for a while, you know that this just wouldn’t fly with my Type-A personality.
Sometimes it’s the little things like this silly shadow that can have a big impact. For me…adding that extra step is worth all the effort.
There is one thing I do want to clarify. I could have eliminated a lot of the masking/erasing on the Outside Photott layer if I had done a more precise selection. If I had used the Magnetic Lasso tool versus the Quick Selection tool, I could have drawn my selection more carefully around the oar & kayak. Like this:

Over the years, I’ve found there’s a bit of a trade-off whichever tool you decide to use. The Quick Selection tool is just that…quick. Whereas the Magnetic Lasso is more precise but takes a bit more skill/patience and time.
I’ve found that either way I end up needing to mask/erase something. And honestly, most of the time I’d rather select too much over not enough. I’d suggest you experiment with both tools and see which one works out best for you. Watch for a future post with more information about selection tools!
Note: I’m not going to keep showing images of the Layers panel for the remainder of this post. I only wanted you to see them during this first part hoping to keep you from getting completely confused with all the layers. After seeing how things look during this part you should be able to follow easily during the remainder.
Pop Up Effect
The Pop Up OOB effect is a dynamic 3D Photoshop effect. Certain parts of an image appear to pop out from the image frame. I’m not sure how popular it is but it is a fun effect.
I’m going to use a photo of a little girl on the lawn. This definitely isn’t an action shot. But wait until you see the effect.

Most of the steps I described above with the kayak photo will be used for this. The most striking difference is I want to select only the little girl (all of her). Sadly, prior to version 2024, there’s no Remove Background Feature in PSE. Since I’m using PSE 2024, I could easily remove the background. But I know that a lot of people may not have this version and will be on their own for removing the background. So, I’m going to pretend I don’t have that option and try to help you through this.
I could use the selection tool of my choice and select just the little girl & create a new layer with her alone. But anytime I’m working with a photo that includes hair…it can get pretty tricky and time consuming to get a clean selection that doesn’t include some of the background. Yes, I could either refine the selection or mask away part after I’ve created the new layer. But that gets very tedious. Admittedly, the hair in this photo isn’t too bad because it’s not windy. But it’s still hair & that’s always tricky on some level.
There’s actually a much faster way I can remove this background. I don’t know if you saw my April 2023 post about a great tool that I found last year…RemoveBG. Let me tell you, it’s no joke and makes background removal so much quicker. Best of all it’s free!!!
I used RemoveBG to get rid of the background and here’s how it looked:

Looks pretty great right? And it only took me a matter of seconds (I kid you not). It’s not 100% perfect. You can still see some grass around the bottom. Clearly, I could take some extra steps to make it a bit closer to perfect. But it certainly is sufficient for what I’m going to be doing so I’m good with it.
I do need to make you aware, when using RemoveBG if you don’t create a new Kaleido Account you can only download a small “preview” version of the results. So, what is KaIeido? Kaleido is the company behind RemoveBG. They use Artificial Intelligence (AI) methods to edit photos & videos. The account is free (unless you upgrade). But based on the website it appears it still only gets you 1 free “full-size” image.
I can tell you from my own experience that the free preview image has always been sufficient for my needs. It’s small but it is at high resolution (300 dpi). In this particular case, the little girl preview was only 611 x 409 pixels (px) while the full image would have been 2868 x 1920 px.
I did select to use the free preview. All that meant was I needed to resize to match the original photo. And that wasn’t a big deal.

Note: For illustrative purposes only, in the image above the girl is slightly offset from the original so you can see that resizing worked with no loss of quality.
This new layer of the little girl (no background) became the Outside Photo.
Aside from this, I followed the same steps as above in the Basic “Action” OOB section to create the Frame and Inside Photo layers. In this particular case I was able to apply a shadow to the little girl and frame without any extraordinary editing so that was easier. For fun, I used a gradient fill for the background instead of leaving it blank. And here’s the little girl now:

How fun is this? And here’s another example using a different type of photo just to give you even more ideas:

Perspective Pop Out Effect
The Perspective Pop Out OOB effect is a very dynamic 3D photo effect as it accentuates the perspective in the photo. Again, I’m not sure how popular this effect is either but it is an interesting effect.
I’m going to use this lighthouse photo that I got off Pixabay:

The steps to achieve this effect are really going to be very similar to the pop up of the little girl.
I again used RemoveBG to get rid of the background. Well, most of it…this time it didn’t remove all the background. But I went in and cleaned it up by masking away the parts I didn’t need. I eventually ended up with this:

I then proceeded with the same basic steps from above only this time the walkway became the Outside Photo layer and only a portion of the original photo ended up as the Inside Photo Layer giving me this result:

For some variety, I created 2 different backgrounds to give you some ideas about what you can do with this Perspective Pop Out. On the first one I just expanded the original photo so only the sky would be visible behind the OOB image:

For the second option I basically used this new background and clipped it to a mask so it looked like the image was “floating” in the clouds:

An idea for how to incorporate these Perspective Pop Outs into a layout would be to have the OOB image touch the edge of the paper or a border of some type. I used Layer Works 704 (modified) from Katie Pertiet Designs to create this layout as an example:

You can see more details about this layout in my gallery.
I hope I didn’t confuse you and you’ll have some fun experimenting with some (or all) of these OOB options. And please feel free to search the internet for Out Of Bounds photos to find other ideas about what you can do with these techniques.
Spill Frames
Well, this post got waaaaaaaaay longer than I anticipated and I don’t want to risk overwhelming you today. Though I suspect that might already be the case 😉 So, I’m going to save Spill Frames for next week.
I hope you’re not too disappointed and I appreciate your patience. Please check back next week for Part 2!
Most Important Tips About OOB
Let your imagination be your guide. You don’t have to stop with just one OOB for any given photo as you can see in the image above.
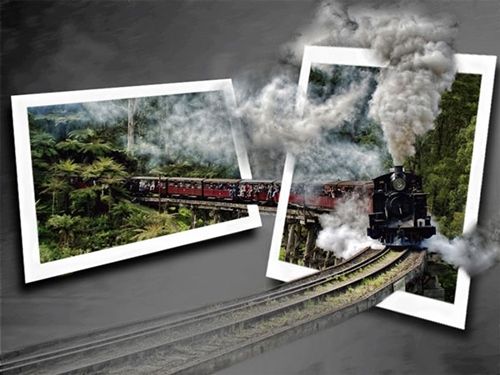
Look for ways to create an “interactive” OOB such as this:

Remember always to be mindful of the shadows and lighting angles in your OOB.
The OOB effect almost always results in just a very precise portion(s) of the photo extending beyond the edge of the frame. Hardly ever will you see other portions of the original photo outside the frame.
As I frequently say, practice, practice, practice. The more you experiment with the OOB techniques the better you’ll get. And you may even find yourself looking at your photos in a whole new light!
As usual, if you have any questions or need a bit of help, please don’t hesitate to “Message Me” for some assistance.
Thanks for reading this week’s Tuesday Tip. If you want to stay informed about next week’s post, just click “Follow Me” to get an update. I hope you have a wonderful week!