Spilling Over
So, last week’s post got to be a bit long. To avoid potentially overwhelming you…I’ve kind of let the topic spill over to this week. So that’s where we are today. As I previously mentioned, there’s some confusion about the difference between Out Of Bounds (OOB) & Spill Frames. It really boils down to the difference in precision.
OOB – Spill Frame Part 2
A true OOB is very precise with a very well-defined portion of the photo extending beyond the frame with the remainder of the photo being contained only within the frame. While a spill frame effect has sections of a photo spilling out over the frame in a very imprecise manner. And this happens often in multiple locations around the frame which in effect displays more of the photo than what might show up with the OOB effect. Such as this:
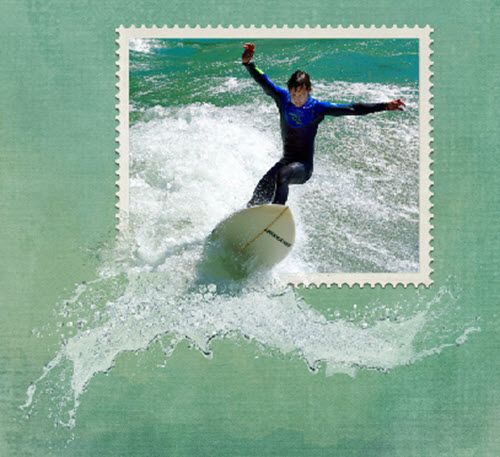
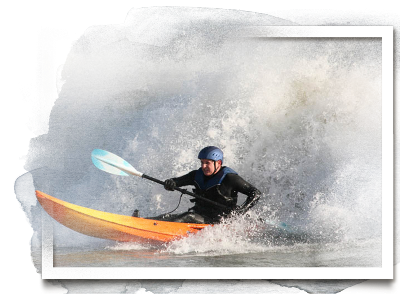
Notice that only the wave & surf board extend beyond the frame. Now I want you to look at this same photo treated with a Spill Frame.
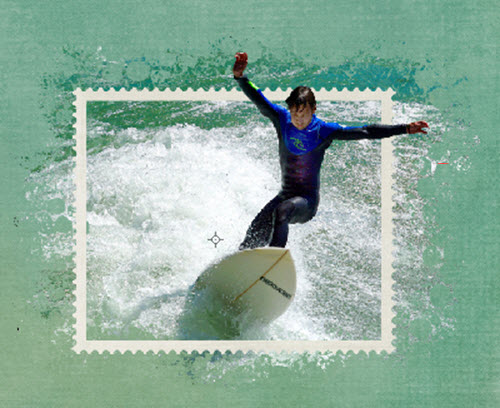
A lot of people would consider this an OOB because the surfer’s arms/hands extend beyond the frame. But this photo, strictly speaking, would be considered a Spill Frame because there’s so much more water spilling out around the entire frame.
Just try to remember this…a Photo Spill Frame is out of bounds but an Out of Bounds effect is not necessarily a Photo Spill Frame! I know that doesn’t really clear up the confusion all that much. In either case the technique used is different. Last week I covered OOB & today I’ll give you tips on Spill Frames.
Note: Please remember that I have a Windows operating system & use the current version of Photoshop Elements (PSE 2024). Some of my screenshots may look different than what you see on your screen & everything that follows is done using that software configuration. I’m fairly certain you can accomplish all of this in most any graphics editing software. Just look for tutorials specific to your chosen software.
Spill Frames
You may or may not already have some spill frames in your arsenal of supplies. These are almost always a layered PSD file. Some designers will call a set of them Frames & Masks while other designers will call them Out Of Bounds Masks & Frames (even though they might not technically be an OOB).
But they don’t have to be layered. Every once in a while, you can run across a set of clipping masks that will give you a spill frame effect such as these:
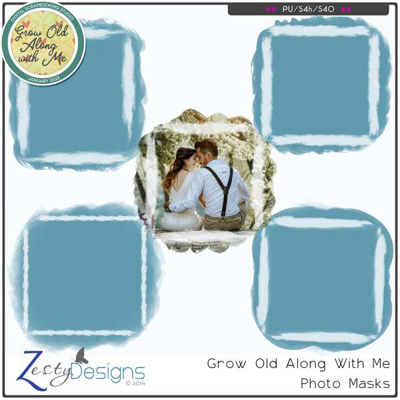
This set of masks is from “Grow Old Along With Me” by Zesty Designs (currently not available). While there’s no actual frame, you can see in the example how the mask gives the illusion of a frame. These masks are fun to play with but they are not the kind of spill frames I want to talk about today.
Here is an example of some layered spill frames:

This set of frames & masks is from “Dare To Dream” by TirAmisu Design. I know you’re trying to figure out why I specifically call these out as a spill frame.
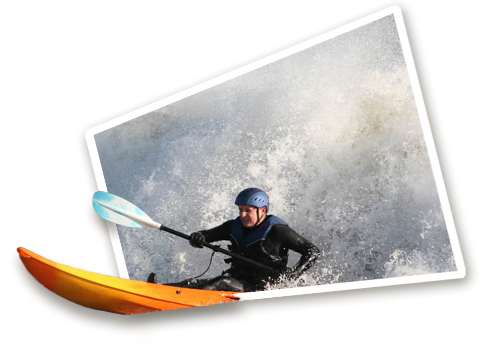
I’m going to use the same kayak photo I used last week and one of those Dare To Dream frames & masks (rotated horizontally) to show you the difference.
Here’s the OOB version as a reminder:
It’s really all about the precision. Spill frames are much more “forgiving” and so much easier to modify. And that’s what I’m going to talk about next.
Unlike with the OOB effect, just about any photo will work and you’ll typically see more of the original photo in the end result.
And, I have to say it’s really much easier to create your own Spill Frame than it is to create the OOB effect. It does take some practice and patience if you’re new to using brushes to create a mask. But good news…there generally is no need to use the PSE Selection tools. And you can also refer back to my earlier post on creating masks!
Modify A Layered Spill Frame
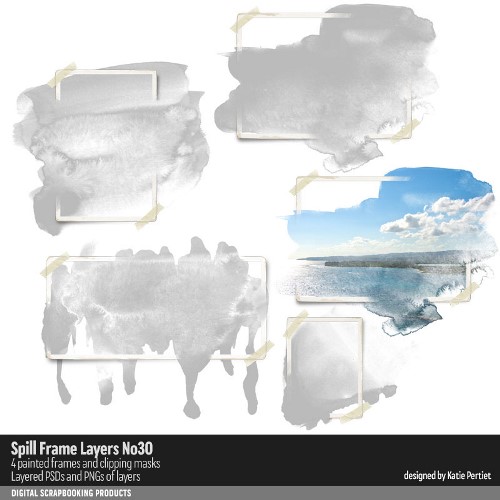
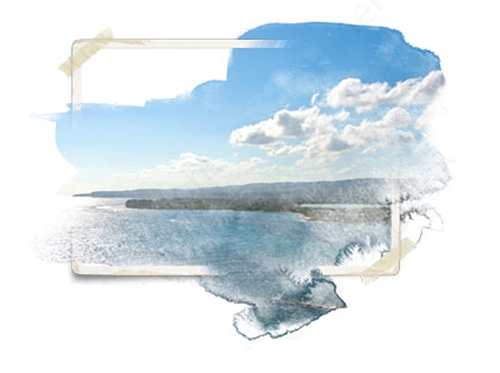
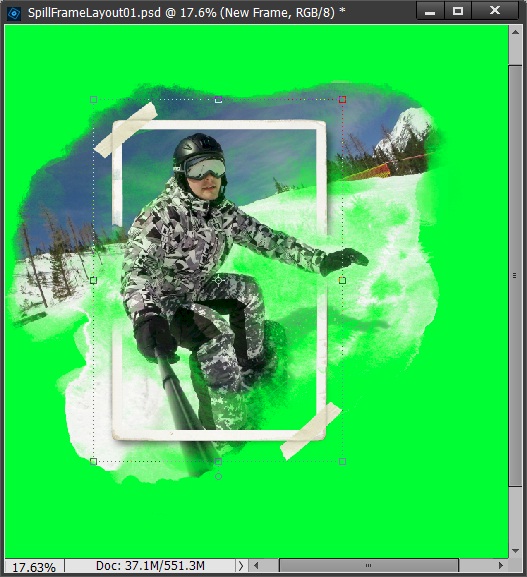
Today I want to show you how very easy it is to take an existing layered Spill Frame and customize it for your photo. I’m going to be working with a layered set out of “Spill Frame Layers 30” from Katie Pertiet Designs. You might even recognize the example image in the set preview directly above. It’s actually the featured image at the very top of this post.
And I’m going to use this photo from Pixabay:
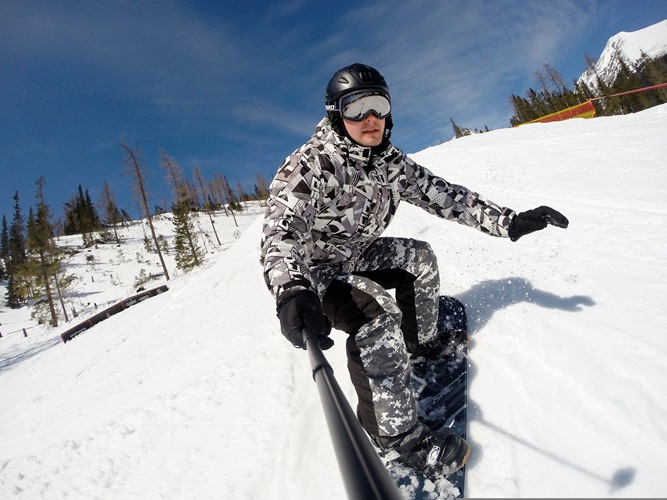
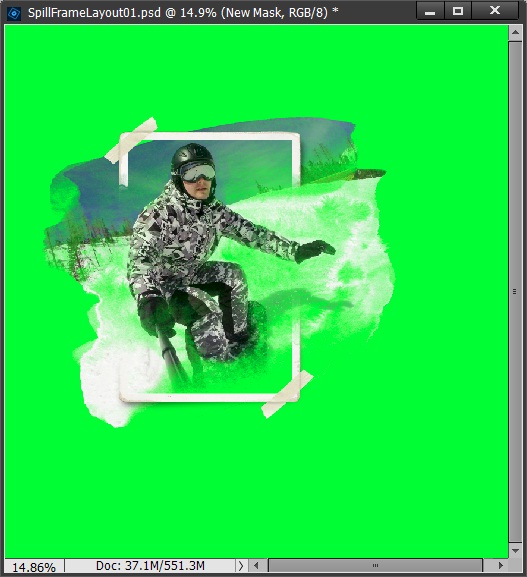
Since I haven’t really started a layout just yet, I’m going to open a blank file in PSE sized at 12×12. This will give me plenty of room for my spill frame & photo. I’m also going to fill the background with a bright green color (you can use any high contrast color of your choosing). Why, you ask? There’s a lot of white in both the spill frame and the photo and I want to really be able to see how that photo is showing up in the spill area. So, here’s my starting point:

I’m not totally thrilled with how much of my skier looks green. That means that the mask is very transparent in many spots. But I know I can easily fix that.
Note: Last week in the first section of the post about OOB I provided a lot of screenshots showing the Layers panel view. I’m not going to be doing that today as it just takes up a lot of room and makes the post that much longer. I will be very careful to keep the layers’ names (and their order) easy to follow.
Okay, now before doing anything else, I duplicate the mask layer of my spill frame, rename the new layer New Mask and hide the original mask and make it the bottom layer. This way I preserve the original mask in case I mess something up.
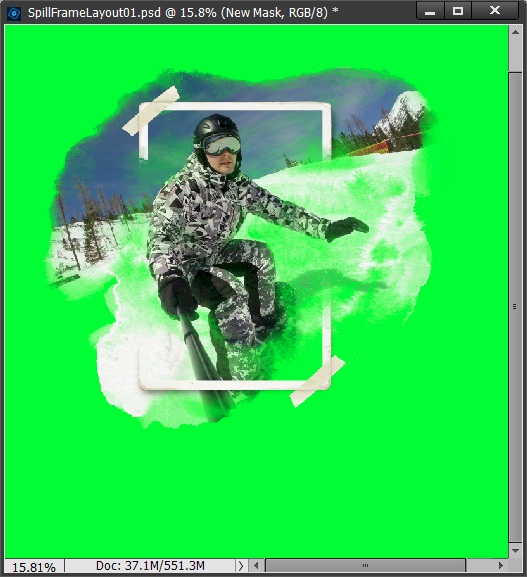
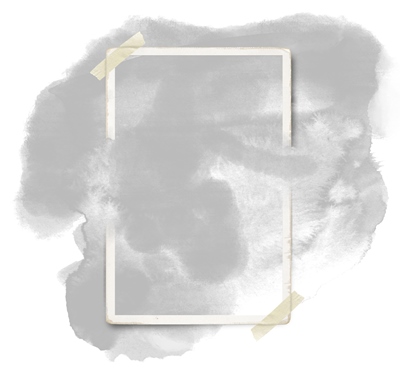
I ensure that the New Mask layer is selected. I then set my foreground color to a shade of grey matching the existing mask (hex value #babbba). I select a nice watercolor brush (more info on those in the next section) and just paint over the existing mask until I’m happy with the amount of my photo that will be visible. Here’s what I ended up with:
I like this much better. But I think I want a bit more of my photo to show in some spots outside the frame. So, I do some more brushing until I end up with this…
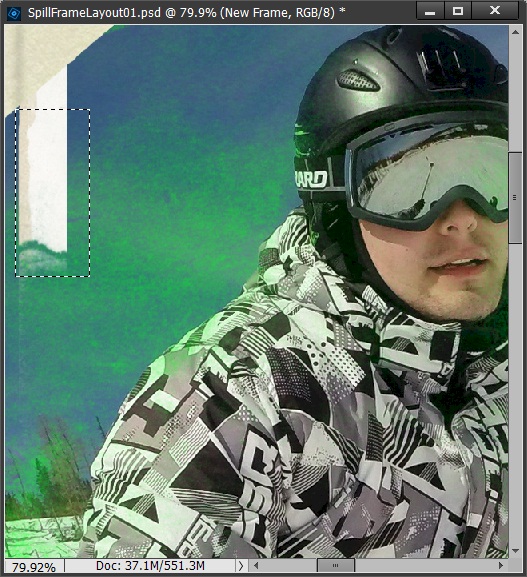
I’m much happier with this. With one exception…I’d like the frame to have smaller gaps on each side, especially on the right where his hand is reaching out.
Note: I know at the beginning of this post I mentioned that working with spill frames typically doesn’t require the use of any PSE Selection tools. And I stand by that. But in the following few steps I am going to be using the Marquee tool. Again, this is not a normal occurrence when working with purchased spill frames. I only find this necessary when I end up modifying a spill frame’s existing frame!
Before making any adjustments to the frame, I duplicate the original frame layer of my spill frame, rename the new layer New Frame, hide the original frame and move it to above the hidden original mask at the bottom. Again, this will preserve the original frame in case I make any mistakes.
I ensure that the New Frame layer is selected. I’m going to start on the left side of the frame. Using the Rectangular Marque Tool, I draw a selection box around the frame starting just below where the tape crosses the frame and extending to where the frame is torn:
I then create a new lay via copy and move that new layer down until it just covers the torn area on the original frame:
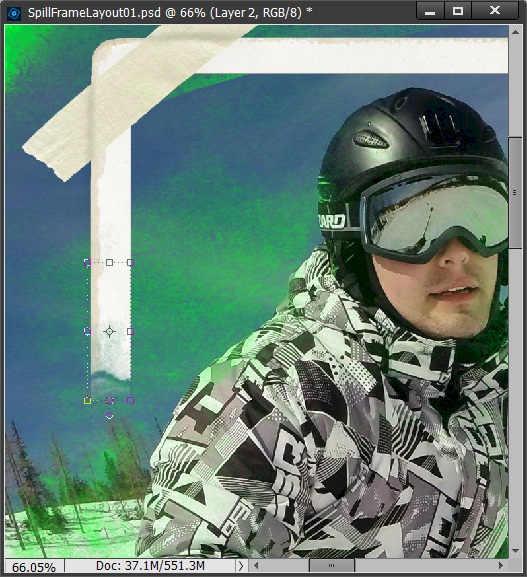
That looks better. I repeat these select/copy/move steps on the remainder of the frame areas I want to change and here’s the result:
I am so much happier with this. So, I merged all the additional frame pieces to the New Frame layer just to keep them all together as a single frame. And now you know how to easily modify an existing layered spill frame!
And to complete the process, I’ve added my skier to a layout…

Note: This layout was created using “Winter Magic” (including a template) by Dutch Dream Designs & Heartstrings Scrap Art. You can see more details about the layout in my gallery.
If you’re working on a new file (as I) then you can either copy the Frame & Mask layers from this new file to a layout in progress or save this file as a layered PSD for future use. Just remove any extraneous layers before saving it as a PSD. You can crop the file to size if you want before saving it but it certainly isn’t necessary. Leaving it at the current size would allow some wiggle room if you needed to add to the outer portions of the mask to accommodate a different photo. I chose to save mine as a PSD. And here it is:
Yes, you can see the silhouette of my skier…LOL. But that doesn’t mean I can’t use this Spill Frame combo again. I know how to do a little bit of tweaking.
Create A Layered Spill Frame
Ok, so given everything discussed in the section above, you could easily create your own layered custom spill frame by modifying an existing one from your stash of supplies. As the old idiom goes…why reinvent the wheel?
But what if you don’t have any layered spill frames in your stash? Just look for any individual frames & masks that you do already have. These are all you need to create your own spill frame.
Let me show you how to make one…
Just as I did when modifying an existing layered spill frame, I’m going to open a blank file in PSE sized at 12×12 with a bright green background. This will give me plenty of room for my spill frame (& photo if I’m using one as a guide).
Typically, I have a photo in mind when I’m looking to use a spill frame. But it’s not required. All you need is a frame & a mask. It would help to at least know whether you want a landscape or portrait-oriented frame.
I’m going to be using this photo of mine:
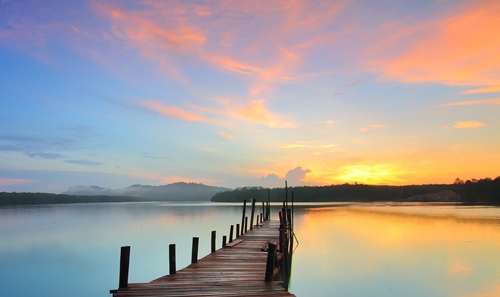
Along with a frame and mask from “Open Doors” by PapierStudio Silke (currently not available). So, here’s my starting point:
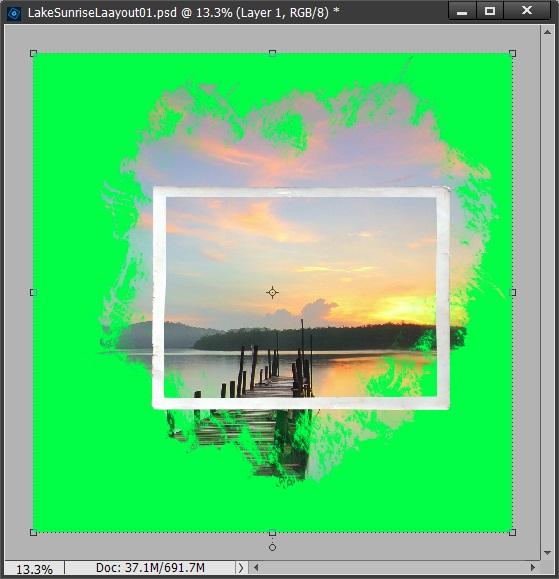
The first thing I’m going to do is look for places where it makes sense (or at least somewhat) for portions of the photo to cross the frame, such as these:

These are spots where I need to erase part of the frame and may need to increase how much photo is being picked up by the mask.
I’m going to use one of my “go to” watercolor artist brushes to work around the frame & some of the mask. The brush I’m using was part of a watercolor action set I obtained via a class I attended quite some time ago. Unfortunately, I can’t share that brush with you. But I know there are a lot of great free watercolor brushes at Brusheezy that would work perfectly for this instance. Just search for watercolor brushes.
When I’m making changes to an existing mask, I always duplicate the mask layer, rename the new layer to New Mask and hide the original mask layer. I can than just set my foreground chip color to match the color of the mask (in this case black) and use my brush to add to the mask as needed. Since I have preserved my original I don’t have to worry if I mess things up…I can always go back to the original if necessary.
If I’m erasing part of a frame, I always use a layer mask. Since “masking” is a non-destructive method of erasing, I don’t need to duplicate the frame layer. Masking also allows me to more easily make changes as I go along…removing and/or adding portions of the frame until I’m happy with the result.
After tweaking both the mask & the frame here’s my result:
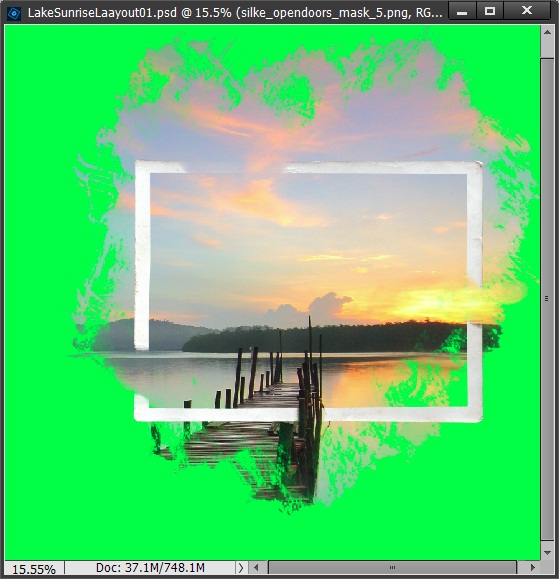
I’m pretty happy with this so I’m going to first, remove all extraneous layers (including the photo), crop to size and save as a layered file (PSD) for future use. Notice, I did not yet add a shadow to the frame. I prefer to do that once I incorporate it into a layout and know what the lighting angle is for everything else.
Next, I work this into a layout I had planned for this lovely photo:
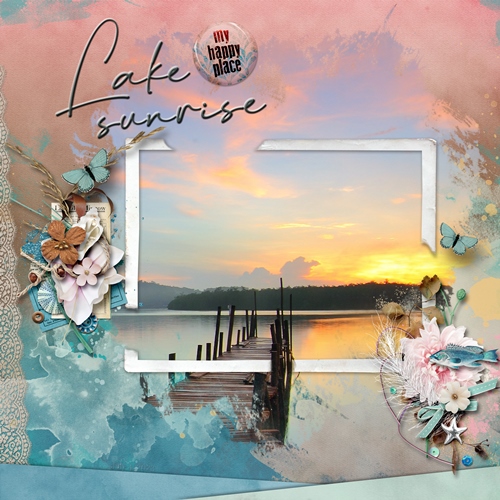
Note: This layout was created using “Seashell Memories” (including a template) by Heartstrings Scrap Art. You can see more details about the layout in my gallery.
See, it’s not so hard to make a custom layered spill frame after all. I have to be honest…I did have to do a bit more tweaking to the mask & frame once I put it in the layout. But that’s the beauty of knowing how to make these kinds of adjustments.
There is one more trick I didn’t cover. If you use the layer mask method rather than erasing the frame you must simplify the layer before applying any shadows. Otherwise, you end up with shadows where they don’t belong.
Most Important Tips About Spill Frames & Masks

Don’t let the difference between OOB & Spill Frame scare you. The worst thing you can do is overthink things. Just pick the technique that fits your photo, layout design and skill level. Then let that and your imagination drive your approach.
And a quick reminder…if you don’t have any masks (or suitable ones) in your stash just refer back to my prior post about creating masks. There’s nothing to stop you from making your own 😉
I know I sound like a broken record here but the key is practice, practice, practice. The more you work with these techniques the better you’ll get at creating your own spill frames.
And, if you have any questions or need a bit of help, please don’t hesitate to “Message Me” for some assistance.
Thanks for reading this week’s Tuesday Tip. If you want to stay informed about new posts, just click “Follow Me” to stay in touch. I hope you have a wonderful week!
