Recolor Plaid
If you’ve been following me during this year alone, you may have shuddered when you saw the word “Recolor” in today’s title. I know April of this year got pretty intense with four straight weeks of coloring tips. But at the end I said some objects wouldn’t work with the method I used back then. I also promised I’d provide additional pointers in the future. Well, today I’ll specifically address how to recolor plaid.
I’m going to show you a neat little gem from within the Enhance options of Photoshop Elements (PSE). It’s another recoloring method to try when the Color Blend Mode method won’t work without a lot of fiddling. I’m talking about the Colorize Photo feature.
The automated “Colorize Photo” option was first introduced in PSE 2020. Released in October 2019, this feature was actually added to automatically colorize black-and-white photos. In order to use Colorize Photo, internet connectivity is required because it relies on Adobe Sensei AI, a cloud-based technology.
Complex Recoloring
Before I get started, I use PSE 2024. If you use a different version, some of my screen shots may look different from what you see on your screen.
Just as with the Color Blend Mode method, this is a non-destructive process. It creates the changes on a new layer so that the original paper is left unaltered. Extra bonus, it also retains any textures.
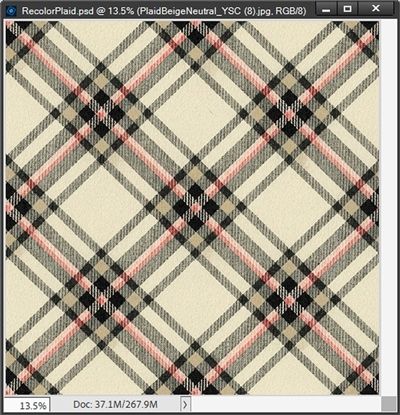
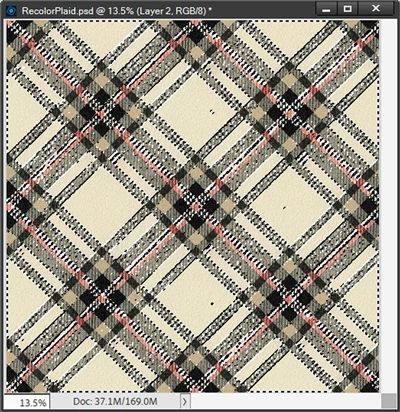
I’m going to start by creating a new 12×12 file with a blank background. Then I open a multi-color plaid from my stash and pull it into the file:
Note: If you’d like to follow along exactly, you can click here and this plaid paper will be automatically downloaded for you.
This is a lovely autumnal plaid but I’d really like to change it so it is better suited for spring or summer. Unfortunately, this paper is a difficult one to recolor. It has various colors and some very distinct textures; making it hard to select individual colors for recoloring. Because of that, using the Color Blend Mode method isn’t a good option. So, I’m going to show you a trick you can try in PSE.
Colorize Photo
Even though this is a non-destructive process, from time to time I find that PSE still wants the layer simplified. It doesn’t happen all the time…totally inconsistent. I have no explanation for that. So, I try to make a habit of just simplifying the paper before I start. It’s not a big deal if I don’t, I just deal with it if/when it happens.
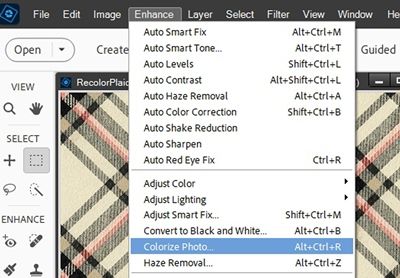
I go to the top tool bar and choose Enhance->Colorize Photo (Alt+Ctrl+R):
Note: If this is the first time you’ve ever selected the Colorize Photo option, you may be prompted to “Download” the tool (I can’t remember exactly what it says and I’ve not been able to find any descriptive images anywhere on Adobe or elsewhere on the internet). The prompt appears within the PSE workspace, and typically looks like a popup dialog box that includes a “Download” or “Update” button to activate the Adobe Sensei-powered functionality.
This recoloring method works as a great alternative method for recoloring some papers because all I typically will have to do is select the whole thing. While it is possible to use this to recolor things like flowers or things with easy to select parts, it’s truly so much better to use the Color Blend Mode method from my April 2026 posts for those types of things because it provides so much more control over the recoloring process.
So, while you can try to use this for elements, I have found this option works best with complex papers that are difficult to recolor.
Recolor Plaid Presets
PSE opens the Colorize Photo dialog box and will always pull it up in “Auto” mode and automatically generates previews of four preset recoloring options:
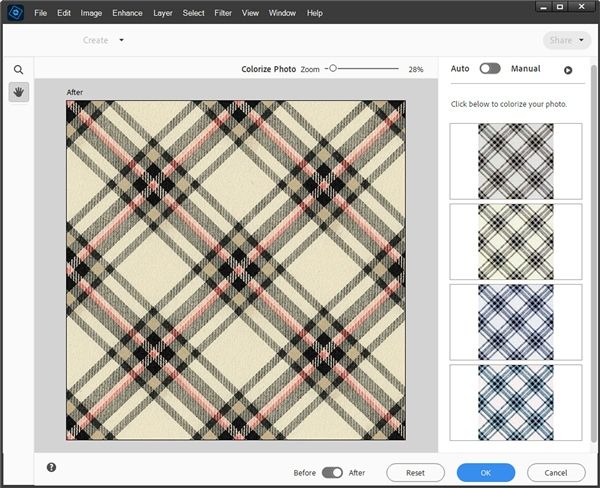
You can see the previews on the right-hand side. I kind of like the look of the blue one for something seaside or summery. And the greyish-neutral one could come in handy for multiple themes. Truth be told, I could make a case for any of the four. But none of them are really what I was hoping for.
I could choose to select one of them and then click OK. At which point PSE would close the Colorize Photo dialog box and return me to the original file with the colorized version of the plaid above the original.
Recolor Plaid Manually
But in this case, I want more control over how this plaid gets recolored. So, at the top right where it says Auto – Manual, I’m going to toggle (click on) the slider button to get the Manual options:

I’m going to start at the top and work my way down the menu options. First, I have to select a portion of the paper to recolor. In this case, I want to recolor the entire paper so I’m going to select the entire image.
I click on the Quick Selection Tool icon, set the Size to the maximum of 250, click inside the paper and drag all the way around to select the entire paper. This will tell PSE I want the entire paper recolored:
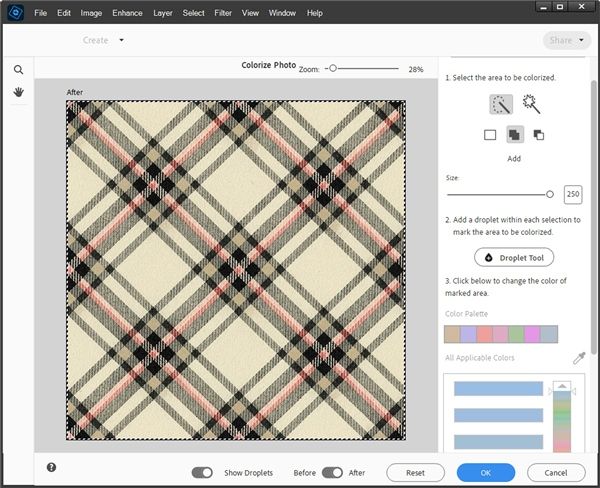
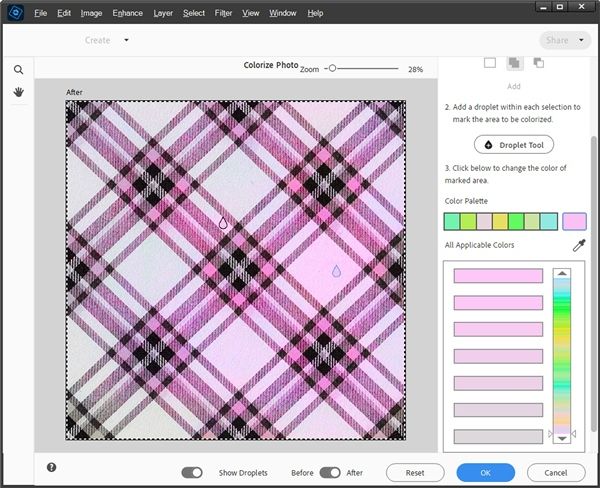
Do you see how all the options below the Droplet Tool button are muted (greyed out)? In order to access those, I need to add a “droplet” to the paper. This droplet will tell PSE which Color Palette to open. So, I click on the Droplet Tool button and click once approximately in the center of the paper:
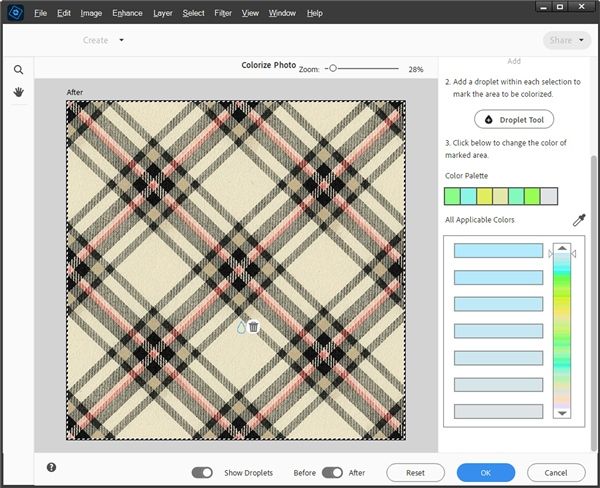
Note: I did not click close to the center because I want PSE to key in on the lighter colors in the plaid.
You can now see a small droplet shape over the paper and the bottom options have opened up. Notice how the Color Palette has changed from what it was when I started. And I’m guessing you’re probably wondering about the trash can icon.
The trash can will appear whenever I place a color droplet on the image. It acts as a quick-delete feature, allowing me to easily discard an unwanted color swatch without having to navigate to a menu. All I have to do is click the trash can and the droplet is removed. This comes in handy if I’m trying to use more than one droplet for an image. Or if I’m having trouble getting a suitable color pallet to appear. More on that in a minute!
Finding A Color Pallet
The color palette that appears after I add a droplet is totally driven by the color over which the droplet is placed. I’m planning to recolor the entire paper unlike what would happen if I were trying to colorize multiple portions of a photo (what the tool was designed for) so I will only need one droplet.
I’m not super thrilled with the palette that popped up based on that first droplet position. All I have to do is click on the trash can to delete that droplet and click on the Droplet Tool button and try selecting different colors in the plaid until I come up with a palette that looks a bit more promising:
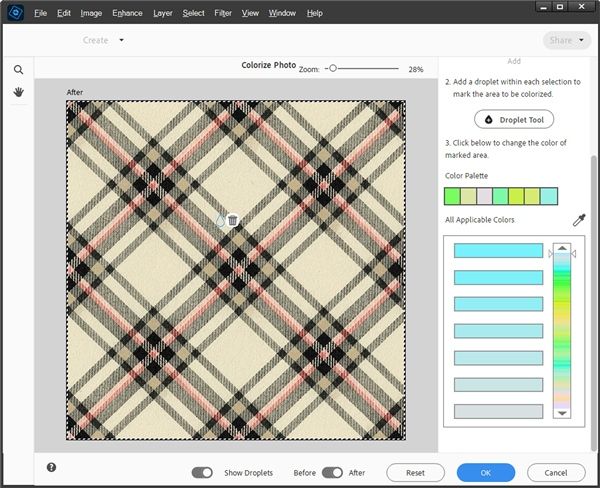
You can now see how the color palette looks a bit more like spring. The color palette “chips” and the color ranges oddly enough, are directly related to the color on which I placed the droplet. Somehow that one spot on the paper was a good choice!
So, similarly to what happens using the Color Blend method, it’s important to remember what I explained about tints or shades of the color you are trying to achieve. If you want a specific color, it’s best to start with a color that most closely resembles the same level of saturation and lightness/darkness you want to see in the color palette. It’s not always going to be easy…just do your best. If it makes you feel any better, it took more than a few tries before I hit on my chosen palette.
Using The Pallet
Earlier I said I wanted to shoot for spring or summer colors. So, I’m going to drag the right color slider down until I come across a color range that gives me that:
I click on the color I like most in that range (first one) and here’s how the paper looks:

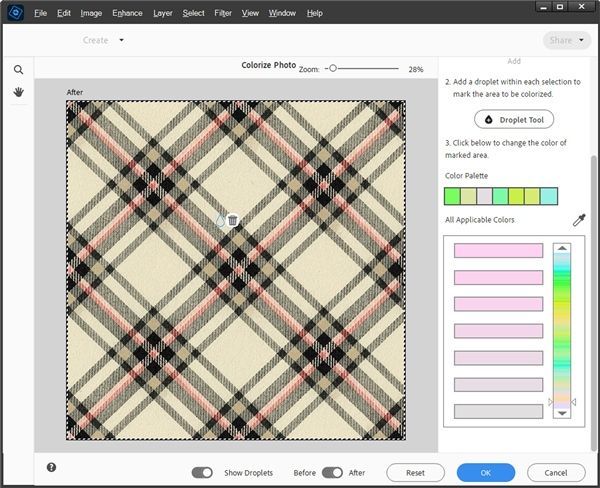
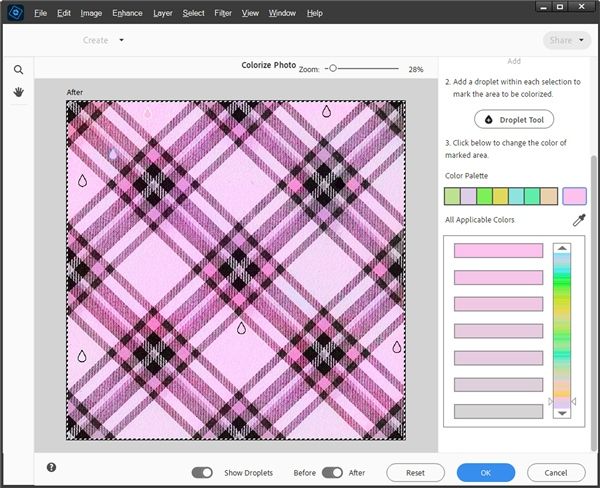
Now, you can see the paper has been recolored (sort of). I know it’s not a perfect recoloring but it’s close. There are some spots that need some help. So, to fix that, I just click on one of the problem spots to place another droplet. Then, on the right-hand side of the Color Palette “chips” I click on the separate pink color chip (right above the eye dropper). PSE now recolors the area of the paper around that second droplet:
You should be able to see that there’s a bit more pink in the plaid off to the right. That separate color chip will stay the same no matter how many other droplets I add. So, I can just continue placing new droplets and clicking on that same color chip until I have recolored the problem areas to my liking:
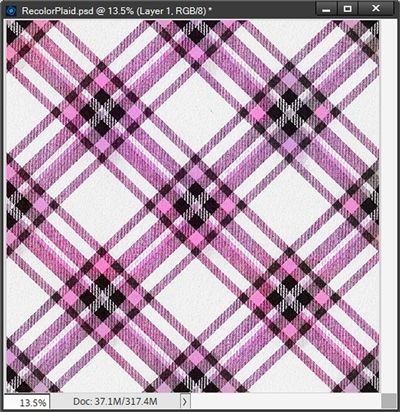
I now have a plaid paper with shades of pink and some hints of purple. That certainly seems more spring-like than what I started with. I click OK to confirm:
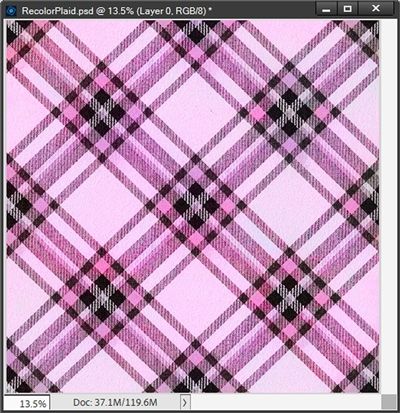
PSE takes me back to my file. In the Layers Panel, it’s easy to see that this process was non-destructive. PSE created the changes for the new plaid on a new layer and the original paper is still underneath.
Again, it’s not what I would consider perfect, but it’s still very good and something worth trying when other methods don’t work. And just in case you’re wondering how it would look if I did try the Color Blend method, here’s how that turned out:
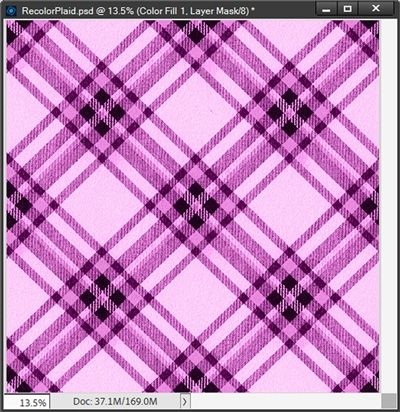
Note: For the solid fill layer that was blended over the original plaid, I used one of the darker shades of pink (#f38ed7) in the small squares within the new plaid.
This is dramatically different…still okay but honestly, I like the “colorized” version better. With this Color Blend version, the pink is more intense. I’ve also lost a lot of the subtle nuances and ranges of colors…no more hints of purple here. So, you can try both options and see for yourself which one works best for you.
As you can see, the major drawback to this “colorize” method is I don’t have total control about which color I can use to recolor this paper. And due to the lack of control when using this method, it’s extremely difficult to replicate exact results. But I at least wanted to show this option because sometimes it’s the one thing that works when other methods don’t.
But it’s not as limited as you might think. It takes a little (okay maybe a lot) of work. Regardless, it is still a good work around. And there are some other things that can be done to make further enhancements…
Additional Options
If you read my “Recolor – Part 2” post on April 14, 2026, you already know it’s sometimes possible to isolate a single color within even a complex patterned paper. Believe it or not that is often a viable option on some complex plaids. The one I’m using today happens to be one of those. Let’s take a look…
Recolor Plaid Background
If I wanted to take this spring plaid I just created and add the beige “background” back, I could easily do that.
I just go back to the original plaid (still in my file just below the new plaid) and open the Magic Wand tool. I click the Add new icon, set the Tolerance to 32, check Anti-aliasing, then ensure Sample and Contiguous are NOT checked. Next, I just click somewhere in one of the larger sections of beige:
Note: I’m not worried about any of the random spots of marching ants that I see within the larger beige sections. They’re small enough that it shouldn’t make that much of a difference in the end.
I press Ctrl-J and PSE creates a new layer from that selection (Layer 1 for me) and I move Layer 1 above the new plaid in the Layers Panel:

That’s not too bad! And I could go the extra mile and try making that beige background white:
Oh, I think that’s very nice! If you need pointers on how to change that beige (or other color) to white refer back to my “Recolor – Part 4” post from April 28, 2026.
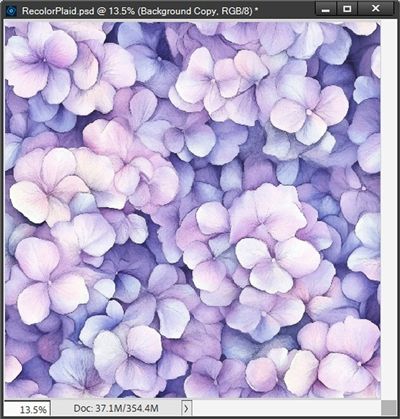
Feel free to try this method on complex patterns other than plaids. Using a floral lilac pattern from my stash, I can literally go from this:
To this:
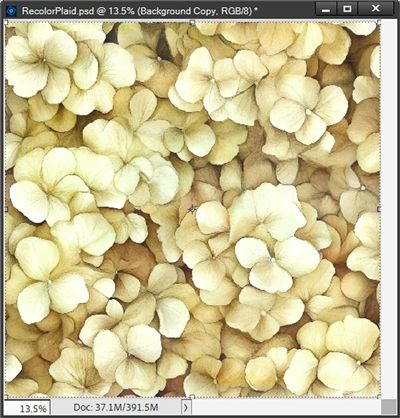
With virtually one click, and selecting one of the Colorize Photo Auto options! Trust me, I tried using the Color Blend mode option on this paper and it wasn’t anywhere near this pretty!
I hope you’ll try the Colorize Photo option on at least one of your complex patterns. Being able to recolor plaid paper beats having to try finding paper that fits your color scheme.
Final Tips

Patience and perseverance are your absolute best “tools” when using this Colorize Photo tool. Finding a color palette that suits your needs can sometimes take a while. Just take your time and don’t give up too easily.
When trying to come up with a good color palette, it sometimes helps to zoom in so you can select an area with an appropriate level of hue/saturation based on the outcome you desire.
As with the Color Blend method, this is a non-destructive process meaning the original paper remains unchanged.
The Colorize Photo method is not anywhere near as quick as using the Color Blend method. But we already know that method doesn’t work well on complex patterns.
The Colorize Photo method is a great option to try when all others fail.
Don’t be surprised if more than once, one of the four preset Colorize Photo recoloring options ends up being your first choice.
You can try to use this for elements, but I have found this works best mostly with complex papers that are difficult to recolor.

When it comes to the creative process, patience is accepting that the majority of the work we do is out of our control. – Rick Rubin
Thanks for reading this week’s Tuesday Tip. Remember, if you have any suggestions or questions please don’t hesitate to “Message Me“. Check back next week for a few more quick recoloring tips. Click “Follow Me” to stay in touch. I hope you have a wonderful week!