Blur Distractions
Surely, you’ve run across more than one photo in your scrapbooking adventures that you want to use but the primary subject isn’t the center of attention. It’s not so much that you don’t want all the other people or things in the photo; you just want the primary subject to be “the star”.
There are multiple ways to deal with this scenario. Most often, the majority of us will either enlarge the photo so we can crop out the “distractions”. Or we’ll use the entire photo and just put a frame/outline around the portion we want to highlight.
While those options can work, a lot of times neither of those solutions are ideal. Especially if I want to keep the majority of the photo for “context”. Sometimes the rest of the photo tells the rest of the story! Such as a photo of a huge birthday party celebration where I want to highlight the celebrant…not the crowd. Or a dance recital with lots of lovely dancers but I want to highlight my dancer!

While I highlighted one little dancer…the rest of the photo is still distracting. At least to me. And that’s exactly what I want to avoid.
If you struggle with situations like this…I have a solution! I found a way to frame or highlight my subject, keep the original photo, but blur out all the distracting parts. I love the results. I think you will too. Let’s take a look at this technique to focus on your “star”.
Focus & Blur

In the spirit of full disclosure, I’m going to be upfront & honest. I did not think of this idea all by myself. I learned how to do this years ago working on a challenge layout. The challenge host provided a template. I used that template at the time but have since come up with another way to do the same thing (and a modified template). I love using this technique! Especially when the photo isn’t exactly “the best”. And I don’t always need the template!
Before I get started just a quick reminder that I use Photoshop Elements (PSE) 2024. If you use a different version, some of my screen shots may look different than what you see on your screen.
Focus & Blur Template
I’m going to start with what I call the Frame & Focus option. And I’m going to use the template I created based on what I learned in that challenge I mentioned above. It’s certainly not necessary to use the template it just makes it go quicker.
If you’re not a template user…no worries. I’ll show you how to accomplish the same effect without a template a little further along in this post.
The template is set up to use a standard 6” x 4” (landscape) photo. It certainly can be easily rotated to accommodate a portrait-oriented photo if needed.
Note: If you want to follow along all you have to do is click here or on the image below and the template will be automatically downloaded for you. This template is in PSD format. If you can’t use this format, please message me and I will help you get a TIFF file instead.

When I open my Blur & Focus template in PSE, it looks exactly like the image you see above:

And here is what the Layers Panel looks like:

You may have noticed that the “photo spot” looks similar to a polaroid frame. But the template also includes an option for a simple rectangular frame which is the first layer in the Layers Panel (should be hidden when you open this template). You will also see a layer for a Brightness Adjustment layer directly above the Background layer (also hidden and named Adjust Opacity for brightness). I’ll explain both of these layers in a bit.
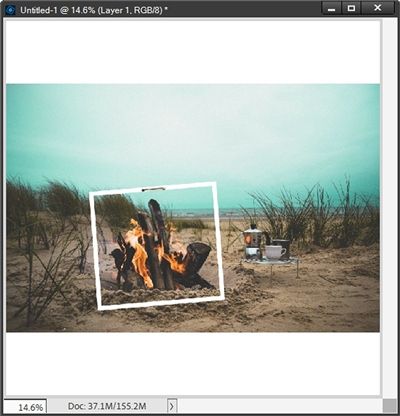
With my Blur & Focus template open in PSE, I drag my photo into the file just above the Background layer:

Note: This beach picnic photo is from Pixabay. You can use any photo that you like.
That photo covers that Background layer completely which is perfect. If the photo you’re using doesn’t cover the Background layer, re-size it as necessary.
Next, I duplicate the photo and move it in the Layers Panel so that it is directly above the Polaroid Frame layer. I then clip the photo to the Polaroid Frame layer:

Since I want to highlight the “camp fire” on that beach picnic, that photo spot is almost exactly where I need it to be. But I do need to move it.
So, I click on the Polaroid Frame layer in the Layers Panel:

Notice that all of the necessary photo spot layers are linked together (Simple Frame, Polaroid Frame, Frame & Frame Drop Shadow) and they will all move as one unit. All I have to do now is move the photo spot to the section of the photo I want to highlight.
Very Important…Do not select the duplicate photo layer when moving the photo spot! Both photo layers must remain in their original positions!
With the photo spot in place, I could also re-size the photo spot to better fit the portion of the photo I want to highlight. In this particular case, the size is fine:

Before I move on to the blurring step, I’m going to show you how to switch to the “simple” frame. It’s really easy. All I have to do is unhide the Simple Frame layer. Then in the Layers Panel I need to move the duplicate photo layer above the Simple Frame layer and clip the photo to that layer:

I actually like that better but I may move that frame up just a skosh later. For the rest of this demonstration, I’ll leave it where it is. Now, it’s time to blur the original photo layer.
With the original photo layer active (the one directly above the Background layer) I go to the top tool bar and select Filter->Blur->Gaussian Blur:

PSE then opens the Gaussian Blur dialog box:

The Radius value is set to 10 pixels (at least for me). I can either use the slider or I can just enter a new value in order to set the blur. In general, for most photos in this technique I like a Radius of 15-20 pixels. But every photo is different so there’s nothing concrete here. Feel free to experiment until you’re happy with the amount of blur on your particular photo.
Today I went with 15 pixels, clicked OK to accept and here’s the result:

There is only one thing left to do! I’ve included that Adjust Opacity layer that can be applied to the original photo layer. This layer comes set with a Blend mode of Soft Light and an Opacity of 50%. Those can both be changed. I would recommend that you not mess with the Blend Mode other than to see what changes the other modes will cause. I have found over the years that Soft Light generally works out the best.
Simply adjust the Opacity on that layer to make it brighter or darker. Higher Opacity values (such as 80%) will tend to make the background also appear a bit blurrier in addition to lighter…at least in my experience.
I did go with 80% today and here is the final result:

That’s it! Have some fun with this template & play away.
For those of you who do not like (or lack the capability) to use a template, this technique can be accomplished very simply using an alternate method. I’ll explain this very briefly…
Focus & Blur – No Template
I can accomplish the exact same effect achieved in the steps above by simply pulling a photo into either a blank (or white) 12×12 file in PSE or just opening the photo directly in PSE. I typically wouldn’t start with the photo alone but you can do that…just make sure you have a duplicate copy of the original photo saved somewhere safe.
Let me show the rest of the steps quickly. Here’s the photo in a 12×12 file with a white background:

Next, I’m going to bring in a frame. I’m using one of my frame creations that is a “standby” for me when I’m not working on a particular layout. But any frame is fine. And I position the frame in the orientation I want it over my photo:

Then using the Rectangle Tool, I draw a square/rectangle to cover the frame’s opening and layer that beneath my frame. This becomes my photo spot:

Next, I make a duplicate of my photo and layer it between the frame and the photo spot I just created. And I clip that duplicate photo to the photo spot:
Now all I have to do is follow the same steps as above to apply the blur to the original photo:

Then I can add whatever shadows I like and I end up with nearly the same final result as what I had above:

Note: I did use some custom shadows I created specifically for this “go to” frame of mine. You can shadow your frame any way that suits your needs.
If you want to include a brightness adjustment layer similar to what is included in my template all you have to do is create a new layer directly above the original photo layer and fill it with a very pale-yellow color (#f8fae6). Clip it to the photo, set the Blend Mode to Soft Light and the Opacity to 50% as a starting point:

And there you have it a focus and blur effect without a template.
Now, way back near the top of this post I showed a picture from a dance recital. Well, a slightly different version of that picture was used in a layout:

You can see more details about this layout in my 2025 gallery.
I still have more to show you. But, this post (as many do) got longer than I’d hoped. I decided rather than inundate you with more “distractions” it may be best for me to continue the discussion next week. So, keep an eye out for that post where I’ll show you how to Focus & Blur without using a frame.
A Few More Tips

Don’t forget, if using the template, you can re-size and reposition the provided photo spot to accentuate the desired part of your photo.
When applying this technique with or without the template, you can use any frame you want to use. With the template it would just require making the photo spot fit the new frame and applying your own shadow.
Once you frame your photo’s focal point, remember that you still don’t have to use the entirety of the photo. You can use a clipping mask to “hide” part of the photo or you can just crop it to a smaller size.
When blurring your background photo be careful that you don’t blur it too much. You really don’t want to end up with a muddy mess behind your focal point 😉
Don’t be afraid to experiment with using/adding a “brightness” adjustment to your blurred photo. Again, be careful not to go too light or too dark as this could affect how your focus shifts.
When you do use the “brightness” adjustment feel free to play with the Blend Mode. Typically, the blend of Soft Light works best. But as I’ve said, every photo is different so feel free to experiment.
Thanks for reading this week’s Tuesday Tip. Remember, if you have any suggestions or questions please don’t hesitate to “Message Me“. Check back next week for part 2 of blurring distractions. Click “Follow Me” to stay in touch. I hope you have a wonderful week!