
Mask With Grey
A few weeks ago, I shared a post about using “Two-Tone Masks”. Today I want to show you another masking technique that is very similar but a bit more intriguing. Let’s take a look at using grey to make a mask selectively, magically transparent.
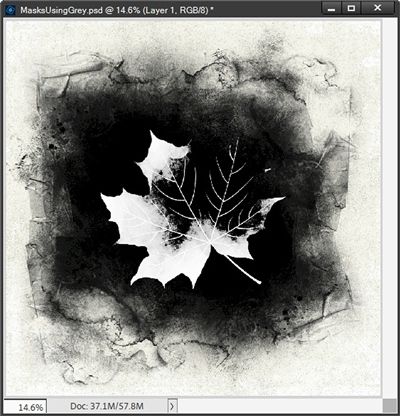
Magical Mask

As I mentioned when I posted about two-tone masks, most often those masks are done in black & white.
You may already know this but whenever we use a layer mask, we don’t have to use just black & white. Layer masks do not recognize the hue (i.e., black, white, yellow, green, etc.) of any color in the mask. However, masks do recognize varying shades (or tones) in those color values.
Today I’m going to be using a grey element to subtract from the mask in order to make it a little fancier and selectively transparent.
Let’s get started…
Using Grey
Before I get started just a quick reminder that I use Photoshop Elements (PSE) 2024. If you use a different version, some of my screen shots may look different than what you see on your screen.
As usual I’m going to start with a 12×12 file with a blank background.
Next, I’ll set my foreground/background color chips to the default of Black and White (press D). Then I pull in a solid textured paper:

Note: I created this textured paper in part by using some of the techniques I discussed in my “Paper Texture” post back on September 10, 2024. I also used a full-page mask I created years ago to give the edges a “painted” look.
If you’re following along you can use any textured background paper that you’d prefer.
Next, I’m going to use what some refer to as a complex mask. This just means the mask is not completely a single solid color. Rather the mask has varying tones of a given color. In this case tones of black:

Note: This mask is one I created using some techniques I provided in my “All About The Mask” post back on October 24, 2023.
If you’re following along you can use any complex mask that you’d prefer. If you don’t have a complex mask, you’re welcome to click here and my mask will immediately be downloaded for you.
I’m also going to use an overlay:
Note: This overlay is one I created from a leaf element using some techniques about creating custom brushes I provided in my “Modern Gesso” post back on June 18, 2024.
If you’re following along you can use any overlay that you’d prefer. If you don’t have a suitable overlay, you’re welcome to click here and my overlay will immediately be downloaded for you.
Now the basic pieces are set up and ready to go. The next thing I need to do is fill that overlay with black. And if you’ve been reading many of my posts, you know I’m going to duplicate that overlay (just in case 😉) and hide it. I do this any time I’m about to make any “destructive” changes to an image.
Note: If the overlay you’re using shows up as a “smart object” you will need to simplify the layer and lock the transparent pixels. If you read my “Two-Tone Mask” post a few weeks ago you already know why you need to do this.
With the duplicate overlay layer active and the foreground color chip set to black all I have to do is press Shift+Alt+Backspace and the overlay appears to have disappeared:
Don’t worry…it’s still there! With the duplicate overlay layer active all I have to do is click on the Move tool and I can see the PSE bounding box so I know the image is still there:

You should be able to see the bounding box in the image above. If you’re following along and you don’t see a bounding box around your overlay…please ensure the overlay layer is active.
This overlay is about the same size as the black center of the mask so I think it’s a good size for now.
Note: If you’re following along and have an overlay that’s a lot smaller than your mask you may want to resize it so that it’s about the same size as the darkest portion of your mask.
Now I’ll just reposition that overlay off to the lower right side of the mask so I can see the interesting edges poking out around the edge of the mask:

Note: If you’re following along, you can reposition your overlay to suit your needs.
To keep from getting too confusing, I’ll name this repositioned overlay layer to “Black Overlay Moved”. I did this because I’m now going to duplicate the Black Overlay Moved layer (Ctrl+J) and hide the duplicate layer for the moment. I will use this duplicate layer later to create a selection.
I’m going to activate the mask layer and the original Black Overlay Moved layer. This is what my Layers Panel looks like right now:

With those layers active I can now Right-Click on the thumbnail for either layer and select Merge Layers from the dropdown:

And the two layers are now one:
And now my Layers Panel looks like this:

See how PSE merged the two layers and kept the new layer above my original (hidden) overlay layer? That’s exactly where I want it to be at this point.
With that newly merged layer active the next step is to add the “magic” by turning the entire overlay portion of this layer to grey. So, I’m sure you’re wondering how I’m going to do that since the only parts of that overlay that I can see are along the edges.
This is going to be easier than you think. Again, with the newly merged layer active, I’m going to add a layer mask to that layer by clicking the Layer Mask icon at the top of the Layers Panel:

PSE places a white “layer mask” to the right of the newly merged layer’s thumbnail:

That Layer Mask should be active (ensure there’s an outline around the layer mask – mine is blue). If you don’t see an outline around the Layer Mask…just double-click inside the white Layer Mask.
Now, do you remember the duplicate of the original overlay layer that I hid earlier? I said I was going to use that to make a selection. Well, that’s what I’m going to do now. That layer can remain hidden for this next step.
Again, the Layer Mask must be active. Then I Ctrl-Click on the thumbnail for the hidden overlay layer. And I now have the marching ants:

As soon as I made this selection PSE reversed my color chips:

PSE uses white by default when a Layer Mask is using a selection. But I don’t need to use white or black. I can use any color I choose. If I used black (currently the background color chip) to fill that selection PSE would hide the selection and I’d see the underlying background. And that’s not what I want.
For this “magic” technique, I want to fill that selection with a light grey color. I’m going to use the color picker (click on the black background color chip) and select roughly a 25% grey (#b2b0b0):

The Layer Mask is still active. If yours isn’t then just double-click inside the white Layer Mask.
Now I’m going to fill the selection with that light grey by pressing Ctrl-Backspace:

You can see that the Layer Mask now has that selection showing up in grey. I then cancel the selection (Ctrl+D or ESC) and here’s my new mask:

I know that “overlay” portion looks like a much darker shade of grey than the color I used. I really have no explanation for exactly why that happens. My only guess is that the black is showing through the grey making it look darker. Bottom line is, I know this grey will work.
Before I show you how this works with a photo I am going to save this fancy mask as a PNG file for future use. All I have to do is hide the background and crop the image to size being careful that I include all of the mask detail. And here’s my PNG:

Regardless of the color difference, this looks lovely. But you can’t yet really see the magic of this new mask until I clip a photo to it. So, I’m going to use this lovely sunrise photo from Pixabay:

When I pull this photo into my file, I can see it’s not going to cover the entire mask:

I can do one of two things. I can either make the photo larger or the mask smaller. I tried it both ways and decided the best option with this photo (for me) was to make the photo larger. And here is the result:

I know you likely can’t truly see how gorgeous the leaf overlay shows up at this small size. It is meant to be a subtle addition to the mask which makes it hard to appreciate at something less than full size.
So, I’m going to go one step further for you. If you Right-Click on the image above and select open in a new tab, you should be able to see this at a larger size. Hopefully that works out and you can see the finer details of the leaf veins in the masked photo.
By using grey for the leaf detail, I created more transparency in the mask allowing the photo to show through a bit lighter in those areas. Remember at the beginning I said masks will recognize varying shades (or tones) in color values which causes the difference in transparency.
I hope that makes sense. More importantly, I hope you’ll play around with adding this little magic touch to a mask of your own.
Now as a special treat for you, if you click on the image below that mask will download automatically for you. I hope you enjoy it.
And here’s a layout I made using that fancy mask and my own photo:

If you’d like to see more details about this layout, you can find it in my 2025 Gallery.
Extra Tips

Try playing with the shade of grey that you use when filling the “overlay” selection. The darker the grey the more the photo will show through. Conversely, the lighter the grey, the less the photo will show through.
Be careful how light a grey you use. Remember, as you learned in my “Two-Tone Mask” post, PSE will treat white the same as it does black. That means white will provide no transparency at all in your mask.
And don’t forget…you can also use text instead of an “overlay”. This would be yet another way to have sort of a built-in caption!
Also please be aware that different photos will react differently to the same mask. The darker the photo the more susceptible it will be to the more transparent sections of the mask.
Thanks for reading this week’s Tuesday Tip. Remember, if you have any suggestions or questions please don’t hesitate to “Message Me“. Check back next week for a tip about highlighting your photo’s subject. Click “Follow Me” to stay in touch. I hope you have a wonderful week!
