
Busy Quilts
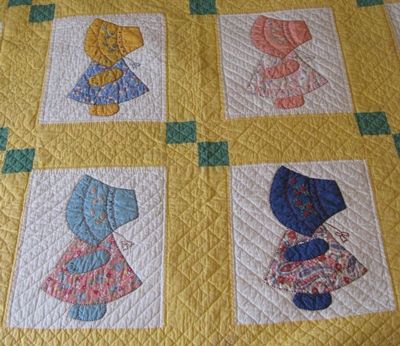
I love quilts. I always have. I’m from a German family (on both sides) and there were always lots of quilts around. I’m not sure how many people these days are familiar with or really appreciate old-fashioned quilts such as the one featured above.
As a technique, quilting has been used for a diverse range of objects, from clothing to intricate objects such as pincushions. Along with patchwork, quilting is most often associated with its use for bedding. But quilts are not only practical objects. Quilts in the late 17th century and early years of the 18th century were made as decorative items that displayed the fine needlework of the maker. Only the wealthy had the leisure time for quilt making, so such quilting was done by only a few.
I grew up around women who made quilts and I learned how to quilt from them. I even made a quilt for my son before he was born. Back in my day…we didn’t have the opportunity to know in advance whether the baby would be a boy or a girl. So, the quilt I made had to be in gender neutral colors. Baby shower gifts also had to be that way. But that’s just how things were back then. Funny how times change…seems a lot of things are gender neutral now. But not necessarily in a good way.
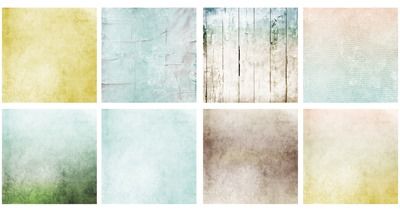
As a child I had a “Little Dutch Girls” quilt that was completely hand-stitched by my paternal grandmother. It was made up of roughly 30 or so blocks that looked something like these:
Today quilting has even made its way into scrapbook layouts. It took me a long time to feel comfortable using a quilted background because they always seemed waaaay too busy to me.
But I have gotten past that and find myself using a quilted background more than I ever dreamt I would. So today I thought I’d share with you some fun ways to use some not so busy quilt patterns in our scrapbooks…
Quilting With A Twist

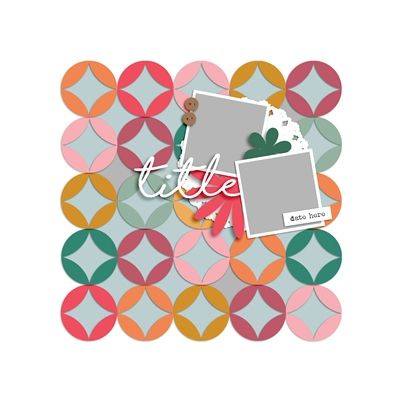
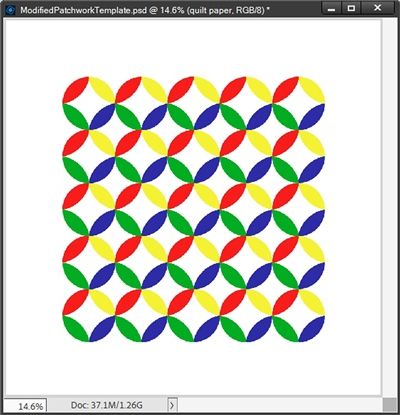
The image above was made using a template I created some time ago for a pinwheel quilt design I used as a background. In that image the background is a whole lot busier than what I actually used for my background. And I’m sure it looks busier than what some might find to be practical.
But that’s what this post is all about. I don’t want you to shy away from a gorgeous quilt pattern simply because it looks like too many colors/patterns to use behind your photos (or even journaling).
I was going to use another quilt template of mine to illustrate the ideas I have for you. But I recently ran across another template that will be a better example:

This is a lovely set of “Patchwork Templates” by Scrapping with Liz that could make some gorgeous quilted backgrounds.
Before I get started, just a quick reminder…I use Photoshop Elements (PSE – 2024). So, my screen shots may look different than what you see on your screen.
Now let’s start quilting…
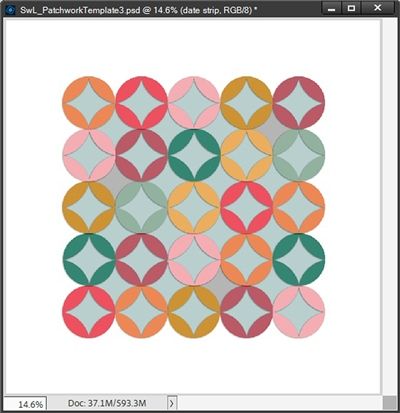
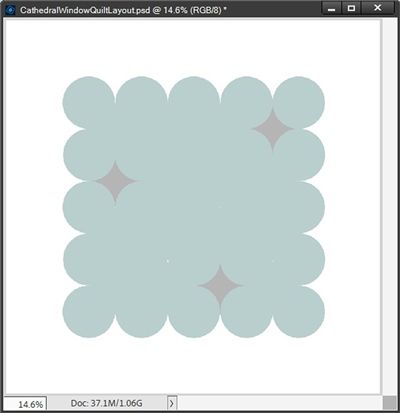
I love the cathedral window (sometimes called the folded circle) quilt design so I’m going to use template#3 from this set:
This design should look a bit familiar…it’s also featured at the top of this post. Though replicating the quilt pattern in that image requires using a different template. I’ll explain why.
The template I created based on the featured image at the top of this post is a bit more complicated in as much as it allows me to change all four of the ellipse “corners” on each circle. That gets a bit time consuming and I thought using a simpler template for this post would be better.
The first thing I’m going to do is hide all of the template layers that are not part of the actual quilt pattern, leaving me with this:
Picking Papers
Typically, the first thing I do is pick the papers I’m going to use to create the quilt. But, it’s truly not the very first thing. Generally speaking, whenever I’m creating a quilted background, I already have a layout (photos included) in mind. So that means I also have the color scheme fairly well thought out.
If you look at the template you can see that there are 8 basic colors for the ellipse shapes as well as what looks like only two colors for the shapes beneath those ellipses. That should mean there are going to be only 10 papers I need to pick for the quilt pattern.
Yes, I said should…why? Well, each set of ellipse “corners” has its own individual circle shape beneath it:
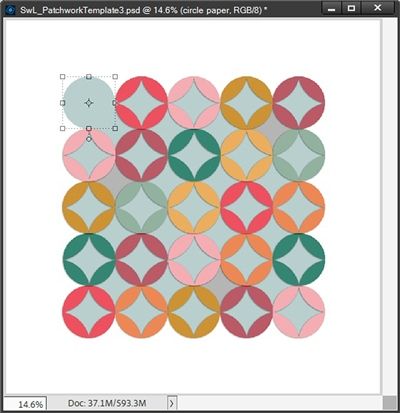
And, there’s a circle shape for the “space” between each set of ellipses. Given that, it is possible for me to use up to as many as 41 different papers for those individual circles alone. Since this post is all about NOT creating a busy quilt background, I’m sure you’re hoping I’m not going to do that. But I’m also not going to use just two colors for those background circles. But we’ll see how this goes.
In an attempt to make things a bit easier for me while I’m clipping papers to all of these quilt shapes, the next thing I do is go in and color code the ellipse layers based on color. Clearly that’s not going to be 100% foolproof since in PSE we only have seven different layer colors available. But coloring seven sets will help dramatically. Here’s what a portion of my layers panel looks like now:

I could go an extra step and reorder the layers by color so each color “set” is together. But that really isn’t necessary. And you do have to be careful not to mess up any layering. I hope you know what I mean by that.
For example, if you look at the layers panel above you can see that this template has each of the quilt pattern shapes (named quilt paper) layered directly above its underlying background circle shape (named circle paper). That doesn’t mean you can’t organize the “quilt paper” color sets together. It just means you have to make sure that in the end, all of the quilt paper shapes end up layered above all of the circle paper shapes. I hope that didn’t confuse you.
As long as layering isn’t an issue organizing colors can sometimes make it easier when it comes time to start clipping papers. It’s certainly one of those steps that is totally a personal preference issue.
I’m working on a layout with a coastal theme (I know…big surprise 😉) so I’m going to be using papers and elements from “Seaside Treasures” by CarolW Designs. My goal here is to make the quilted background subtle so it doesn’t overtake the photos/embellishments on the layout.
I’m going to start with these eight papers for the quilt paper (ellipse) shapes:
Clipping Papers
I’m going to start with the ellipse shapes that are the darker green color. So, I pull in the paper you can see at the lower left corner of the above image. I position this paper layer directly above the top most dark green ellipse shape layer and clip the paper to the shape:

It’s a little more subtle than I was going for. I really wanted the dark shades of green. But that’s easy to fix. All I have to do is “grab” one of the corners and re-size the paper until I’m happy with the color:

I want to use that same shade of green on the remaining two dark green ellipse shapes. So, all I have to do is duplicate this paper twice and move those new paper layers so one is above each of the remaining dark green shapes and clip the paper to the shape:
You can likely see that the position of the paper is not identical on the other two dark green shapes. I did this intentionally to give it a little different look on each of the three shapes.
Now I’m going to use that same re-sized piece of paper for the two lighter green ellipse shapes. Again, all I have to do is duplicate the original “green” paper two more times, move those new paper layers so one is above each of the light green shapes and clip the paper to the shape:
This time I positioned the papers so different shades of a lighter green are over each of these two ellipse shapes.
With the green shapes taken care of I’m now going to concentrate on the goldish ellipse shapes. I’m going to use the paper at the top left corner of that image of the papers above…a deep yellow shade.
Again, I pull in the paper, position this paper layer directly above the top most goldish ellipse shape layer and clip the paper to the shape:
Again, I really wanted the dark shades of yellow. This time I’m not going to re-size the paper because I may want to use one of those other shades (at full size) for the light orange ellipse shapes later. So, this time I just reposition the paper until I’m happy with the color:

And just as before, I’m going to duplicate/move/clip this paper until I have the remaining goldish ellipse shapes “covered”:

I don’t want to bore you with clipping all the other papers to the ellipses so I’m just going to follow the same process until I have the rest of them covered:

Quilt Background
Now for the circle shapes beneath those ellipse shapes. I mentioned above there are 41 circle shapes that make up the quilt background:
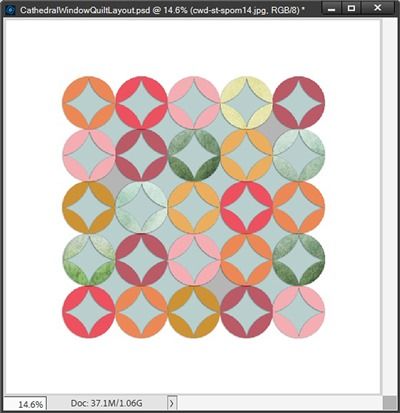
As you can now more easily see, three of those circle shapes are a darker color. For those three circles I’m going to use one of the eight papers that I showed earlier:
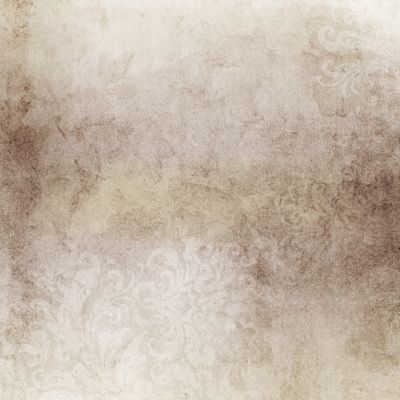
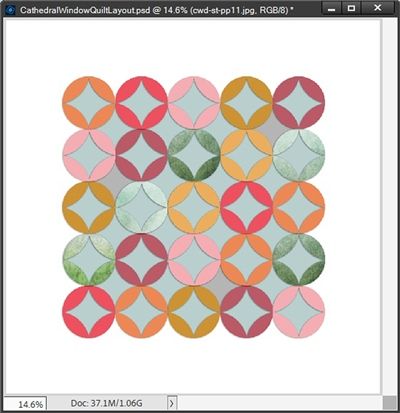
For the circle shapes that are beneath the ellipse shapes I’m going to use one of the solid papers (not previously shown) from the “Seaside Treasures” kit (link above):

And for the circle shapes that are beneath the spaces between the ellipse shapes I’m going to use one of the ombre papers (not previously shown) also from the “Seaside Treasures” kit (link above):

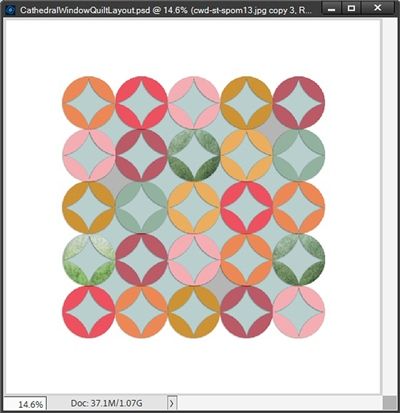
Again, I won’t bore you with all the clipping. Here is the finished quilt background:

I hope you can appreciate how un-busy this quilt pattern is compared to the quilt pattern shown at the beginning of this post. It’s not the most subtle quilt pattern I’ve ever made. Usually, my quilt patterns tend to be more monochromatic. This time I wanted to use more colors that would tie in with the pictures I plan to use.
Note On Final Cleanup: If you, as I, have clipped full size papers to any of the shapes in the template, you will want to go back through once you are completely happy with the quilt and cut that paper down to only the size required. If you aren’t sure how to do that, please refer back to my August 1, 2023 “Learning New Tricks” post about doing just that.
And here’s the layout I made using this quilt background:

If you’d like to see more details about this layout you can find it in my 2024 Gallery.
Cathedral Window – Complex
So, I’ve shown you how to use a simple cathedral window quilt pattern. But I also want to show you how you can turn that simple template into one that will allow you to manipulate the individual ellipse shapes similar to what you see in the image above.
I know this sounds like it’s going to be a chore but it’s really not that difficult. And I promise I’ll try to keep this super quick!
I’m going to go back to the template that I started with before clipping papers to the shapes:
I’m going to hide every layer except the layer for the top left ellipse circle:

I’m going to duplicate this layer, hide the original layer and remove the shadow from the duplicate layer. Next, with the duplicate layer active I draw a selection box around the top half being very careful to select “exactly” only down to where the bottom half meets the top half:

For that image directly above, I zoomed in super close so you could see how I was able to get as close to that intersecting point as possible. And here’s the full selection:
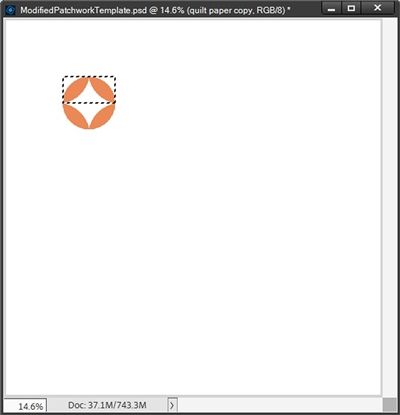
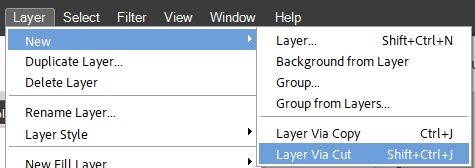
Now that the selection is made, I can create a new layer via cut (Shift+Ctrl+J):
PSE puts that selection on its own layer (Layer 1 for me) and I hide the duplicate copy of the “full” ellipse circle:

Now I can select just the left half of this layer, create another layer via cut (Layer 2 for me). Now each of those ellipse shapes is on its own layer.
I can now select both of those layers and Right-Click anywhere in the “grey area” around those layers and select Duplicate Layers (Ctrl+J will also work):
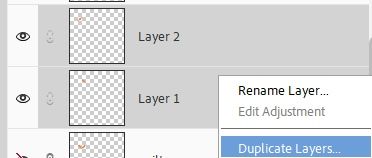
Those two new copies are the ones selected which is exactly what I need. With those two layers selected I can now go to the top tool bar and click Image->Rotate->Flip Layer Vertical:

And I end up with this:

Well, that doesn’t look much like the quilt “circle” now does it 😉 No worries…all I need to do is ensure that the move tool is selected and then nudge those flipped layers down until their tops are even with the bottom of the upper two ellipses:

Once again, I zoomed in super close so you could see how I was able to get those new layers placed right up against those other ellipses without overlapping them.
Note: Once each separate ellipse was created, I renamed those layers “Elliptical Top Left”, “Elliptical Top Right”, “Elliptical Bottom Left” & “Elliptical Bottom Right”. You do not have to do that…I just think it makes it a bit easier to keep track later.
I’m now going to re-color those four ellipses just to more easily tell that they are separate ellipses:

Note: There’s no significance to the colors I chose. You can color yours any way you wish.
If you want to replicate the white outline around each ellipse as shown in the example pattern at the top of this section. That too is not a big deal. I’m not going to do that now. But watch for next week’s post where I will tell you how to do that if you so choose.
From here it’s a simple matter of linking those ellipses, duplicating them and placing them in the correct positions until I complete the first row of the quilt pattern:

You may have noticed that I kept each colored ellipse “circle” in the same orientation as the first. If you’re trying to vary the position of each individual color you can rotate the ellipses as you see fit. I was just trying to keep things simple for illustration purposes.
To finish the pattern, I select all the of colored ellipse “circles” in the row, I grouped the ellipse layers together:

I named my group Row 1. You can name yours any way you wish. Now I can just duplicate (rename based on Row #) the group and reposition the new group as many times as necessary until I have the entire quilt pattern:
See…that wasn’t too bad, was it?
Another Cleanup Note: If you plan to keep this new template with each of the quilt “circles” in four individual pieces, I HIGHLY recommend that you go back through and hide (or even delete) the original layers that are no longer needed. There’s nothing that says you can’t keep the original “whole” circles. But it can make the template a bit cumbersome to navigate. At a minimum, if you do want to keep the original quilt “circles” I’d recommend that you order those layers together and place them in a group. This would at least get them “out of the way”.
Once you’ve gotten this far all you need to do is go back in and apply shadows to the ellipses. This could be done at the Group level which would be quicker. But (and this is a BIG but) if you ever ungroup the rows for any reason, you would lose your shadows.
I’d recommend applying the shadow to each individual ellipse. I know that sounds like a lot but all you have to do is create a shadow on one of the ellipses and then copy it, select all the ellipses in a Group (row) and paste the layer style to all of them at one time.
So, it’s totally your call on how you add your shadows.
Note: If you think you want to go the extra step and replicate the white outline around each ellipse as shown in the example pattern at the top of this post, you should hold off on applying any shadows. Again, stay tuned for next week’s post on creating that outline.
There you have it. Now you have the option to clip all sorts of different paper to those individual ellipses.
More Quilting Tips
Any time you’re working with a “busy” background paper, like a quilt pattern, it’s a good idea to “ground” your photos so they still show up nicely. You can do this by placing a solid (or mostly solid) color shape (circle, square, triangle, etc.) behind them or put a solid color frame around them. This will help calm down the busy background paper a bit.
When using a “busy” quilt pattern consider using a monochromatic, preferably pastel, color scheme. You don’t have to use solids. But if using patterned paper, try to shy away from large bold prints.
Another tip for working with a “busy” background paper; Layer a piece of “vellum paper” over top of the background. This will mute the busy background keeping it visible but not so busy.
You can create your own piece of vellum for calming down busy paper. Just create a 12×12 blank file, fill it with a white, off-white or grey color and set the opacity to a value that suits your needs. Some good color values are: Off-white (#f7f6ef) & Grey (#d7d8dd).
The beauty of working with templates is endless if you remember to think outside the box.
If you think you want to add the quilt “outlines” next week…hold off on doing any shadowing right now.
As always, if you have any questions or want to make a suggestion about a topic you’d like me to cover, please don’t ever hesitate to “Message Me”.
Thanks for reading this week’s Tuesday Tip. If you want to stay informed about new posts, just click “Follow Me” to stay in touch. I hope you have a wonderful week!
