Not That Filter!
Okay, so now you’re probably certain I’ve dangerously veered off course. What can a coffee filter possibly have to do with scrapbooking? Well funny story there. Back in the day when the original Your Scrapping Café was still open, we actually did use coffee filters in lots of different ways when working on a traditional scrapbook page. Believe it or not, once we actually made flowers using those filters. But that’s definitely not the kind of filter I’m going to be talking about today!
Back last fall I posted about creating artistic images using the Filters available in Photoshop Elements (PSE) to manipulate photos. But did you know that you can use filters on more than just a photo? PSE has some fantastic filters. You can really tap into your creativity and use these to develop interesting effects on all manner of digital supplies. Namely paper & other elements.
As I was working on this post, I realized that given everything I wanted to share with you, it was going to get very long very quickly. I’ve done too many long blog posts and I’ve made a promise to myself to try and keep them shorter in the future. I think I just heard you scream “YEA!!!!!” So, I’ll be tackling all kinds of things about filters over the next several weeks.
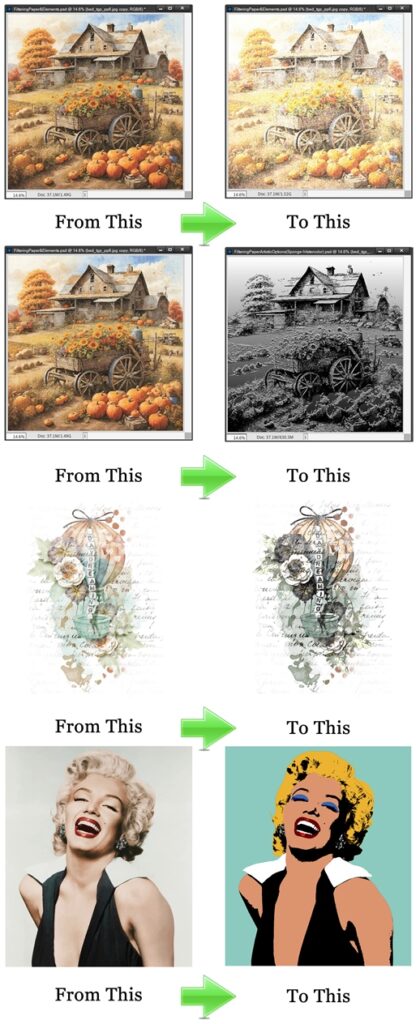
Today I’ll be covering “the basics ma’am, just the basics!” But before I get into that I did want to give you an idea of some of the things you’ll see in the coming weeks. Take a peek below…
Sneak Peek
And here’s just a taste of some things you’ll learn how to do in the future posts.
Filter Basics
Clearly, I’m showing my age just a bit 😉 with that throwback to the original Dragnet days! If you’re to young to remember Dragnet…I hope you get a laugh out of the image anyway!
Just a quick reminder…I use the current version of PSE – 2024. So, everything I show you was accomplished using that software. Some of my screen shots may look different than what you see on your screen depending on the version you are using. If you don’t use PSE, please search the internet for other tips/tutorials specific to the graphics editing software that you use.
Filters change the look of your image whether it’s a photo, piece of paper or other elements. They can add fun effects to make your image appear textured, painted, tiled, etc. You can apply a filter to almost any image that you work with in PSE. Be aware, not all filters will work on images in Grayscale mode.
All filters fall into two primary categories; Corrective Filters which fix a problem with your image. Perhaps you need to adjust the color of an image, remove scratches, etc. When you use a corrective filter, your image’s appearance stays the same. It’s just improved. Sharpen and Blur are two of the most popular corrective filters. & Destructive Filters which create a special effect, such as making a photograph look like a painting. Destructive filters can make an image look very different from the original, such as warping an image.
Here are the most used categories of filters:
Artistic filters: Simulate a painterly appearance on traditional media and create a unique look.
Blur filters: Soften a selection or an image. Useful for retouching.
Brush Stroke filters: Give a painterly or fine-arts look using different brush and ink stroke effects.
Distort filters: Geometrically distort an image, creating three-dimensional and other reshaping effects.
Noise filters: Blend a selection into the surrounding pixels and remove problem areas, such as dust and scratches.
Pixelate filters: Sharply define an image or selection by clumping pixels of similar color values.
Render filters: Create cloud patterns, lens flare, fibers, and lightning effects in an image.
Sketch filters: Add texture for depth or to give a hand-drawn look.
Stylize filters: Produce a painted or impressionistic effect by displacing pixels and heightening contrast.
Texture filters: Give the appearance of depth or substance, or add an organic look.
Each of these filter categories contain multiple effect options. I’m not going to list or even try to provide examples for each of them over the coming weeks. But I will try to provide a somewhat comprehensive look at a few of the categories’ options.
Note: There are four categories of filters that I will not be covering at all: Correct Camera Distortion, Adjustment filters, Other filters & Digimarc filter (used to embed a digital watermark into an image to store copyright information). If you’d like more information about those filters, I’d encourage you to search the internet for details about those filters.
You can access filters in any of the following three ways:
Filter menu: You access the Filter menu from the top tool bar. It contains all of the available filters and lets you apply filters individually. As soon as you select a filter, PSE will open it in the Filter Gallery.
Filters panel: This is the option available at the bottom of the Layers panel. If you do not see Filters at the bottom of your Layers panel you can access it by going to the top tool bar and selecting Window->Filters. This Filters panel also displays thumbnail examples of what each filter listed in the Filter menu does. The Filters panel allows you to apply filters individually to a photo in the Expert view. Important Note: When using the Filters Panel you need to be aware that you cannot “save” the actual settings for adjustment once you’ve committed a filter. I HIGHLY recommend that you write down the values you use for each setting and perhaps include them in the layer name for future reference.
Filter Gallery: You access the Gallery by going to the top tool bar and selecting Filter->Filter Gallery. The Gallery displays thumbnail examples of what each filter does, like in the Filters panel. The Filter Gallery lets you apply filters cumulatively and apply individual filters more than once. You can also rearrange filters and change the settings of each filter you’ve applied to achieve the effect you want. Because it is so flexible, the Filter Gallery is often the best choice for applying filters. However, not all filters listed in the Filter menu are available in the Filter Gallery.
Most filters let you preview their result in the Filter Options dialog box and the file window. You can then choose to apply the filter or cancel the operation without losing time. Some Filters will require that you simplify the object before applying the Filter (most any purchased digital scrapbook supplies – see my post about file sizes for more information about smart objects) .
PSE (and Photoshop) use the foreground and background colors when applying some filters. There are many of PSE Filters that work differently depending on the current foreground and background colors settings. In most cases the filters affected are those in the Sketch category. The Halftone Filter is a great example. If you have red and green selected the halftone pattern will appear in red and green – not always the desired look. But Filters in other categories can use the background/foreground colors too such as the Clouds Filter in the Render category.
It is possible to add Filters by using third-party “plug-ins”. As a beginner, these add-ons (some free) can help simplify complex editing processes. As an expert, they can help expand your available PSE tool set even further, and help lead you in new artistic directions. Each plug-in must be saved in a specific location on your computer. Some of these plug-ins will be in the form of an actual filter file (.ACF) others may be available as a PSD or Photoshop Action. For more details about Filter plug-ins please feel free to search the internet.
Now that I’ve gotten all of that out of the way, I’ll look forward to showing you how to use some of these Filters next week.
More Tips On Filters
Filters allow you to apply artistic effects to your images. You can make images look as though they were sketched with chalk, drawn with a graphic pen, or even add perspective to them.
Applying filters to a large image can be time-consuming. It’s quicker to preview what the filter does in the Filter Gallery.
Apply filters in succession to build up effects. You can apply filters to individual layers or to several layers in succession to build up an effect. Choosing different blending modes in the Layers panel blends the effect.
When using the Filters Panel you need to be aware that you cannot “save” the actual settings for adjustment once you’ve committed a filter. I HIGHLY recommend that you write down the values you use for each setting and perhaps include them in the layer name for future reference. If you need to make adjustments you basically will need to un-do the Filter and then re-apply it with different settings.
When using the Filters Gallery you can “save” the actual settings for adjustment once you’ve committed a filter. And you have the ability to “stack” filters in layers which can be re-ordered to preview different results.
You’ll always be able to tell if a layer in the Layers Panel has been treated with filters via the Layers Gallery. There will be an icon to the far right of the layer’s thumbnail that looks like two overlapping circles. When you double-click that icon, the Filter Gallery will open for that image/layer.
Consider feathering the filter edges. If you’re applying a filter to only a selected area, you can soften the edges of the filter effect by feathering the selection before you apply the filter.
Create textures and backgrounds. By applying filters to solid-color or grayscale images, you can generate a variety of backgrounds and textures. You can then blur these textures. Although some filters (for example, the Glass filter) have little or no visible effect when applied to solid colors, others produce interesting effects. For solid colors, you can use Add Noise, Chalk & Charcoal, Clouds, Conté Crayon, Difference Clouds, Glass, Graphic Pen, Halftone Pattern, Mezzotint, Note Paper, Pointillize, Reticulation, Rough Pastels, Sponge, or Underpainting. You can also use any of the filters in the Texture submenu.
You can make a series of images look similar by applying the same filter to each.
As always, if you have any questions or want to make a suggestion about a topic you’d like me to cover, please don’t ever hesitate to “Message Me”.
Thanks for reading this week’s Tuesday Tip. Be sure to check back next week for great tips on using Artistic filters with paper. And if you want to stay informed about other new posts, just click “Follow Me” to stay in touch. I hope you have a wonderful week!


