It’s All About The Size
Are your scrapbooking files getting too big for your storage space? If you’ve been digi-scrapping for any length of time at all you’ve certainly noticed how quickly digital storage space can be “consumed”. Having enough storage space isn’t just about storing our supplies, it’s also about storing all of our hard work on projects.
If you’re using most any graphics editing software, you’re likely creating your scrapbook layouts in layered files. These layered files can sometimes grow to unimaginable sizes. But there are things you can do to reduce their size.
As I’ve mentioned previously, I use Photoshop Elements (PSE). PSE creates a Photoshop Document (PSD) file when I save my layered layouts. And I also create all my layouts at the 12” x 12” size. Today I’m going to talk about how to reduce the size of your PSD files…
File Size Management
Before I go much further here’s a quick primmer on bytes. Things have changes so much over the last 20 years and it’s hard to keep track of the different increments of bytes. This little chart should help…

And I know I said I was going to talk about PSD files. But really quick I do want to mention that all of the gorgeous digital scrapbook layouts (or other graphic images) we create can certainly also take up a lot of space.

Most often, we save our precious images in JPG or sometimes PNG file formats. It’s equally important to manage the size of these file types as well.
There are a multitude of ways to compress these file types. A lot of things can affect the degree to which you might want to compress these images. Specifically printing quality & “public” posting quality. I encourage you to search for tips on the internet regarding the best way to do that specific to your operating system. It would be silly for me to try talking about this since everyone’s requirements can vary so dramatically.
Now back to PSD files…when you are working with layered digital scrapbook pages, it’s easy for the file size to get pretty large. This happens especially if you are using a lot of different element & paper layers. But that’s not the only reason we can end up with so many layers.
Sometimes, specifically when clipping papers to parts of our layout, it’s possible to end up with more than a few layers of “paper”. And any time we use a pre-made template as a starting point for a layout there is a risk that we may forget to delete all of the “placeholder” layers after replacing them with our own supplies.
Working with templates, while a great way to start a layout quickly, can often result in a lot more layers than starting a layout “from scratch” such as this layout:
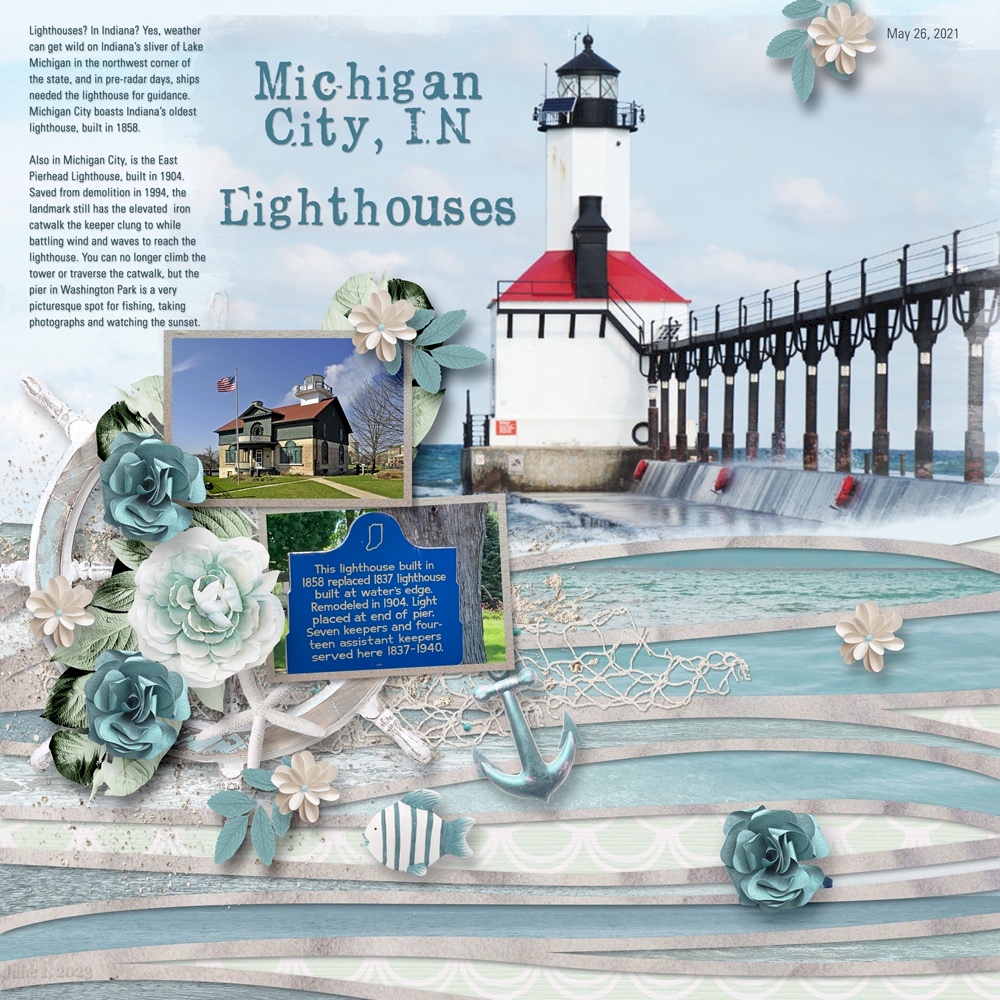
I created this layout using a template from “Strip It! #3” by Heartstrings Scrap Art. You can see more details about it in my gallery. Every single one of those wavy shapes is a different piece of paper. But that is partially my doing. The original template had the wavy shapes broken into four color “blocks”. Because I wanted to use more than four different papers/colors, I separated some of the wavy strips into individual layers.
I always (or at least mostly) save my layout periodically while working on it. Generally speaking, I don’t think too much about file size management until I feel like I’ve gotten it in final form. When I reached that point on this layout the size of the PSD file was HUGE.
It was a whopping 1,405,119 Kilobytes (KB) or 1.4 Gigabytes (GB). Let me reiterate…GIGABYTES!!! That’s enormous. Thankfully, when I saved the layout as a JPG file, the size was by contrast, a mere 8,144 KB or roughly 8 Megabytes (MB). Note: I do save my JPG files at the maximum Quality (12) for a variety of reason. Obviously, I could reduce the size a bit more by reducing the quality.
I don’t know about you, but if I created many layouts that ended up with a PSD file that size, I’d be looking at having to buy more storage devices on a regular basis. So read on for some tips about cutting that size down.
Important Note: I HIGHLY recommend that you make a backup copy of your original PSD file before you experiment with some of these tips!
Add White Top Layer
One quick method that was very popular a few years ago is to add a top white. Simply add a new blank white color layer on top of everything else, and save the PSD file. This small trick has been reported to save as much as 50% in file size.
Why should this work? This has to do with the preview image generated by Photoshop. If it is a single-color layer, then the image will be smaller.

Note: For illustrative purposes only, I offset the top layer so you could still see part of the layout underneath. Anytime you use this method the top white layer must completely cover the entire layout.
I tried this quick method and didn’t see anywhere near a 50% reduction in file size. With this given layout I only netted a 2% reduction.
Perhaps things have changed over the past few years with how PSE generates the preview image. Or it could be that this is an option that only works well if using the full version of Photoshop. Since I don’t use the full version, it’s hard for me to say. So, I’m not sure this is a viable option anymore. But it certainly wouldn’t hurt for you to try it.
Crop The Entire Layout
One method frequently recommended is to just crop your final layout to 12×12 (or whichever size is your preference). This method is designed to crop out any paper/elements that extend beyond the edges of the layout.

To be perfectly honest, I’m not sure why this option is “pushed” so frequently. In the case of this layout out, cropping had virtually no effect. It still weighed in at a staggering 1,404,337 KB (1.4 GB). I expected more than a 782 KB reduction. So disappointing after how many times I’ve seen this touted as a great option!
So now what?
Zip It!
Another quick method is to create a compressed (zip) file of your original PSD file. Simply choose a file compression tool like WinZip or WinRAR to compress your PSD into a .zip or .rar file. This is the best and classic way to compress any file since the dawn of the internet. If your operating system is not Windows, you will need to search the internet for compression tools specific to your operating system.

I tried this zip method and ended up with a compressed file at 915,034 KB. That’s a nice size difference…but really only about 38% smaller.
And the only way this really saves you anything is if you remember to delete the original file used to create the zip file. So, you’ll want to consider if using a zip file will be an inconvenience if you need to make changes in the future.
Even with a 38% reduction…I’m pretty sure I can do better than this.
Delete Hidden Layers

When you are creating your layout, you may try a lot of different papers embellishments or alphas and instead of deleting them you may have just used the “Eye” icon to hide them. This can also happen when using a template’s “placeholders”.
Note: In the image above, it shows a piece of paper clipped to the hidden layer. When deleting this type of hidden layer, you must also delete whatever may clipped to it.
Sometimes I’ll have a hidden text layer that I created to retain the actual font if I needed to simplify text before applying any special effects. This is a hidden layer that I would definitely want to keep.
Before saving your layout for the final time, always go back through and look for hidden layers that can be deleted.
I didn’t have any hidden layers in this layout so I added some by duplicating some elements & the framed photo layers then hiding them. The new file size (with hidden layers) went from the original 1,405,119 KB to 1,528,246 KB.
I then went back and deleted the hidden layers. This did result in an approximate size reduction of 8% but that really only took it back down to the size prior to me adding all those hidden layers. So, that doesn’t seem like it made much of a difference, right?!?
Admittedly, my example was a fabricated version of hidden layers. That’s not to say that in a “real” scenario when deleting naturally occurring hidden layers you won’t see better results. It’s certainly worth a try!
Let’s take a look at some other options…
Don’t Use Full Sheets
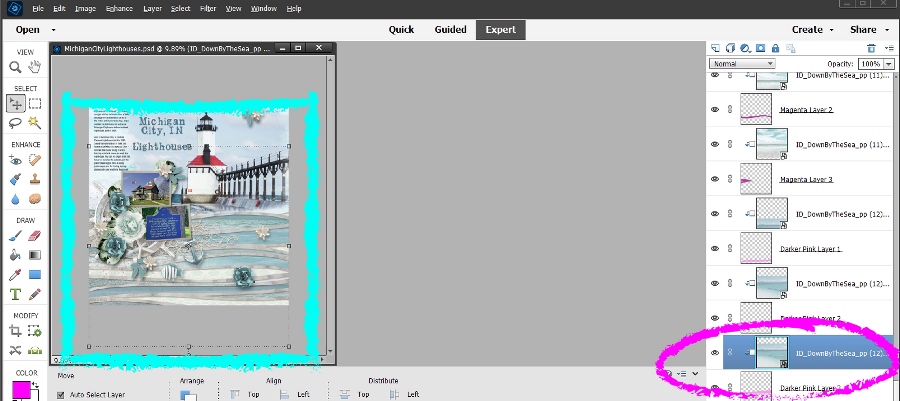
Going back to the original layout (not cropped…no hidden layers), notice in the image above, that a piece of paper is clipped to the layer below it (highlighted in hot pink). Now look very closely at the section highlighted in aqua. Can you see the “outline” of the full sheet of paper still visible in the layout’s workspace? Clearly, the entire piece of paper is not needed. But it will remain full size when I save the PSD file.
In cases like these the best thing to do is create a new layer of that paper with only the portion required to cover the shape to which it will be clipped.
With the paper layer selected I use the Rectangle Marque Tool and draw a selection around only the portion of the paper I need to keep. I am always careful to make my selection “box” a bit larger than what I might need…just to be safe. I then create a new layer via copy.

Note: A little tip here. On this particular layout it wasn’t as easy as in most cases, to see exactly what portion I needed to keep. To help with that I actually hid the paper layer prior to drawing my selection box. This allowed me full visibility of the area I wanted to cover. Once the selection was made I unhid the paper layer.
In order to preserve the name of the original paper that I used, I rename the new layer to the same name as the original paper. I then delete the original paper and clip the new layer to the appropriate layer.
So, I went through and did this for all of the layers to which I had clipped pieces of paper (and photos) that were larger than required (even if they weren’t completely full-size).
That was pretty time consuming but well worth the effort. It reduced the file size by a staggering 70%. The PSD file size came in at just 435,439 (435 MB). That’s much more reasonable than the original 1.4 GB.
Merge Layers

If you want to save more space, merging layers to which papers/photos (or other things) have been clipped will also help.
Select the layers that you want to merge in the Layers Panel then right click and choose Merge Layers.
I did go back through and merge all of the “clipped” layers after having reduced the paper/photo sizes. I saw a slight decrease in the PSD file size…only about 80,000 KB.
I’m not sure it’s worth taking the time to merge layers specifically because I’ve now lost all of the original layers. I’d never be able to go back in and make modifications.
But if your space is at a premium…it might be a useful option. And there’s one more thing we can try…
Simplify Layers

If you are using lots of smart objects (or smart layers), you can save space by simplifying them.
So, what exactly is a smart object? Smart Object layers in PSE are layers that contain image data from a separate file. This data is linked to the layer, so if you edit the smart object, the changes will be reflected in the layer.
Smart Objects let you perform vector-based edits to the file (i.e., re-sizing, transforms, etc.,) without changing the raster content of the embedded object. Unlike in the full version of Photoshop, you cannot directly edit Smart Object layer content in PSE. To edit the raster content (e.g., re-color) of a Smart Object layer in Photoshop Elements, you must first simplify, or rasterize, it.
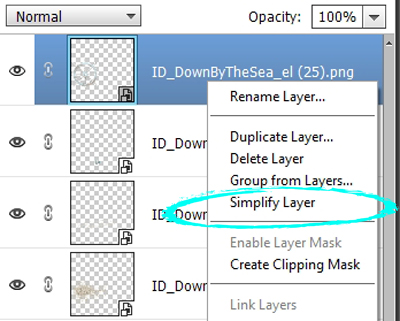
Smart Objects can be identified by the icon in the bottom right corner of the layer thumbnail in the Layers panel.

To rasterize a Smart Object layer in PSE, which converts it into a raster image layer, right-click the Smart Object layer’s thumbnail in the Layers panel. Then select the “Simplify Layer” command as shown below.
Generally speaking, most any element or paper you use from a digital scrapbooking kit will be a smart object. Smart Objects are handy for resizing layers without losing pixel data, but when you have finished your page, you won’t need those extra pixels.
I’ll be perfectly honest here. I went through and simplified all of the smart objects in this layout prior to doing any of the other options above. It reduced the original PSD file size by roughly 50%. But at more than 730 MB, it was still fairly large.
I then went through and cut clipped paper/photos down to only the required size. And I once again ensured I had no hidden layers I didn’t need. This resulted in a new PSD file size of 232,680 KB (232 MB). I’m pretty happy with that. And note, this is roughly one quarter the size of the zip file I created above!
I subsequently went through and merged “clipped” layers. This resulted in a final PSD file size of 174,086 KB (174 MB)…impressive!
Clearly this combination of “downsizing” measures resulted in the smallest PSD file size. But again…I’ve lost some of the original layers.
And when I saved the layout as a JPG file this last time, the size was 8,129 KB or roughly 8 MB only a slight contrast to the JPG file size with no space saving efforts (8,144 KB also roughly 8 MB).
Most Important Tips About Reducing File Sizes

The single best “downsizing” option is to make sure you’re not using full-sized papers/photos when clipping. This will result in what I believe is the best file reduction while still allowing for editability in the future.
Don’t forget to delete any unnecessary “hidden” layers.
Consider simplifying smart object layers.
Regardless of the file reduction measure I tried, once saved as a JPG file, the file size was roughly the same as with no space saving efforts (about 8 MB). Again, I do save my JPG files at the maximum quality. But clearly, all of the file reduction steps taken for PSD purposes had little effect on JPG files size.
As I frequently say, just experiment with the different options and pick the one that makes the most sense for you and your storage space.
And, if you have any questions or need a bit of help, please don’t hesitate to “Message Me” for some assistance.
Thanks for reading this week’s Tuesday Tip. If you want to stay informed about new posts, just click “Follow Me” to stay in touch. I hope you have a wonderful week!
