Ready To Move Forward?
Once you feel comfortable with whatever software program you’ve chosen it’s time to start thinking about how to get started on your first “real” layout. Even though you’ve been playing with software, you likely aren’t 100% certain where/how to begin on a layout. That’s why I’m here!
Step #3 Layouts Made Easy

So many times, I run into people who say they just aren’t creative enough to scrapbook. I am always polite but I have to admit it’s often hard to stifle a giggle. I am famous for telling people, especially beginners, that everyone has some degree of creativity. You just need to tap into it.
And honestly, the best “leg up” on being creative (especially for a beginner) is to use a template or quick page. If you’ve read the “Why Digital?” page you’re already familiar with the concept. And if you’ve clicked on the “Follow Me” button you actually already have my free template (shown below – Note: The blue outline is not part of the template). So, let’s dig a little deeper into these helpful items.

Templates
Before I get too far along…regardless of what software you’ve chosen, you should, by now, understand “working with layers” digitally. If that’s not the case then perhaps you should “Message Me” before you delve more into this subject.
Moving on…I have to admit, my first couple of layouts back in 2018 didn’t involve using a template. And I hadn’t even really started working all that much with Photoshop Elements yet. I didn’t know any better at the time. I did have some prior graphics experience “under my belt” so I just did things the way I always had. I was used to using a “dinosaur” of a graphics program called “Image Composer” (by Microsoft & long since extinct). I managed but had I only known then what I know now. It could have been so much easier.
Templates are great for beginners & experienced scrapbookers alike. I’ve been at this digital thing for more than a few years now and I love them as a way to get something going quickly. As in traditional scrapbooking, we build our digital layouts in “layers”. You start with a background paper and apply all of your photos and embellishments individually “in layers”. Digital layout templates (such as the one above) are layered. It has generic shapes to give you an idea of the type and shape of elements that would work well with the page’s composition. You then look through your stash and choose all the bits to create a page without having to give much thought to the actual page design. Many people love using templates like mine or this one below as a starting point.
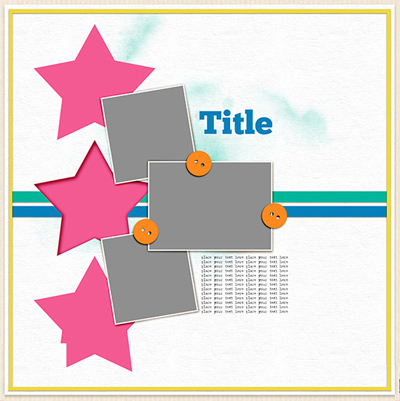
And you’re not locked-in to keeping things exactly as the template has them. You are free to move things around, delete things you don’t like & add things as you wish. It’s kind of like finding a good recipe and tweaking it to include different/extra ingredients.
Templates truly are a great way to create layouts quickly. I haven’t yet run into a shop that didn’t sell templates. Some designers even sell bundles of templates that are designed to help you create an entire album that follows the same look & feel.
Most templates are designed to be used with a graphics editing software package like Photoshop, Photoshop Elements, My Memories or the like. The files are generally provided in layered TIFF or PSD format. As long as you have a software program that supports use of those formats, you’re good to go. If by some chance you’re not using a program like one of those, don’t worry. Most designers will also provide sets of PNG formatted files for each layer of the template (numbered according to the order in which to use them). You will then just pull each layer into your program and go from there. I hope that makes sense. If not, you can always “Message Me” for more assistance.
I’d definitely encourage you to check into using templates as a way to get started.
Standard Quick Pages
If you are a beginner, you may be asking “What in the world is a quick page?” Well, a quick page, or QP for short, is exactly that. A layout that’s already done for you. All you have to do is add your photo(s) and some journaling and you’re done! So, now you’re wondering how they work, right? Keep reading.
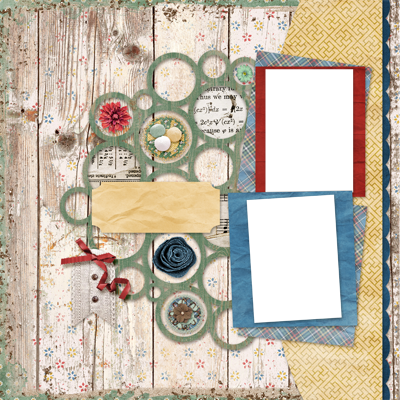
I’ve created a QP using the free template you can receive if you “Follow Me” (shown above in the beginning of this post). I used “Homespun” by Aimee Harrison to create the QP below. Notice how this QP looks very similar to that template? Now all it needs are some photos and maybe some details. If you’d like to get this QP, “Message Me” and I’ll be happy to send you a copy.
When you purchase a standard QP you will receive an image of a completed layout “flattened” into a single layer in PNG format. When you open the QP in your software you will see the complete page with what looks like holes in it. This is where the photos will go. You just place your photo(s) “beneath” the QP layer and you’re done.
The one disadvantage to using a standard QP is that you can’t change anything in the layout. You can however add things like other embellishments, journaling & time/date information.
Adjustable Quick Pages
So, now you’re probably asking “Okay, so what’s an adjustable quick page?” Adjustable (layered) Quick Pages are similar in concept to traditional digital scrapbooking templates, but with one major difference. A traditional template is layered, it has generic shapes to provide you a road map of sorts.
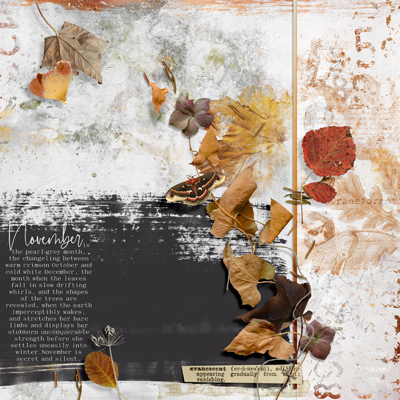
Adjustable QPs, as you see below (from “Evanescent” by Synergy Ink), are dramatically different from a template. These Adjustable QPs are pre-designed pages that already include coordinating elements and papers. Not only can you simply just add your photo, title, and journaling and call it done, you also have the option to rearrange the elements change the shadowing, and more easily add additional elements anywhere on the page.
Just as with templates, most Adjustable QPs are designed to be used with a graphics editing software package like Photoshop, Photoshop Elements, My Memories or the like. Again, these files are generally provided in layered TIFF or PSD format. It’s like using an amped up template…but some of the “hard work” is finished for you. You have all the paper, elements, etc., right there in the QP. This makes it so much quicker than using a regular page template.
A bonus to purchasing Adjustable QPs is that you actually get more than just a QP. Even though most designers don’t include the individual layered PNG files as you’ll often find with templates, you still get all the paper(s) and elements that were used to create it. So, you can always pull them from the Adjustable QP to use in another layout.
Most Important Tip!
Whenever you decide to purchase a QP, please take note of the designer and coordinating kit (if there is one). That way you could later purchase the kit if you ever wanted to create additional pages that would match well with the QP.
If you like what you’ve read and haven’t already clicked on the “Follow Me” button please do. This way you’ll easily stay updated for Step #4…