Want Just Part Of An Element?
Several weeks back in my post about Journaling I mentioned I would have a future post discussing how to cut elements into pieces. Well, that’s this post!
Let me just say, in case it isn’t already obvious…I love digital scrapbooking! One reason is the supplies, which are truly only limited by my own creativity. As I’ve already discussed in prior posts about Re-coloring elements & Re-coloring paper, amazing digital editing programs like Photoshop Elements (PSE), makes altering digital supplies a snap.
Well, sometimes an element might be the right color but you really only want to use part of the element. There are multiple ways to do this depending on the element in question. If you’d love to know more, please read on…
Removing Part Of An Element
Sometimes this is any easy process. For example, you found the perfect scatter to use on your current layout. Only problem is some of the pieces end up in places you’d rather not see them. This is generally fairly easy to fix. Simply use the Eraser tool and remove the parts of the scatter you don’t need.
If you’re using PSE (or likely most graphics editors) you may need to simply (rasterize) the element before doing so. If you’re not sure how to do this you can either “Message Me” or search for tips on the internet.
Either way, before you simplify the image be sure to remove any shadows. First copy (or make note of) the layer (shadow) style. Then delete it from your image. You will then reapply the style once you’re happy with the edits you make.
But There’s More
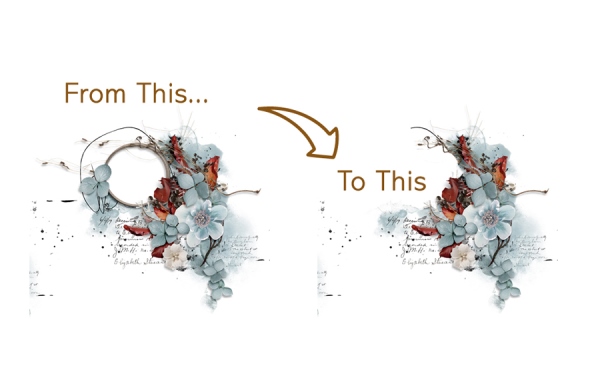
The scatter element was one thing. Then there are times when you find a great cluster but it has a frame that you don’t need. That’s a bit trickier but not impossible.

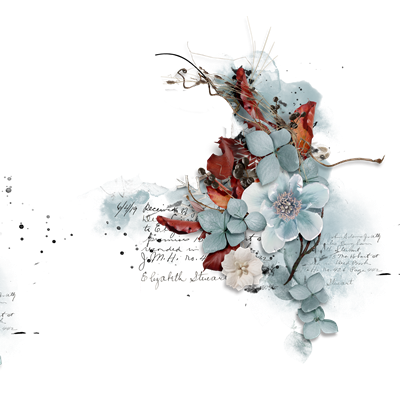
For the layout above I used elements from the “Here and Now” collection by Natali Designs. You can see more details about this layout if you go to my 2023 Gallery. I found the perfect cluster for the leftmost upper photo frame. But it had a frame that wouldn’t work and some other bits that I didn’t care to keep.

Again, I could have removed the frame and other bits by using the Eraser tool. But it was just a bit more complicated than simply erasing a scatter here and there. When this happens, I tend to use the Layer Mask option in PSE. And I do all of this editing outside of the layout for which the cluster is intended.
Using a layer mask allows you to make nondestructive erasures. In essence, masking lets you “hide” rather than physically delete unwanted portions of an element. This also means you can fix any mistakes much more easily.
With the element to be edited open, go to the layers panel and select the Add layer mask tool.
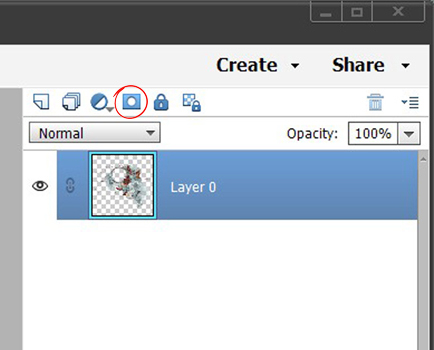
You now see the layer mask (white box) “attached” to the element in the layers panel.
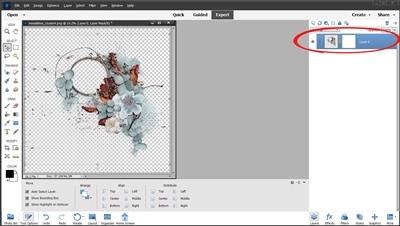
Select the layer mask by double-clicking on the white box next to the layer thumbnail. You’ll know it is properly selected when you see a colored (in my system it’s blue) outline around the layer mask. Now select the Brush Tool. You’ll want to pick a brush shape & size appropriate for the task.
Generally, this will likely be a basic round brush either hard or soft edge depending on the circumstances. If you’re wanting to delete some paint or stamps from an element you may want to look at using a “watercolor” brush. This will tend to make the edges look more in keeping with the original paint/stamp. Changing the opacity can also help. I hope that makes sense. You can decide which brush will work best for you and the element you’re editing.
Remember that when using the layer mask, the color black will erase (hide) and the color white will restore (unhide) portions where you use the brush. So, before beginning to erase you need to ensure that your color chips are set to the default (black foreground & white background). Then just start brushing over the element to erase the parts you want to remove…
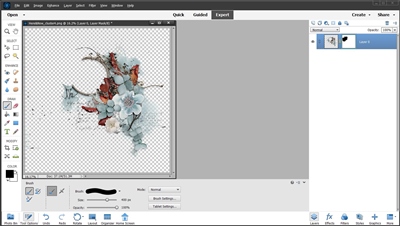
It can be tricky trying to get the frame out and still leave bits and pieces of other elements intact. But that’s what the zoom tool is for. Just zoom in as close as you need so as to be able to carefully erase around certain parts. Yes, it can be tedious and a bit time consuming. But eventually you can end up with the perfect result.
And I would encourage you to save your altered element (both as a layered (PSD or TIFF) and a PNG) under a new name so you have it for future use. By saving it as a layered file you can always go back and modify the element even further if you so desire.
Note: I did use a watercolor artist brush to work around some of the paint. The brush I used was part of a watercolor action set I obtained via a class I attended quite some time ago. Unfortunately, I can’t share that brush with you. But I know there are a lot of great free watercolor brushes at Brusheezy that would work perfectly for this instance. Just search for watercolor brushes.
When I used this altered cluster in the layout above, I did rotate it horizontally and brush out a few more bits once I placed it in the correct position.
This method works on all manner of elements. It’s also especially useful if you want to use just a portion of a piece of word art. This is just one more way to make better use of your supplies.
Cutting Elements Into Pieces
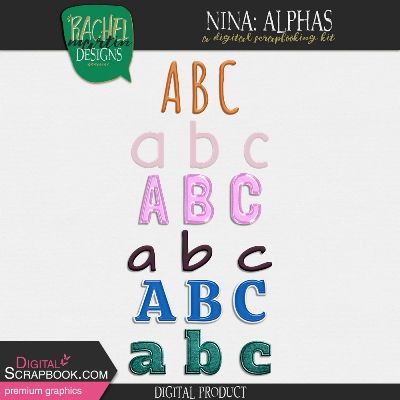
I know…now you’re wonder what an alphabet pack has to do with this topic. Well, if you remember back to my post about fonts & alphas, I specifically mentioned that not all designers provide their alpha characters as individual PNG elements. That’s the case with this particular set of alphas from “Nina” by Rachel Martin.
Rachel provides (at least currently) her alphas only in single sheets like this…

Obviously, you’ll need to cut the individual letters out. Which is a very simple process so don’t be scared.
With the alpha sheet open in PSE (or your software of choice) select the Rectangular Marquee tool in the Tool Options. You could try using the Circle/Oval Marquee tool but that might be a bit trickier.
Click on the New Selection icon. Set the Feather to 0 (zero) and Aspect/Style to Normal.

Drag a selection around the letter you want. Then select Layer> New> Layer Via Copy. This will create a new layer with just the character you selected. You can now either move that single layer to your layout or save it as a stand-alone PNG file.
Easy peasy…right?
This same process can be used to edit existing word strips you may have and break them apart or replace certain words with others. Of course, replacing words in existing word strips can be tricky if you don’t know what font the designer used. But I’ll try to do a post about that soon.
Creating Word Bits
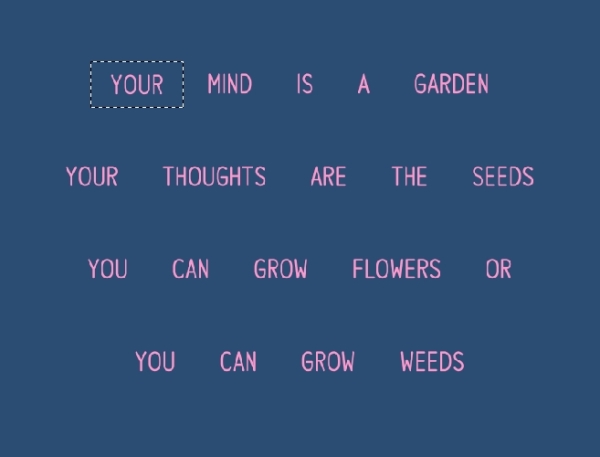
So, that last technique is not that much different than what you would do to create word bits from complete sentences as I discussed in the post about Journaling.
With a plain, untextured paper open in PSE, follow these steps:
- Type a phrase or sentence using a journaling font of your choosing.
- Place 6-10 spaces between each word.
- If you need to press Enter/Return to go to the next line, add several lines (at least 3 depending on your default line spacing) instead of just single-spaced.

- Select the Rectangular Marquee tool. In the Tool Options. You also could try using the Circle/Oval Marquee tool but again, that gets a bit trickier. If you’d like to try this…just increase the amount of space you leave between words and lines giving you more “wiggle room”.
- Click on the New Selection icon. Set the Feather to 0 and Aspect/Style to Normal.
- Drag a selection around one of the words.
- In the Menu Bar, choose Edit > Copy Merged. This basically merges the selected text with the underlying paper and creates a copy in your clipboard.
- Choose Edit > Paste. You will not be able see the new word art because it will appear to be blending into the paper.
- Repeat the process until you have all the words cut out.
When all words have been copied onto their own new layer:
- Hide the type layer.
- Hide the original paper layer.
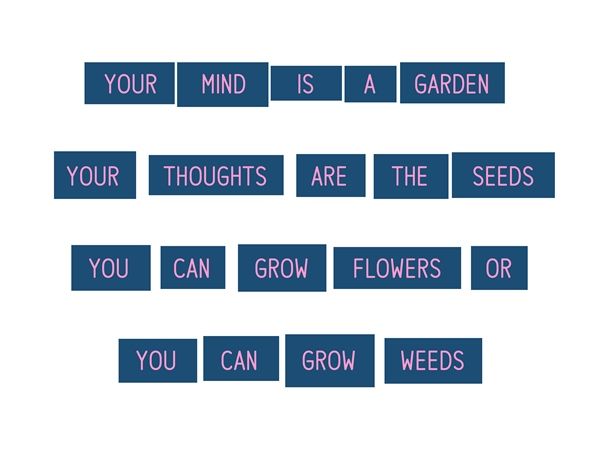
You can now either move the individual word layers to your layout or save each word bit as a stand-alone PNG file for future use.
When creating word bits such as these I have a few recommendations; don’t use a script (or other fancy/funky) font, use a dark font on a light paper or a light font on a dark paper & don’t worry about getting the sizes exact. That’s part of the charm of it all.
Single Most Important Tip About Separating Elements
Practice taking pieces of word art apart so you can customize it to fit your layout. Experiment with creating your own word bits. Both of these will not only open up a whole new way for you to make the most of the supplies that you already have it will also give you the flexibility to create your own unique journaling elements.
As with all the other things I’ve talked about in prior posts…the more you play around with erasing parts of elements the more comfortable you’ll get with the process.
Thanks for reading this edition of the Tuesday Tip series. If you want to see what’s in store next week click “Follow Me” to stay in touch. And as always…“Happy Scrapping!”